2.3 Installing ZENworks Reporting
Before starting the installation, perform the preinstallation tasks. For more information, see Section 2.2, Preinstallation Tasks.
IMPORTANT:You must install ZENworks Reporting only through media. You must not install it by mapping to a network drive. In the case of a Virtual Machine, it is recommended to copy the iso to the device where you want to install ZENworks Reporting, mount the iso as a virtual drive, then launch the installer.
-
Start the ZENworks Reporting installation program by using one of the following methods:
- Graphical User Interface (GUI) Installation
-
-
Mount the DVD.
On a Windows device, the installation begins automatically after inserting the DVD. If the installation does not begin automatically, run setup.exe from the mounted drive after inserting the DVD.
-
On a Linux device, mount the DVD, then run the following command:
sh /media/cdrom/setup.sh
-
- Command Line Installation (Linux only)
-
-
Mount the DVD.
-
To start a command line installation to a directory where all users (including “others”) have “read and execute” access, either mount the DVD or copy the DVD’s files to a temporary location other than the /root directory.
Ensure that the copied files and their parent directories have “read and execute” access for all the users (including “others”).
-
Run the following command:
/mount_location/setup.sh -e
NOTE:If you are installing ZENworks Reporting on RHEL Operating system with Command Line installation method, then password might appear in clear text format. In this scenario, you must install compat-libstdc++-33-3.2.3-69.el6 package on RHEL Operating system.
-
- Silent Mode Installation
-
-
Create a silent install configuration file by using the following command:
setup.exe/setup.sh -s
-
Open the silent install configuration file in a text editor.
-
Search for ADMINISTRATOR_PASSWORD=,LDAP_ADMINISTRATOR_PASSWORD=, (Optional) DB_SERVER_PASSWORD=, (Optional) SMTP_SERVER_PASSWORD=,
-
Specify the actual password.
For example, if the password is novell, then the entry will be ADMINISTRATOR_PASSWORD=novell
-
Save the silent install configuration file and exit the editor.
-
To run the silent install use the following command:
setup.exe/setup.sh -s -f path_to_the_silent_install file
-
-
Follow the prompts in the installation program. For more information, see Section 2.3.1, ZENworks Reporting Installation flow.
2.3.1 ZENworks Reporting Installation flow
The required information is listed in the order of the installation flow.
|
Installation Prompts |
Explanation |
|---|---|
|
Pre-Installation Summary |
|
|
Installation Path |
The installer prompts to choose the directory where you want to install ZENworks Reporting.
|
|
Prerequisite Status |
If the prerequisites are not met, you cannot continue with the installation. The prerequisites that are not met are displayed (GUI) or listed (command line). |
|
Configure Ports |
The installer prompts to specify ports for ZENworks Reporting. The default port values are displayed and can be modified. 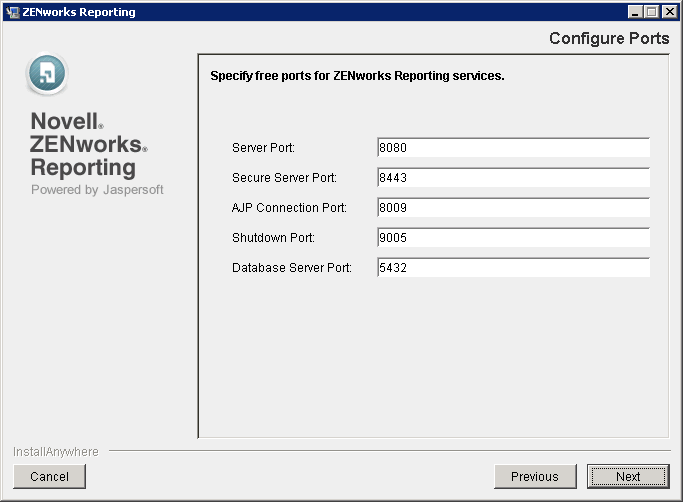
The following ports are used by the ZENworks Reporting:
|
|
Open Firewall Ports |
If firewall is enabled, then installer prompts you to open ports used by ZENworks Reporting.
|
|
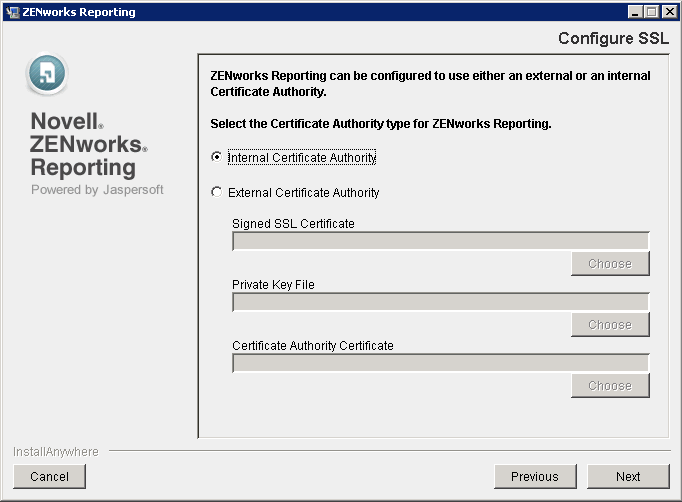
Configure SSL |
The installer prompts to configure SSL certificate details to be used by the server.
|
|
Configure User Source |
The installer prompts to specify the LDAP (Lightweight Directory Access Protocol) connection details. In this panel, you must configure a user source to authenticate LDAP server connection through ZENworks Reporting. 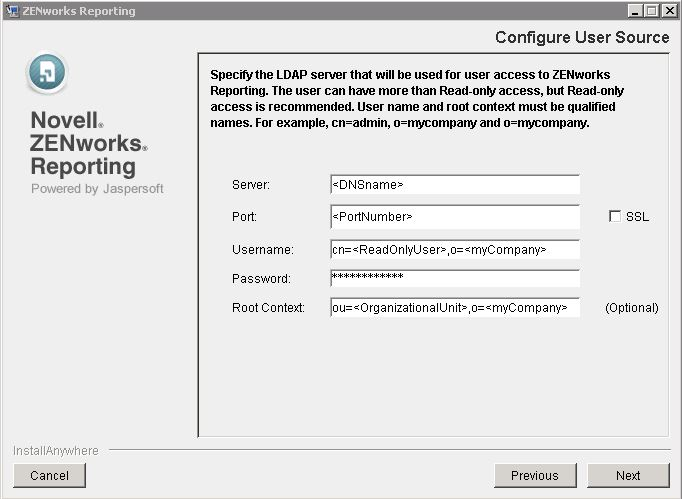
|
|
1. Specify the following:
|
|
IMPORTANT:Only administrators have complete access permissions to ZENworks Reporting. The administator priviledges are:
Users and Roles in ZENworks Reporting: Roles define sets of users having similar permissions. In the LDAP server, it is recommended to maintain users in groups to have the advantage of a role based user management. When a user log in to the ZENworks Reporting for the first time, a user is created in the ZENworks Reporting repository. Based on the user's group in LDAP, a ZENworks Reporting Role is created and the User is assigned to the newly created role. For subsequent users belonging to the same LDAP group, at their first login, a user is created in ZENworks Reporting repository but it will be assigned to the previously created Role. By default, any user present in the LDAP server can login to ZENworks Reporting. All the logged in users are assigned to ROLE_USER in ZENworks Reporting. Among them, the administrators are assigned to ROLE_ADMINISTRATOR (ZENworks Reporting administrator role). For all other users, a role is created based on the LDAP group they belong to. For example, if “user1” is a user that belongs to LDAP group “group1”, then a role by name “ROLE_group1” is created and user1 is assigned to that Role. An administrator cannot assign a user to a role. Users can be assigned to roles only through the LDAP by mapping the user's corresponding LDAP groups to ZENworks Reporting roles such as ROLE_ADMINISTRATOR, ROLE_USER, and so on. 2. Click . 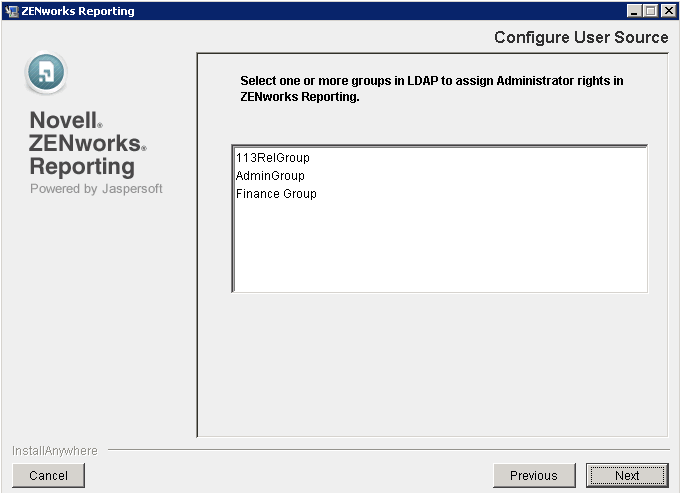
|
|
3. Select the LDAP groups that you want to map to the ROLE_ADMINISTRATOR role. This panel displays the short listed LDAP groups based on the . From this list, you must select at least one or more user groups that you want to map to the ROLE_ADMINISTRATOR. If you have selected a parent group (a group containing other sub-groups) to be mapped to the administrator role, the sub-groups that are under the parent group will not be mapped to the administrator role. If you want to map any sub-groups to the administrator role, they must be selected individually. For example, a “Finance” group has sub-groups (finance_account, finance_purchase, finance_administration) and a user (finance_manager). If the “Finance” group is selected, to map to administrator role, only the user (finance_manager) gets the administrator rights. The rights does not flow down to the users in the nested sub-groups. If you want administrator rights for the users in the sub-groups too, then select these groups (finance_account, finance_purchase and finance_administration) too, so that these also get mapped to the administrator role. 4. Click . To Configure Multiple User Sources ZENworks Reporting 5 supports only one user source. You can overcome this limitation by using the ZENworks Reporting LDAP Utility. Using this utility, you can add another user source and map to its required groups for the ZENworks Reporting administrator role on your existing ZENworks Reporting. You must run the utility on your existing ZENworks Reporting server. It prompts you to separately configure another LDAP source and manually enter the LDAP groups that need to be mapped to the administrator role on the same server. If you want to map a group on another user source, run the ZENworks Reporting LDAP Utility again. For more information about ZENworks Reporting LDAP Utility, see the TID 7014511 in the Novell Support Knowledgebase. IMPORTANT:Run the ZENworks Reporting LDAP Utility tool, after installation is completed. |
|
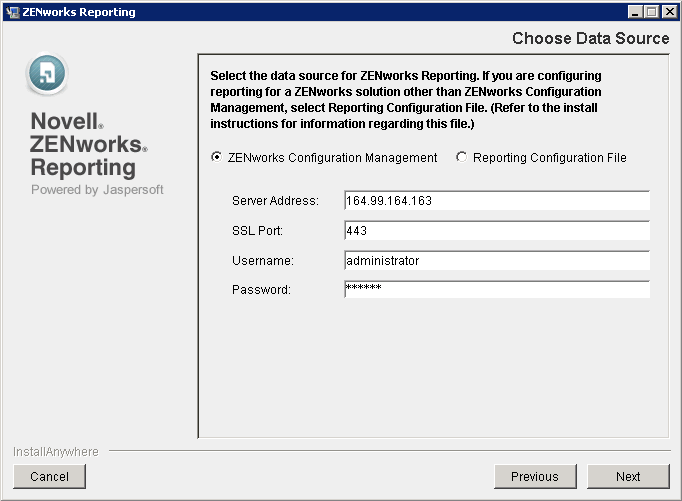
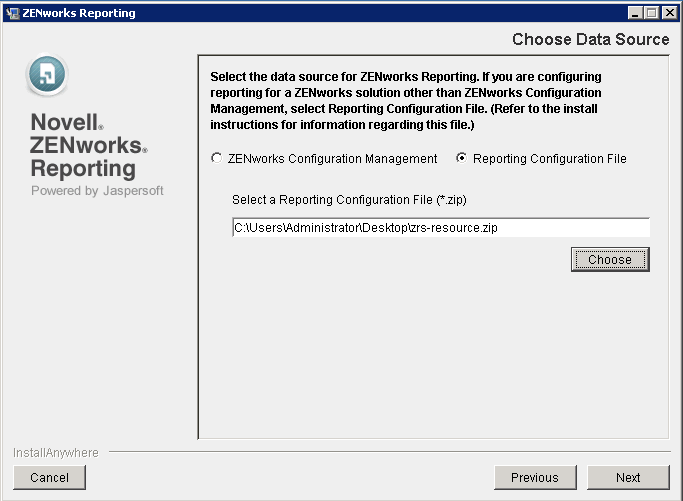
Configure Data Source |
Data source configuration publishes the domains and reports for ZENworks Reporting. A domain is a collection of objects mapped to a database schema. You can configure the data source by using one of the following methods:
|
|
|
|
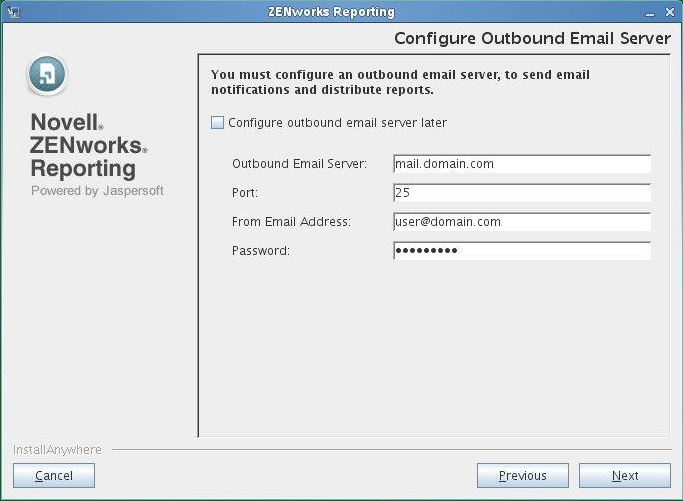
Configure Outbound Email Server |
The installer prompts to configure the Outbound Email Server. This configuration is required to enable email notification feature for Report Scheduling.
You can also configure the Outbound Email Server after installation by using the ZENworks Reporting Configuration Tool. For more information, see |
|
Installation summary |
GUI Installation: To modify any information that you have entered, click . Click to begin the installation, or click to exit the installation. Command Line Installation: To modify any information that you have entered, type back and press Enter. Press Ctrl+C to exit the installation. |
|
Installation completion |
A confirmation message appears when the installation is complete. A zenworks-reporting folder is created in the installation directory. |
|
ZENworks Reporting version |
|
2.3.2 ZENworks Reporting applications
After installing ZENworks Reporting the following applications are installed on your device as part of Jaspersoft engine:
-
Apache Tomcat 6.0.26 version
-
PostgreSQL 9.0 version: It is used internally by ZENworks Reporting engine.
2.3.3 ZENworks Reporting Installation verification
After the installation, perform any one of the following to verify that ZENworks Reporting is running:
-
Launch ZENworks Reporting Console
Use following URL to launch the ZENworks Reporting Console in a Web browser. By default ZENworks Reporting port is 8080.
http://DNS_name_or_IP_address_of_zenworks_reporting:zenworks_reporting_port
For example, http://127.0.0.1:8080
Specify User name and password to log in to the ZENworks Reporting. User name must be smaccountname or cn is used (for example, user1).
This can be done either on the server where you installed ZENworks Reporting, or on a qualified workstation.
-
Check the Windows services by using the GUI
On the server, click , select , then review the status of the Novell ZENworks Reporting Server and Novell ZENworks Reporting Embedded Datastore services.
If they are not running, start the ZENworks Reporting. Right-click the Novell ZENworks Reporting Server service, then select , right-click the Novell ZENworks Reporting Embedded service, then select .
The Restart option stops all related services that are already running and starts each of them in correct order, including Novell ZENworks Reporting Server and Novell ZENworks Reporting Embedded services.
-
Check the Windows services by using a command line
On the server, click , Open command prompt, then run the following commands:
sc query NovellZENworksReportingServer
sc query "Novell ZENworks Reporting Embedded Datastore"
This lists all the ZENworks Reporting statuses.
To start the services, run the following commands:
sc start NovellZENworksReportingServer
sc start "Novell ZENworks Reporting Embedded Datastore"
-
Check the Linux services by using the configuration command
On the server, run the following command:
/etc/init.d/NovellZENworksReportingServer status
This lists all the ZENworks Reporting statuses.
To start the services, run the following command:
/etc/init.d/NovellZENworksReportingServer start
2.3.4 ZENworks Reporting Paths
The ZENworks Reporting is installed within the ZENworks installation folder:
-
For Windows:
%ZRS_HOME% represents the ZENworks Reporting installation path. The default path is C:\Program Files\Novell\zenworks-reporting\
-
For Linux:
/opt/novell/zenworks-reporting/
2.3.5 Installer Logs
The Installer logs are stored in the following location:
On Windows: %ZRS_HOME%\logs
The default path is C:\Program Files\Novell\zenworks-reporting\logs\
On Linux: /var/opt/novell/zenworks-reporting/log/
2.3.6 ZENworks Reporting Services
To stop, start, or restart the ZENworks Reporting services.
-
For Windows:
-
Click .
-
Go to the > folder.
-
Click to stop the services or click to start the services.
-
-
For Linux:
Execute the following commands:
-
To Start the Service: /etc/init.d/NovellZENworksReportingServer start
-
To Stop the Service: /etc/init.d/NovellZENworksReportingServer stop
-
To Restart the Service: /etc/init.d/NovellZENworksReportingServer restart
-