ZENworks Endpoint Security Management - USB Device Control
This document provides test scenarios that show you how to use ZENworks Endpoint Security Management to control users’ access to USB mass storage devices.
1.0 Disabling Access to USB Mass Storage Devices
As the ZENworks administrator, you want to prohibit users from accessing USB mass storage devices on ZENworks managed devices. The following steps help you import a predefined USB Connectivity policy that disables USB mass storage devices and then assign the policy to devices.
-
Import the policy:
-
Copy the following files to a directory on the ZENworks Primary Server:
When you click a filename, the file will either be opened, saved, or you will be prompted to open or save it. You need to save the file. If it opens, click > .
If you downloaded the Endpoint Security Resource Kit, you can copy the files from the PolicyExamples directory.
-
On the Primary Server, open a command prompt, change to the directory where you copied the two files, then run the following command:
zman epi "USB - Mass Storage Class Disabled" policykey.txt USB-MassStorageClass-Disabled.xml
-
When prompted, enter your ZENworks administrator username and password.
The following message is displayed if the policy is successfully imported:
Successfully created the object "USB - Mass Storage Class Disabled" in "/Policies".
-
-
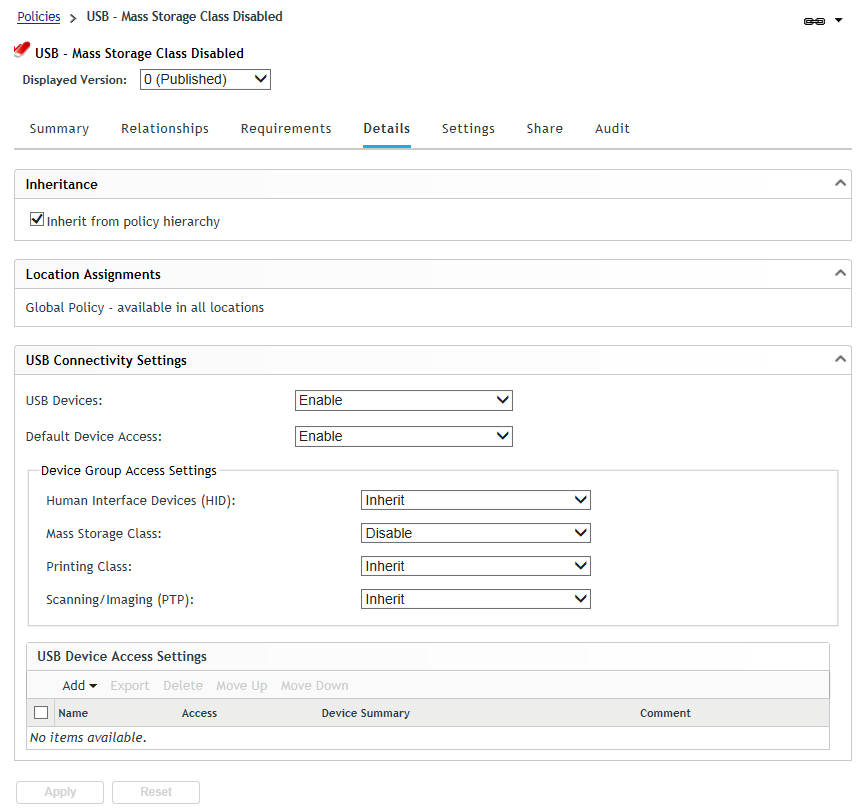
In ZENworks Control Center, click , then click the policy to display its properties.
-
Click the tab.
The policy is a global policy that enables USB device access. The option is set to , which blocks access to USB mass storage devices. The access settings for the other device classes are inherited from other USB Connectivity policies assigned to the device or user.
-
Click the tab.
-
In the panel, add the devices to which you want to assign the policy. When prompted how to resolve policy conflicts, choose .
-
Test the policy on one of the assigned devices:
-
On the device, right-click the ZENworks icon, then click to retrieve the new policy.
-
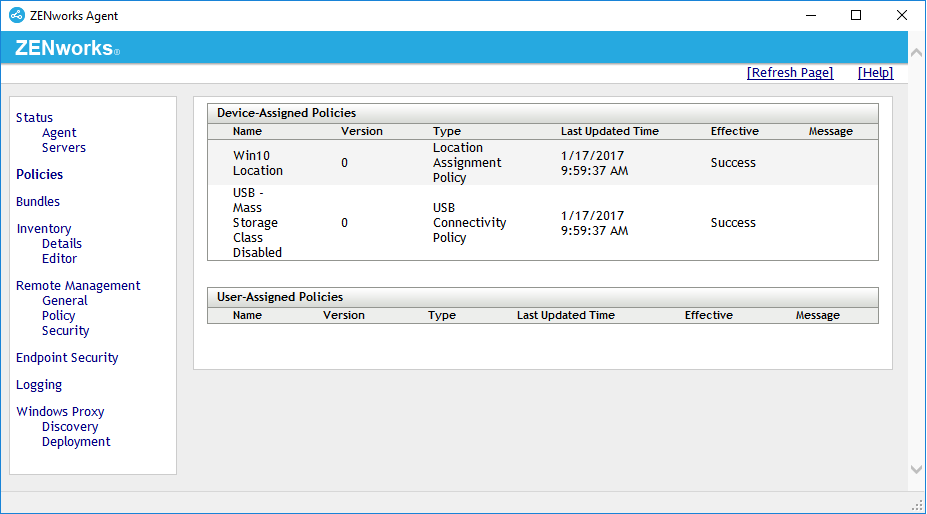
When the device finishes refreshing, right-click the ZENworks icon, and select to display the ZENworks Agent, then click and make sure the policy has been successfully applied.
-
Insert a USB device into the machine.
-
Open Windows Explorer and look for the USB device in the list of drives. The USB device should not be listed.
-
2.0 Enabling Users to Access Specific USB Mass Storage Devices
This scenario assumes that you have already applied a USB Connectivity policy that disables access to all USB mass storage devices on your ZENworks managed devices. If you have not, complete the Disabling Access to USB Mass Storage Devices scenario before continuing.
Your ZENworks administrators have a set of USB mass storage devices that you want to allow them to access, but they are being blocked by the device-assigned USB Connectivity policy. You want to override this restriction on your ZENworks administrators’ machines in order to allow them to use their USB devices.
To ensure that the USB devices are accessible only when a ZENworks administrator is logged in, you need to apply a user-assigned USB Connectivity policy that overrides the device-assigned policy already assigned to your machines. The following steps help you 1) identify the attributes for the USB mass storage devices you want to allow, 2) import a predefined USB Connectivity policy that is preconfigured to allow specific USB mass storage devices, 3) modify the policy’s list of allowed devices to include your devices, and then 4) assign the policy to your ZENworks administrators.
-
Use the ZENworks Device Scanner to discover the information for the USB devices you want to allow:
-
In ZENworks Control Center, download the Device Scanner tool. To do so, click > (under ) to display the ZENworks Download page. Click , then click the tab. Click ZESMDeviceScannerUtilitySetup.exe to download the Device Scanner to your local machine.
-
Double-click ZESMDeviceScannerUtilitySetup.exe to install the Device Scanner.
-
Plug in the USB devices.
If you need to scan more devices than you have USB ports, you can perform multiple scans.
-
Launch the Device Scanner ( menu > > > > > ).
-
Click to scan the USB devices.
-
If you have additional USB devices to scan, plug them in, then click again.
When you are done scanning devices, each device should have an entry in the list.
-
-
Import the policy:
-
Copy the following files to a directory on the ZENworks Primary Server:
When you click a filename, the file will either be opened, saved, or you will be prompted to open or save it. You need to save the file. If it opens, click > .
If you downloaded the Endpoint Security Resource Kit, you can copy the files from the PolicyExamples directory.
-
On the Primary Server, open a command prompt, change to the directory where you copied the two files, then run the following command:
zman epi "USB - Mass Storage Devices Enabled" policykey.txt USB-MassStorageDevices-Enabled.xml
-
When prompted, enter your ZENworks administrator username and password.
The following message is displayed if the policy is successfully imported:
Successfully created the object "USB - Mass Storage Devices Enabled" in "/Policies".
-
-
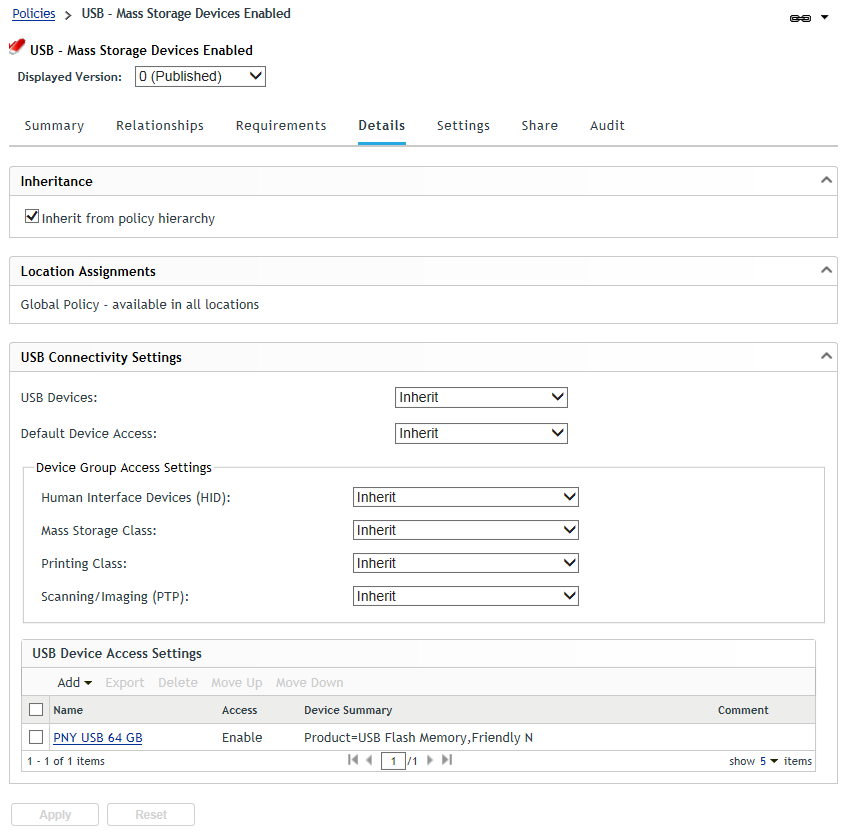
In ZENworks Control Center, click , then click the policy to display its properties.
-
Click the tab.
The policy is a global policy with all access settings inherited from other USB Connectivity policies assigned to the device or user. The USB Device Access Settings list includes one USB device, , that is specifically defined and assigned access. It is included as an example for you to use when adding your USB devices to the list.
-
To add a device to the list:
-
Click > to display the Add USB Connectivity Controls dialog box.
-
In the field, select .
-
In the field, provide a display name for the USB device.
-
Fill in the , , and fields with the USB device information captured by the Device Scanner.
-
Click to add the device to the list, and click to save the changes.
-
-
Click the tab.
-
In the panel, add the ZENworks administrators to whom you want to assign the policy.
-
Test the policy on one of the ZENworks administrators devices:
-
On the device, make sure the ZENworks administrator is logged in.
-
Right-click the ZENworks icon, then click to retrieve the new policy.
-