19.7 Using Appliance Commands
If you're working in a Telnet session or from the command line, you have 23 appliance commands available, several of which can be used with various parameters and values. These commands are listed in the table below.
iChain Proxy Services includes help for all commands and their associated arguments and parameters.
To see a list of commands, enter help at the command line.
To see a list of arguments for a command, enter help command.
To get help for a specific command/argument combination, enter help command_argument.
19.7.1 Troubleshooting the Command Line
Commands entered return an error
-
Make sure you use the equal (=) sign when setting or adding, for example, set forward enable=yes.
-
Try the command again. Sometimes a command will fail the first time it's entered.
I made several changes that don't show when I use the GET command to display them
-
You must conclude with the apply command to make the values take effect.
19.7.2 Connecting through Telnet
Telnet is disabled by default. At the command line interface, you can use the following command to enable Telnet:
set listener telnet enable=yes
IMPORTANT:Telnet access is not secure unless a password is set. We strongly recommend that you set system passwords as part of the appliance initialization process. For more information, see Password Dialog Box. Remember that when you are using Telnet, the login username and password are sent in clear text.
You can manage the iChain Proxy Services by using commands from a workstation with a Telnet connection to the appliance.
Starting a Telnet Session
This section assumes you are using a Windows 95/98 or Windows NT 4 workstation. If you are using another type of workstation, use the following steps as general guidelines to configure your Telnet software to work with the appliance.
IMPORTANT:The appliance Telnet connection supports only the VT-100 terminal type.
-
Ensure that you have a network connection between the workstation that you are running Telnet on and the appliance.
-
Click Start, then run telnet.exe.
-
From the Telnet screen, click Terminal > Preferences.

-
Under Terminal Options, select VT 100 Arrows.
-
Under Emulation, select VT-100/ANSI.
-
Set the Buffer Size to 25.
-
(Optional) Set any of the other preferences that you desire.
-
Click OK.
-
Click Connect, then click Remote System.

-
Enter the appliance IP address in the Host Name field, then select Telnet for the port and VT100 for the terminal.
The uppercase VT100 option usually works better with the appliance than the lowercase vt100 option.
-
Click Connect.
-
Type the Config user password.
All appliance passwords are case-sensitive.
Additional Telnet Information
If the appliance has a monitor attached, commands issued through a Telnet connection are echoed on the appliance monitor.
If you get a message asking whether you want the X-session displayed on a display other than the default, you have selected the wrong terminal type. Click Connect, click Disconnect, repeat the connection procedure starting with Step 9, and ensure that you have selected the VT100 terminal type in Step 10.
Setting Up an Appliance Through Telnet
Section 2.0, Installing iChain Components explains how to initialize an appliance and configure forward proxy services using the browser-based tool. The following procedures explain how to complete this task from the command line:
-
Start a Telnet session on the client machine.
For help starting a Telnet session, see Starting a Telnet Session.
The starting address for Telnet should be 172.16.0.1, which is the address of eth0 on the appliance.
IMPORTANT:Versions later than 1.0 have no default password for Telnet access. Telnet is not secure unless a password is set for the Config user. (Telnet doesn't provide View user access.)
We strongly recommend that you set system passwords as part of the initialization process. For more information, see Password Dialog Box.
Telnet always prompts for a password. If you have not set a password for the Config user, enter a null password by pressing Enter.
After logging in to Telnet, you see the following prompt:
System Console
>
-
At the System Console prompt, enter the following:
set eth1 address=iii.iii.iii.iii, mask=mmm.mmm.mmm.mmm
set dns server=ddd.ddd.ddd.dddset dns domain=xset gateway nexthop=ggg.ggg.ggg.ggg, metric=t
apply
The variables are i = the IP address, m = the subnet mask, d = the DNS server IP address, x = your domain name, g = the gateway IP address, and t = the number of hops to the next hop.
-
(Optional) Configure the appliance to provide forward proxy service.
At the System Console prompt, enter the following:
add forward address=iii.iii.iii.iiiapply
The variable i = the IP address you entered in Step 2.
The appliance is now configured to begin providing forward proxy service. To configure client browsers to use the forward proxy service, see Section 2.0, Installing iChain Components.
Troubleshooting Telnet
Telnet never starts
To establish a Telnet connection, you must be able to ping the server.
Telnet starts after a long time
If you previously ran a session and turned on Transparent Proxy, Telnet might be very slow in starting.
Commands at the bottom of the screen look strange or don't make sense
The display might not update correctly. Enter clearscreen to get a new screen and start at the top.
19.7.3 Establishing a Null-Modem Connection
This section assumes you are using a Windows 95/98 or NT 4 workstation. If you are using another type of workstation, use the following steps as general guidelines to configure your terminal emulation software to work with the appliance.
IMPORTANT:The appliance null-modem connection supports only the ANSI terminal type.
To establish a null-modem connection with the appliance:
-
Connect a null-modem cable to the serial port on the workstation and the appliance.
-
Click Start, then run hypertrm.exe.
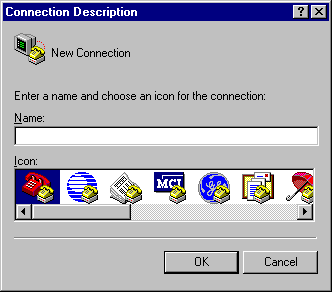
-
Specify a name for the connection, select an icon as instructed, then click OK.

-
Click the Connect Using drop-down list, select a Direct to Com option corresponding to the serial port connection on your workstation, then click OK.

-
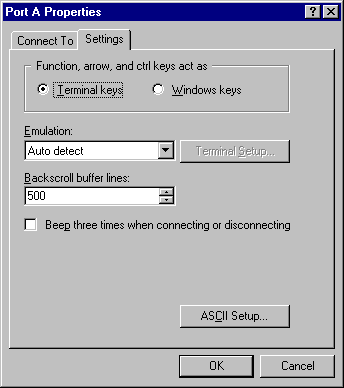
Set the properties according to the following table, then click OK.
-
Click File > Properties > Settings.
A dialog box similar to the following appears:
-
Click Terminal Keys.
-
Click the Emulation drop-down list, then select ANSI.
-
(Optional) Specify cursor behavior by clicking Terminal Setup.
-
Click ASCII Setup, then ensure that only Wrap Lines That Exceed Terminal Width is selected.
-
Click OK twice.
-
Press Enter.
A command line prompt appears in Hyper Terminal.
You can now use all console commands to manage the appliance.
Additional Null-Modem Information
If the appliance has a monitor attached, commands issued through a null-modem connection are not echoed on the appliance monitor.
The following commands are available when using a null-modem connection:
-
cls clears the screen
-
_info displays the Com port settings for the appliance
When accessing the appliance through a null-modem connection, arrow keys function in the following ways:
-
The Left-arrow acts like a backspace or erase.
-
The Right-arrow acts like a space.
-
The Up-arrow displays a history of previously executed commands (beginning with the most recent command).
-
The Down-arrow scrolls forward through the command history and ends with a blank line.