15.3 iTRAC
This section gives and idea relevant to iTRAC.
15.3.1 Instantiating a Process
An iTRAC process can be instantiated on the iTRAC server by using one of the following methods to associate an iTRAC process to an incident:
-
Associating an iTRAC process to the incident at the time of incident creation
-
Associating an iTRAC process to the incident after the incident is created
-
Associating an iTRAC process to an incident as an action when deploying a correlation rule
For more information on associating a process to an incident, see Section 4.0, Correlation Tab and Section 5.0, Incidents Tab.
NOTE:If you want to perform all of the iTRAC scenarios, you must go through them in the order they are presented.
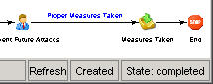
Example Scenario: Creating a Simple Two-Tiered iTRAC Process for a Possible Network Attack
This process is a series of steps that you can take if there is a possible attack on your system.
The example procedure does the following:
-
Asks the user to decide if a preliminary look indicates that the network has been attacked. This leads to a decision step.
NOTE:All decision steps provide different execution paths, depending on the value of the variable defined in the previous step.
-
The Collect Data step reviews the data to make a better determination if there has been an attack.
-
If there has been an attack, iTRAC takes measures to prevent another attack and sends an e-mail to the supervisor indicating that proper measures have been taken. If there is no attack, iTRAC sends an e-mail to the supervisor indicating that there is not an attack.
Figure 15-3 iTRAC Process

To create this iTRAC process:
-
Click the tab.
-
In the navigation pane, click .
-
In the Template Manager window, click .
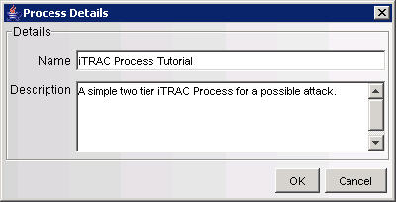
The iTRAC Process Builder displays with a Process Details window.
-
Use the name iTRAC Tutorial. Optionally, add a description.
-
From the Step Palette pane, drag and drop three manual steps, two mail steps, and two Decision Steps. Rename and the attributes to the steps as follows by right-clicking and selecting Edit Step.
-
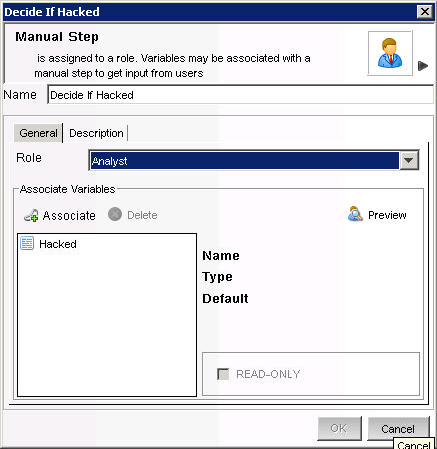
Manual Step-0 to Decide If Hacked.
-
Set the Role to Analyst.
-
Click Associate, then click .
-
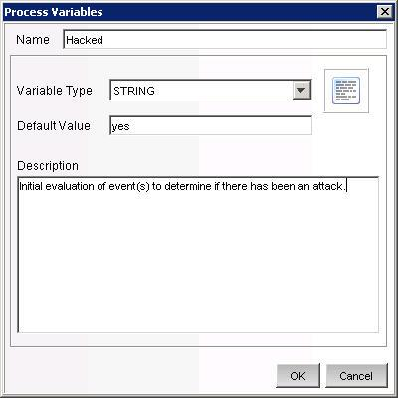
Specify Hacked in the Name field.
-
In the Process Variables window, select the as .
-
Set the to .
-
(Optional) Under the Description tab, specify Initial evaluation of events to determine if there has been an attack.
-
Click .
-
Select the newly created association, then click OK until the step is renamed.
-
-
Manual Step-1 to Collect Data:
-
Set the to .
-
Click .
-
Select, then click .
-
(Optional) Under the Description tab, specify To further evaluate after collecting of events to determine if there has been an attack.
-
Click to rename the step.
-
-
Manual Step-2 to Prevent Future Attacks:
-
Set to .
-
(Optional) Under the tab, specify Take measures to stop the attack. (firewall, router or other intrusion protection method). Also, if possible, determine how the attacked was done.
-
Click to rename the step.
-
-
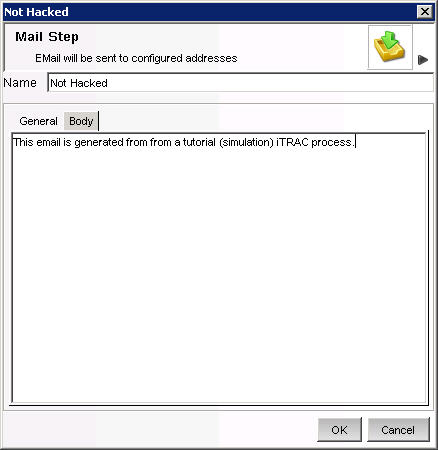
Mail Step-3 to Not Hacked:
-
In the field (because this is for a tutorial), provide your e-mail address. When this step finishes, sends you an e-mail.
-
In the field, provide a made up address such as me@nowhere.com.
-
In the Subject field, specify .

-
(Optional) Under the tab, specify This e-mail is generated from a tutorial (simulation) iTRAC process.
-
Click .
-
-
Mail Step-4 to Prevent Future Attacks:
-
In the field, specify your e-mail address.
-
In the field, specify a made up e-mail address.
-
In the Subject field, specify .
-
(Optional) Under the tab, specify This e-mail is generated from a tutorial (simulation) iTRAC process.
-
-
(Optional) Decision Step-5 to Hacked:
Under the Description tab, provide a description such as Preliminary decision if there has been an attack or not.

-
(Optional) Decision Step-6 to Hacked or Not:
Under the Description tab, provide a description such as Decision if there has been an attack or not.

-
-
Right-click and select . Select as the destination.
-
Right-click and select . Specify the following:
-
Name: Specify Decision.
-
Type: Select Unconditional.
-
Destination: Hacked.

-
-
Click
-
Right-click and select . Specify the following:
-
Name: Not Hacked.
-
Type: Select else.
-
Destination: Not Hacked.
-
-
Click .
-
Right-click and select .
-
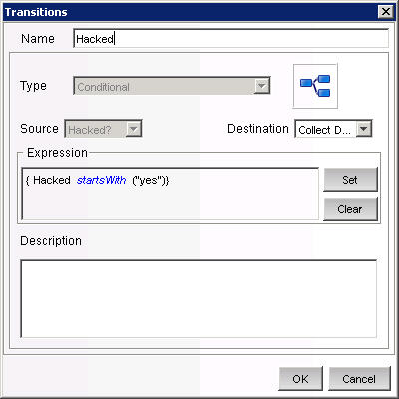
Right-click and select . Specify the following:
-
Name: Specify Hacked.
-
Type: Select Conditional.
-
Destination: Collect Data.
-
-
Click .
-
Select and .
-
Select .
-
Select .
-
Specify a value of yes.

-
Click until the transition is complete.
-
-
Right-click and select . Select and specify the following:
-
Name: Hacked or Not?
-
Type: Unconditional
-
Destination: Hacked or Not
-
-
Right-click and select . Specify the following:
-
Name: Not Hacked.
-
Type: Else.
-
Destination: Not Hacked.
-
-
Right-click and select . Specify the following:
-
Name: Hack Happened.
-
Type: Conditional.
-
Destination: Prevent Future Attacks.
-
-
Click .
-
Select and .
-
Select .
-
Select .
-
Specify Value of yes.
-
Click until the transition is complete.
-
-
Right-click and select . Specify the following:
-
Name: Proper Measures Taken.
-
Type: Unconditional.
-
Destination: Measures Taken.
-
-
Right-click and select .

-
Click . Your new process should appear in the Template Manager.
Example Scenario: Running an iTRAC Process for a Possible Network Attack
The following example assumes the following:
-
A process named iTRAC Process Tutorial has been assigned to your role (analyst)
This is a process created in Example Scenario: Creating a Simple Two-Tiered iTRAC Process for a Possible Network Attack.
-
All steps within the process belong to the Analyst group
NOTE:If you assign steps to other roles, you need to log out and then log in as a user assigned to that role and accept the process. For simplicity, the following example is assigned to one role.
To run this process, this process must first be assigned to an incident.
To start or terminate a process:
-
Click the tab.
-
Click .
-
Specify the following:
-
Title: iTRAC Tutorial.
-
Category: Other.
-
Responsible: assign this incident to yourself.
-
-
Click the tab, then select .
-
Click Create.
Because this is a tutorial incident and not a true incident, it can be deleted without negatively affecting your Sentinel setup.
-
From anywhere in the Sentinel GUI, click the Analyst group (yellow bar) under View Work Items.
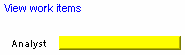
Your bar might already be partially green, indicating that you have accepted (acquired) an iTRAC Process.
All of the processes assigned to the Analyst role display.

-
To accept a work item, select and click .

If the View Work Item list bar was yellow as illustrated above, it changes with an addition of a green bar.

-
Click the green bar under View Work Items. In the Work Items window, click .
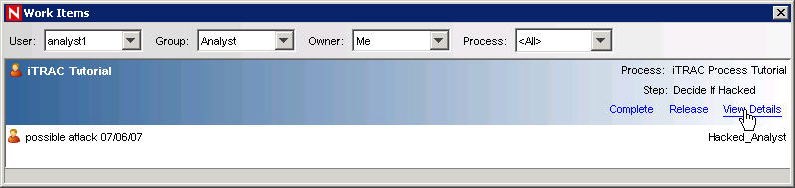
The red highlighted step indicates what step this process is currently in.

-
To start the steps within this process, click the tab.
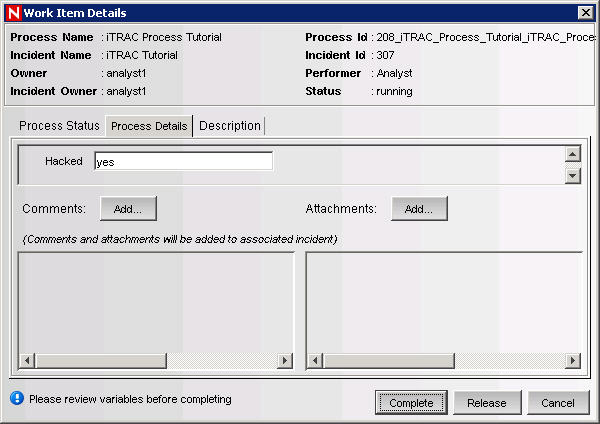
For this manual step, the variable yes is specified. Providing another value such as no or else (no attack) results in an e-mail that completes the process. For example, if initial assessment is that there is an attack and the hacked variable is equal to yes, you click Complete to complete this step.
-
In the Work Items window, select the process and click . The Collect Data step should be highlighted in red. As before, this is a manual step.

-
Click the tab.
-
Again, the variable page displays. In the previous step of the iTRAC Process, Collect Data is a step to further determine by analyzing the events of interest if an attack has occurred. For example, assume that an attack has occurred. Leave the default value of yes. If this were a real attack, it is beneficial to add clear notes or attachments as to the information about this attack.
-
Click .
-
In Work Items window, select the process and click . The Prevent Future Attacks step should be highlighted in red. As before, this is a manual step.
-
In this manual step, take measures to harden the network to prevent future attacks. When this is done, you should add notes and attachments as to the information about this attack.
-
Click .
The next step is an automatic e-mail step indicating that proper anti-attack measures have been taken. The iTRAC Process is removed from the Work Items window.
If you go to the Process View window or if you double-click this process, it appears as Complete.