3.3 Managing Team Workspaces
See also Section 22.0, Managing Workspaces.
3.3.1 Understanding Team Workspaces
When you create your OpenText Vibe site, a workspace named Team Workspaces is automatically created.
As the Vibe administrator, you are responsible to determine how team workspaces should be organized. Without guidance, Vibe users will inevitably create chaos under the Team Workspaces directory.
You might want to organize team workspaces to parallel your business organization. If appropriate, you might have a level for geographical areas. You would typically want a level for departmental areas, and perhaps even for projects within departments. In addition, you must decide which Vibe users need what kind of access to which teams. Creating groups, as described in Creating Groups of Users, facilitates creating teams because you do not need to individually add users to teams.
In the Team Workspaces directory that is automatically created when you install Vibe, you can create other Team Workspace Root workspaces. A Team Workspace Root workspace is designed to contain multiple team workspaces, so use this type of workspace if you want to create additional team workspaces as sub-workspaces to this workspace.
3.3.5 Deleting Top-Level Team Workspaces
You can easily delete top-level team workspaces:
-
Log in to the Vibe site as the Vibe administrator.
-
Launch a web browser.
-
Specify one of the following URLs, depending on whether you are using a secure SSL connection:
http://Vibe_hostname:8080
https://Vibe_hostname:8443
Replace Vibe_hostname with the hostname or fully qualified domain name of the Vibe server that you have set up in DNS. If you configured the HTTP ports correctly during installation, you do not need to include the port number in the Vibe URL.
Depending on how you have configured your Vibe system, you might not be required to enter the port number in the URL. If you are using NetIQ Access Manager, the Vibe login screen is not used.
-
-
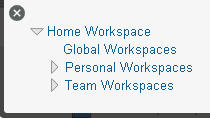
Click the icon
 in the Action toolbar, then expand in the Workspace tree.
The Home Workspace directory is the highest-level folder in the workspace tree, and might be named something specific to your organization.
-
Click .
The Teams page is displayed.
-
Select the top-level teams that you want to delete by selecting the checkbox next to the team name.
-
Click .
-
(Conditional) To move the workspace to the trash, select , then click .
Selecting this option removes the workspace from its current location without permanently deleting it from the Vibe system. You can undelete the workspace as described in
Recovering a Workspace from the Trash
in the OpenText Vibe 4.0.8 User Guide. -
(Conditional) To permanently delete the workspace, select .
IMPORTANT:Deleted items cannot be recovered.
-
Click .
3.3.6 Viewing Team Membership of Top-Level Team Workspaces
You can easily view the team membership of top-level team workspaces:
-
Log in to the Vibe site as the Vibe administrator.
-
Launch a web browser.
-
Specify one of the following URLs, depending on whether you are using a secure SSL connection:
http://Vibe_hostname:8080
https://Vibe_hostname:8443
Replace Vibe_hostname with the hostname or fully qualified domain name of the Vibe server that you have set up in DNS. If you configured the HTTP ports correctly during installation, you do not need to include the port number in the Vibe URL.
Depending on how you have configured your Vibe system, you might not be required to enter the port number in the URL. If you are using NetIQ Access Manager, the Vibe login screen is not used.
-
-
Click the icon
in the Action toolbar, then expand in the Workspace tree.
The Home Workspace directory is the highest-level folder in the workspace tree, and might be named something specific to your organization.
-
Click .
The Teams page is displayed.
Team members are listed in the column.