1.3 Installing Analyzer
-
Download the Analyzer software package from the Novell Customer Care Portal.
You must have purchased Novell Compliance Management Platform to get access to Analyzer, then log in to the Customer Care Portal before downloading the Analyzer software package. For more information, see Novell Compliance Management Platform product page.
-
Download an Analyzer license from the Novell Customer Care Portal.
For more information about installing an Analyzer license, see Section 1.3.1, Activating Analyzer.
-
Extract the Analyzer package to a folder of your choice.
Within your specified folder, all Analyzer files extract into an analyzer_install folder.
-
Launch the Analyzer installer and follow the prompts to install Analyzer.
When prompted, confirm the installation path. By default, Analyzer installs in the following locations (your location might vary):
Linux: /home/<username>/Analyzer
Windows: C:\Program Files\Novell\Analyzer
After you have installed Analyzer, continue with the following post-installation tasks:
1.3.1 Activating Analyzer
Before using Analyzer to analyze and clean your data, you must install a valid license. When you attempt to launch the Analyzer perspective without a license, Analyzer opens the activation page, from which you can manage Analyzer licenses.
NOTE:If you close the Activation dialog box, Analyzer remains locked until you provide a license to activate it. Click in the Project View to open the Activation dialog box when you are ready to add a license.
Figure 1-1 Analyzer Activation Dialog Box
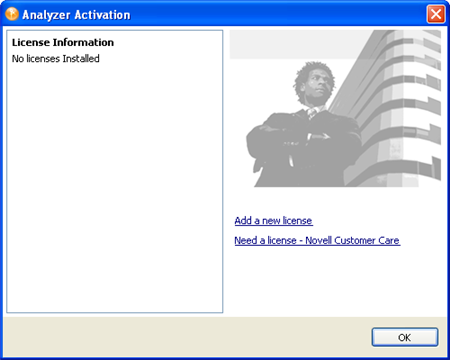
From this page, you can do the following:
Acquiring an Analyzer License
Analyzer licenses are available from the Novell Customer Care Portal.
-
Launch Analyzer, which automatically launches the Analyzer Activation dialog box.
-
In the Analyzer Activation dialog box, click .
-
Browse to and select an Analyzer license.
-
Copy the activation code, then close the Customer Care Portal.
-
Continue with Adding an Analyzer License to install the Analyzer license.
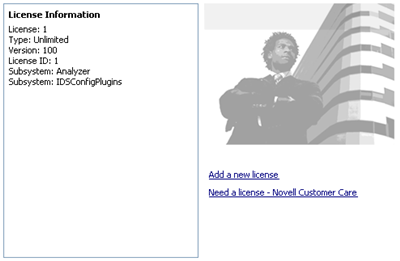
Adding an Analyzer License
When you have a valid license, you can activate Analyzer.
-
In the Analyzer Activation dialog box, click .
-
In the License dialog box, insert the activation code you downloaded from the Novell Customer Care Portal, then click .
Analyzer installs the license and returns to the Analyzer Activation dialog box, where you can see the details of the license you just installed.
-
Click to close the Activation dialog box and begin using Analyzer.
1.3.2 Installing an Audit Client
Analyzer includes an XDAS library that automatically generates audit events from the Data Browser editor when you send data updates back to the application. For more information about using the Data Browser editor to update data in the source application, see Section 3.7.3, Modifying Data.
To view these audit events, you must install an XDAS client that can receive the audit events from Analyzer. More information about XDAS is available at the OpenXDAS Project.
Analyzer includes both a Linux and a Windows XDAS client as part of its download package, but the client is not installed during the Analyzer installation routine.
-
Following the Analyzer installation, browse to the analyzer_install\openxdas folder.
-
Open the folder for the operating system you are running (either linux or win32), then launch the XDAS client installer.
Linux: Use the rpm command to install the XDAS client appropriate for your hardware platform. The 32-bit client is openxdas-0.6.294-1.i586.rpm. The 64-bit client is openxdas-0.6.294-1.x86_64.rpm. Follow the prompts to install the XDAS client.
Windows: Launch openxdas-0.6.294-1.i586.msi and follow the prompts to install the Windows XDAS client. The Windows client is 32-bit only.
When it is installed, launch the XDAS client to automatically receive and display audit events from Analyzer.