6.3 Configuring Reports
Novell AppArmor's reporting feature adds flexibility by enhancing the way users can view security event data. The reporting tool performs the following:
-
Creates on-demand reports
-
Exports reports
-
Schedules periodic reports for archiving
-
E-mails periodic reports
-
Filters report data by date
-
Filters report data by other options, such as program name
Using reports, you can read important Novell AppArmor security events reported in the log files without manually sifting through the messages only useful to the aa-logprof tool. Narrow down the size of the report by filtering by date range or program name. You can also export an html or csv file.
The following are the three types of reports available in Novell AppArmor:
- Executive Security Summary
-
A combined report, consisting of one or more security incident reports from one or more machines. This report can provide a single view of security events on multiple machines. For more details, refer to Executive Security Summary.
- Application Audit Report
-
An auditing tool that reports which application servers are running and whether the applications are confined by AppArmor. Application servers are applications that accept incoming network connections. For more details, refer to Application Audit Report.
- Security Incident Report
-
A report that displays application security for a single host. It reports policy violations for locally confined applications during a specific time period. You can edit and customize this report or add new versions. For more details, refer to Security Incident Report.
To use the Novell AppArmor reporting features, proceed with the following steps:
-
Open .
-
In , click . The window appears. From the window, select an option and proceed to the respective section for instructions:
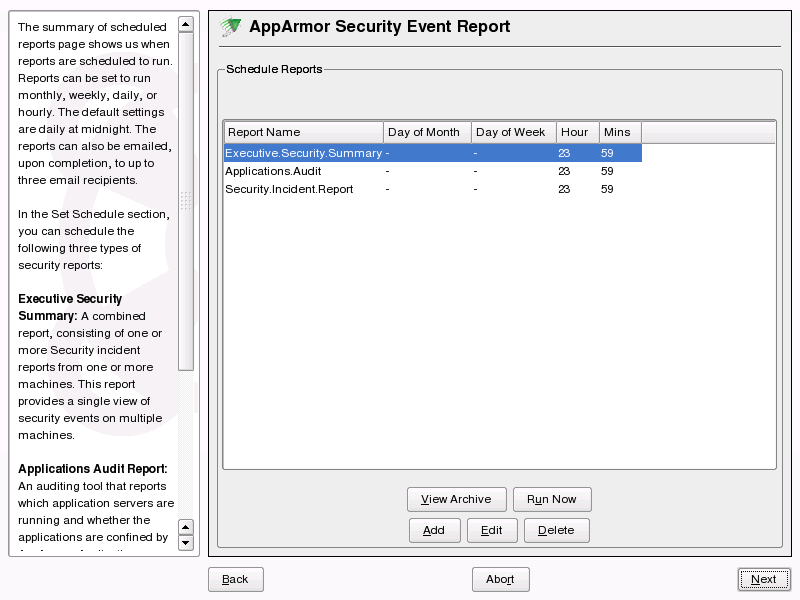
- View Archive
-
Displays all reports that have been run and stored in /var/log/apparmor/reports-archived/. Select the report you want to see in detail and click . For instructions, proceed to Section 6.3.1, Viewing Archived Reports.
- Run Now
-
Produces an instant version of the selected report type. If you select a security incident report, it can be further filtered in various ways. For instructions, proceed to Section 6.3.2, Run Now: Running On-Demand Reports.
- Add
-
Creates a scheduled security incident report. For instructions, proceed to Section 6.3.3, Adding New Reports.
- Edit
-
Edits a scheduled security incident report.
- Delete
-
Deletes a scheduled security incident report. All stock or canned reports cannot be deleted.
- Back
-
Returns you to the Novell AppArmor main screen.
- Abort
-
Returns you to the Novell AppArmor main screen.
- Next
-
Performs the same function as the button.
6.3.1 Viewing Archived Reports
enables you to specify the location of a cumulation of reports from one or more systems, including the ability to filter by date or names of programs accessed and display them all together in one report.
-
From the window, select .

-
Select the report type to view. Toggle between the different types: (Security Incident Report), (Application Audit), and (Executive Security Summary).
-
You can alter the directory location of the archived reports in . Select to use the current directory or select to find a new report location. The default directory is /var/log/apparmor/reports-archived.
-
To view all the reports in the archive, select . To view a specific report, select a report file listed in the field then select .
-
For and reports, proceed to Step 9.
-
The opens for reports.
-
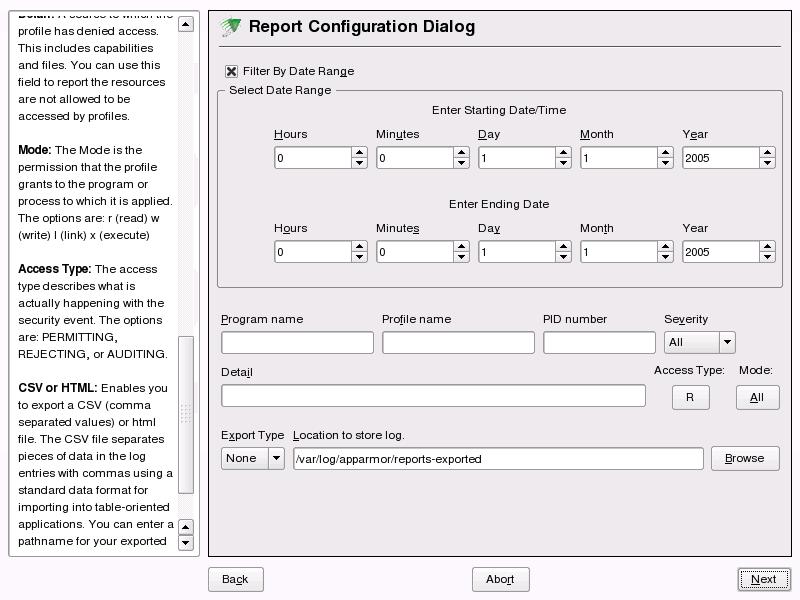
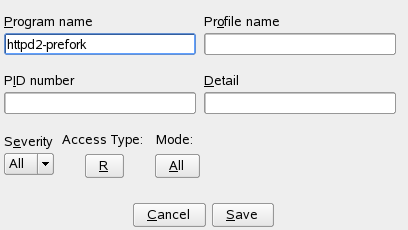
The dialog enables you to filter the reports selected in the previous screen. Enter the desired filter details. The fields are:
- Date Range
-
To display reports for a certain time period, select . Enter the start and end dates that define the scope of the report.
- Program Name
-
When you enter a program name or pattern that matches the name of the binary executable of the program of interest, the report displays security events that have occurred for a specific program.
- Profile Name
-
When you enter the name of the profile, the report displays the security events that are generated for the specified profile. You can use this to see what is being confined by a specific profile.
- PID Number
-
is a number that uniquely identifies one specific process or running program (this number is valid only during the lifetime of that process).
- Severity
-
Select the lowest severity level for security events to include in the report. The selected severity level and above are then included in the reports.
- Detail
-
A source to which the profile has denied access. This includes capabilities and files. You can use this field to report the resources to which profiles prevent access.
- Access Type
-
The access type describes what is actually happening with the security event. The options are PERMITTING, REJECTING, or AUDITING.
- Mode
-
The is the permission that the profile grants to the program or process to which it is applied. The options are all (all modes without filtering), r (read), w (write), l (link),x (execute), and m (mmap).
- Export Type
-
Enables you to export a CSV (comma separated values) or HTML file. The CSV file separates pieces of data in the log entries with commas using a standard data format for importing into table-oriented applications. You can enter a path for your exported report by typing the full path in the field provided.
- Location to Store Log
-
Enables you to change the location at which to store the exported report. The default location is /var/log/apparmor/reports-exported. When you change this location, select . Select to browse the file system.
-
To see the report, filtered as desired, select . One of the three reports displays.
-
Refer the following sections for detailed information about each type of report.
-
For the application audit report, refer to Application Audit Report.
-
For the security incident report, refer to Security Incident Report.
-
For the executive summary report, refer to Executive Security Summary.
-
Application Audit Report
An application audit report is an auditing tool that reports which application servers are running and whether they are confined by AppArmor.
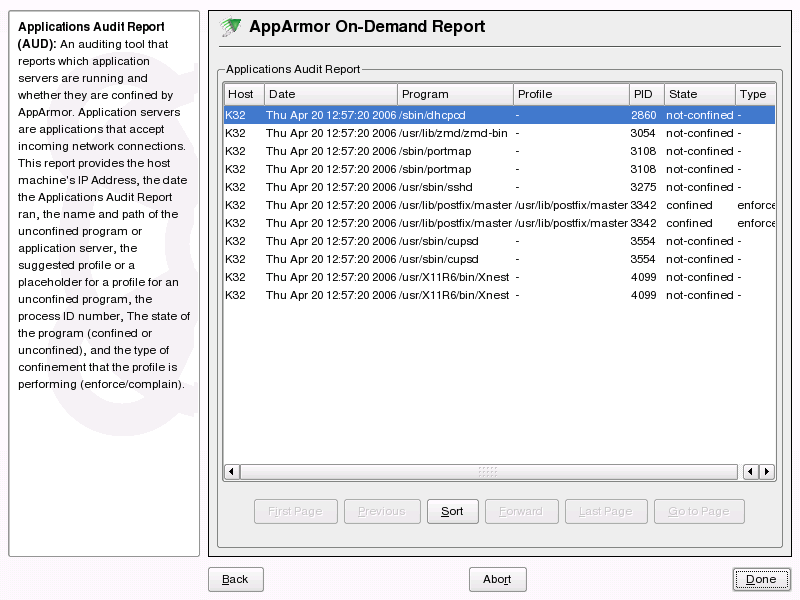
The following fields are provided in an application audit report:
- Host
-
The machine protected by AppArmor for which the security events are reported.
- Date
-
The date during which security events occurred.
- Program
-
The name and path of the executing process.
- Profile
-
The absolute name of the security profile that is applied to the process.
- PID
-
A number that uniquely identifies one specific process or running program (this number is valid only during the lifetime of that process).
- State
-
This field reveals whether the program listed in the program field is confined. If it is not confined, you might consider creating a profile for it.
- Type
-
This field reveals the type of confinement the security event represents. It says either complain or enforce. If the application is not confined (state), no type of confinement is reported.
Security Incident Report
A security incident report displays security events of interest to an administrator. The SIR reports policy violations for locally confined applications during the specified time period. It also reports policy exceptions and policy engine state changes. These two types of security events are defined as follows:
- Policy Exceptions
-
When an application requests a resource that is not defined within its profile, a security event is triggered. A report is generated that displays security events of interest to an administrator. The SIR reports policy violations for locally confined applications during the specified time period. The SIR reports policy exceptions and policy engine state changes.
- Policy Engine State Changes
-
Enforces policy for applications and maintains its own state, including when engines start or stop, when a policy is reloaded, and when global security feature are enabled or disabled.
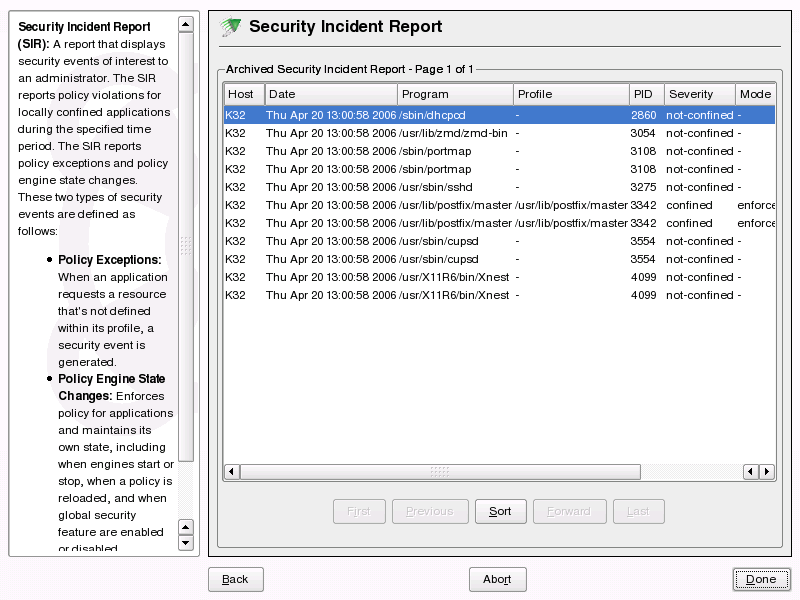
The fields in the SIR report have the following meanings:
- Host
-
The machine protected by AppArmor for which the security events are reported.
- Date
-
The date during which security events occurred.
- Program
-
The name of the executing process.
- Profile
-
The absolute name of the security profile that is applied to the process.
- PID
-
A number that uniquely identifies one specific process or running program (this number is valid only during the lifetime of that process).
- Severity
-
Severity levels of events are reported from the severity database. The severity database defines the importance of potential security events and numbers them 1 through 10, 10 being the most severe security incident. The severity levels are determined by the threat or importance of different security events, such as certain resources accessed or services denied.
- Mode
-
The mode is the permission that the profile grants to the program or process to which it is applied. The options are r (read), w (write), l (link), and x (execute).
- Detail
-
A source to which the profile has denied access.This includes capabilities and files. You can use this field to report the resources to which the profile prevents access.
- Access Type
-
The access type describes what is actually happening with the security event. The options are PERMITTING, REJECTING, or AUDITING.
Executive Security Summary
A combined report consisting of one or more high-level reports from one or more machines. This report can provide a single view of security events on multiple machines if each machine's data is copied to the report archive directory, which is /var/log/apparmor/reports-archived. One line of the ESS report represents a range of SIR reports.
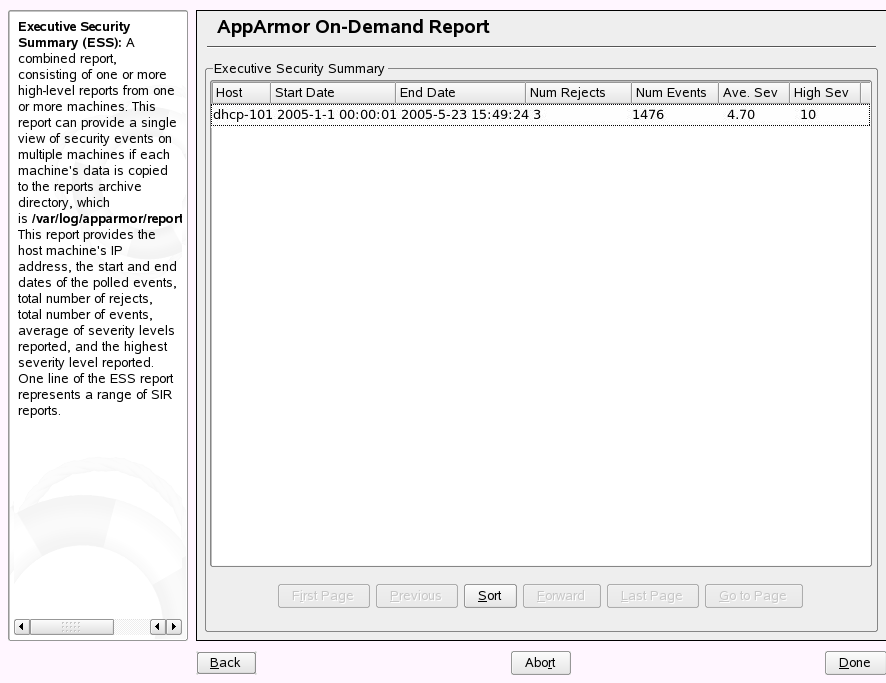
The following fields are provided in an executive security summary:
- Host
-
The machine protected by AppArmor for which the security events are reported.
- Start Date
-
The first date in a range of dates during which security events are reported.
- End Date
-
The last date in a range of dates during which security events are reported.
- Num Rejects
-
In the date range given, the total number of security events that are rejected access attempts.
- Num Events
-
In the date range given, the total number of security events.
- Ave. Sev
-
This is the average of the severity levels reported in the date range given. Unknown severities are disregarded in this figure.
- High Sev
-
This is the severity of the highest severity event reported in the date range given.
6.3.2 Run Now: Running On-Demand Reports
The report feature enables you to instantly extract report information from the Novell AppArmor event logs without waiting for scheduled events. If you need help navigating to the main report screen, see Section 6.3, Configuring Reports. Perform the following steps to run a report from the list of reports:
-
Select the report to run instantly from the list of reports in the window.
-
Select or . The next screen depends on which report you selected in the previous step. As an example, select a security incident report.
-
The opens for security incident reports.
-
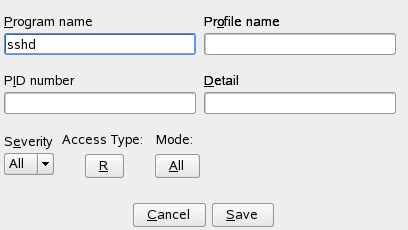
The enables you to filter the reports selected in the previous screen. Enter the desired filter details. The following filter options are available:
- Date Range
-
To limit reports to a certain time period, select . Enter the start and end dates that determine the scope of the report.
- Program Name
-
When you enter a program name or pattern that matches the name of the binary executable for the program of interest, the report displays security events that have occurred for the specified program only.
- Profile Name
-
When you enter the name of the profile, the report displays the security events that are generated for the specified profile. You can use this to see what is confined by a specific profile.
- PID Number
-
A number that uniquely identifies one specific process or running program (this number is valid only during the lifetime of that process).
- Severity
-
Select the lowest severity level for security events to include in the report. The selected severity level and above are included in the reports.
- Detail
-
A source to which the profile has denied access. This includes capabilities and files. You can use this field to report the resources to which profiles prevent access.
- Access Type
-
The access type describes what is actually happening with the security event. The options are PERMITTING, REJECTING, or AUDITING.
- Mode
-
The mode is the permission that the profile grants to the program or process to which it is applied. The options are r (read), w (write), l (link), and x (execute).
- Export Type
-
Enables you to export a CSV (comma separated values) or HTML file. The CSV file separates pieces of data in the log entries with commas using a standard data format for importing into table-oriented applications. Enter a path for your exported report by typing in the full path in the field provided.
- Location to Store Log
-
Enables you to change the location that the exported report is stored. The default location is /var/log/apparmor/reports-exported. When you change this location, select . Select to browse the file system.
-
To see the report, filtered as desired, select . One of the three reports displays.
Refer the following sections for detailed information about each type of report.
-
For the application audit report, refer to Application Audit Report.
-
For the security incident report, refer to Security Incident Report.
-
For the executive summary report, refer to Executive Security Summary.
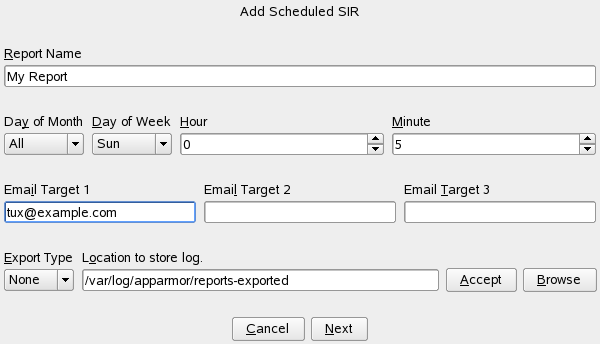
6.3.3 Adding New Reports
Adding new reports enables you to create a scheduled security incident report that displays Novell AppArmor security events according to your preset filters. When a report is set up in , it periodically launches a report of Novell AppArmor security events that have occurred on the system.
You can configure a daily, weekly, monthly, or hourly report to run for a specified period. You can set the report to display rejections for certain severity levels or to filter by program name, profile name, severity level, or denied resources. This report can be exported to an HTML (Hypertext Markup Language) or CSV (Comma Separated Values) file format.
NOTE: Return to the beginning of this section if you need help navigating to the main report screen (see Section 6.3, Configuring Reports).
To add a new scheduled security incident report, proceed as follows:
-
Click to create a new security incident report. The first page of opens.
-
Fill in the fields with the following filtering information, as necessary:
- Report Name
-
Specify the name of the report. Use names that easily distinguish different reports.
- Day of Month
-
Select any day of the month to activate monthly filtering in reports. If you select All, monthly filtering is not performed.
- Day of Week
-
Select the day of the week on which to schedule weekly reports, if desired. If you select ALL, weekly filtering is not performed. If monthly reporting is selected, this field defaults to ALL.
- Hour and Minute
-
Select the time. This specifies the hour and minute that you would like the reports to run. If you do not change the time, selected reports runs at midnight. If neither month nor day of week are selected, the report runs daily at the specified time.
- E-Mail Target
-
You have the ability to send the scheduled security incident report via e-mail to up to three recipients. Just enter the e-mail addresses for those who require the security incident information.
- Export Type
-
This option enables you to export a CSV (comma separated values) or HTML file. The CSV file separates pieces of data in the log entries with commas using a standard data format for importing into table-oriented applications. Enter a path for your exported report by typing in the full path in the field provided.
- Location to Store Log
-
Enables you to change the location that the exported report is stored. The default location is /var/log/apparmor/reports-exported. When you change this location, select . Select to browse the file system.
-
Click to proceed to the second page of .
-
Fill in the fields with the following filtering information, as necessary:
- Program Name
-
You can specify a program name or pattern that matches the name of the binary executable for the program of interest. The report displays security events that have occurred for the specified program only.
- Profile Name
-
You can specify the name of the profile for which the report should display security events. You can use this to see what is being confined by a specific profile.
- PID Number
-
A number that uniquely identifies one specific process or running program (this number is valid only during the lifetime of that process).
- Detail
-
A source to which the profile has denied access. This includes capabilities and files. You can use this field to create a report of resources to which profiles prevent access.
- Severity
-
Select the lowest severity level of security events to include in the report. The selected severity level and above are included in the reports.
- Access Type
-
The access type describes what is actually happening with the security event. The options are PERMITTING, REJECTING, or AUDITING.
- Mode
-
The mode is the permission that the profile grants to the program or process to which it is applied. The options are r (read), w (write), l (link), and x (execute).
-
Click to save this report. Novell AppArmor returns to the main window where the newly scheduled report appears in the list of reports.
6.3.4 Editing Reports
From the AppArmor screen, you can select and edit a report. The three preconfigured reports (stock reports) cannot be edited or deleted.
NOTE: Return to the beginning of this section if you need help navigating to the main report screen (see Section 6.3, Configuring Reports).
Perform the following steps to modify a report from the list of reports:
-
From the list of reports in the window, select the report to edit. In this example we assume you have selected a security incident report.
-
Click to edit the security incident report. The first page of the displays.
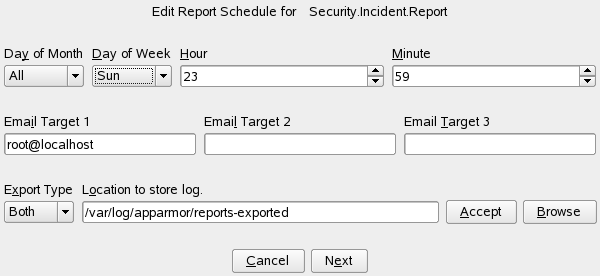
-
Modify the following filtering information, as necessary:
- Day of Month
-
Select any day of the month to activate monthly filtering in reports. If you select All, monthly filtering is not performed.
- Day of Week
-
Select the day of the week on which to schedule the weekly reports. If you select All, weekly filtering is not performed. If monthly reporting is selected, this defaults to All.
- Hour and Minute
-
Select the time. This specifies the hour and minute that you would like the reports to run. If you do not change the time, the selected report runs at midnight. If neither the day of the month nor day of the week is selected, the report runs daily at the specified time.
- E-Mail Target
-
You have the ability to send the scheduled security incident report via e-mail to up to three recipients. Just enter the e-mail addresses for those who require the security incident information.
- Export Type
-
This option enables you to export a CSV (comma separated values) or HTML file. The CSV file separates pieces of data in the log entries with commas using a standard data format for importing into table-oriented applications. Enter a path for your exported report by typing the full path in the field provided.
- Location to Store Log
-
Enables you to change the location where the exported report is stored. The default location is /var/log/apparmor/reports-exported. When you change this location, select . Select to browse the file system.
-
Click to proceed to the next page. The second page of opens.
-
Modify the fields with the following filtering information, as necessary:
- Program Name
-
You can specify a program name or pattern that matches the name of the binary executable for the program of interest. The report displays security events that have occurred for the specified program only.
- Profile Name
-
You can specify the name of the profile for which to display security events. You can use this to see what is being confined by a specific profile.
- PID Number
-
Process ID number is a number that uniquely identifies one specific process or running program (this number is valid only during the lifetime of that process).
- Detail
-
A source to which the profile has denied access. This includes capabilities and files. You can use this field to create a report of resources to which profiles prevent access.
- Severity
-
Select the lowest severity level for security events to include in the report. The selected severity level and above are included in the reports.
- Access Type
-
The access type describes what is actually happening with the security event. The options are PERMITTING, REJECTING, or AUDITING.
- Mode
-
The mode is the permission that the profile grants to the program or process to which it is applied. The options are r (read), w (write), l (link), and x (execute).
-
Select to save the changes to this report. Novell AppArmor returns to the main window where the scheduled report appears in the list of reports.
6.3.5 Deleting Reports
enables you to permanently remove a report from the list of Novell AppArmor scheduled reports. To delete a report, follow these instructions:
-
To remove a report from the list of reports, highlight the report and click .
-
From the confirmation pop-up, select if you do not want to delete the selected report. If you are sure you want to remove the report permanently from the list of reports, select .