E.3 Configuring the Cluster Resources for Dynamic DNS
After the DNS server is configured for dynamic DNS, you must configure each of the BCC-enabled cluster resources to take advantage of it. You modify the BCC load scripts for each of the cluster resources so that the script automatically updates the DNS server with the correct IP address of the given resource during a BCC migration to a peer cluster.
IMPORTANT:In each of the peer clusters, the keys and the BCC load script for each resource will differ. You assign the resource an IP address that is consistent with the subnet into which the BCC-enabled cluster resource is being migrated or failed over. This allows the DNS server to be updated when the resource fails over from the primary cluster to the secondary cluster. The same thing needs to be done on the primary cluster so the DNS server is automatically updated on failback from the secondary cluster to the primary cluster. You must perform these steps for every BCC-enabled resource in the business continuity cluster.
The BCC load and unload scripts for BCC-enabled cluster resources are used to automate any tasks that need to occur when the resource is failed over to a peer cluster. For example, during a BCC migration, the BCC scripts manage the storage and update eDirectory. The BCC scripts are based on Perl, which means that you need to create Perl-based wrappers for the nsupdate utility commands before placing them in the BCC load script. Typically, the line for the nsupdate utility would be the last command to run in the script, but this might not be true for all environments.
E.3.1 Modifying the BCC Load Script
For your convenience, the bcc_dyn_dns.pl NSMI script is included in the BCC ISO image in the <media>/nsmi_scripts/linux directory. This is the script you need as the wrapper for the nsupdate utility. You can add the script to the BCC load script without modifications.
NOTE:The bcc_dyn_dns.pl NSMI script cannot be executed directly by a Perl interpreter because the interpreter does not understand the variables used in lines 62–66 of the script. If you need to test the script outside of the BCC environment, substitute values for the variables. Put the variables back in before using the script in BCC.
-
Open iManager, then log in as the BCC Administrator user.
-
In, select > .
-
Select the Cluster object of the secondary peer cluster in the business continuity cluster environment for the cluster resource. (That is, choose a peer cluster where the resource is not currently assigned and running.)
-
Click the name link of the BCC-enabled resource where you want to add dynamic DNS support.
This opens the Properties page for the selected resource.
-
Select the tab, click , then click in the table.
-
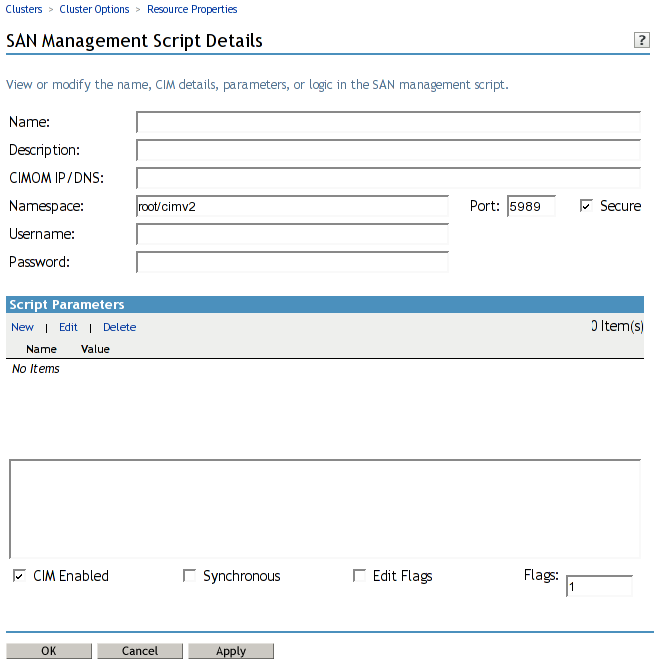
Specify the following settings for the script:
Parameter
Description
CIM-Enabled
Used for CIM (Common Information Model) and SMI-S (Storage Management Initiative Specification) enabled scripts that manage a physical SAN. These are not used for the dynamic DNS script.
Deselect the check box. After this check box is deselected, the CIMON IP/DNS, Namespace, Port, Secure, Username, and Password controls are all disabled.
Name
Specify the name of the script that is shown in the BCC log files (such as in /var/log/messages). The name should give enough information that the entries in the log file are meaningful.
For example, a name of Dynamic DNS Update – Resource Test1 identifies what the script does and which resource it is acting upon.
Description
Specify information that helps you understand the nature of the script. This information is not displayed in any of the BCC log files.
CIMOM IP/DNS
This field is used by CIM or SMI-S enabled scripts. It is not needed for the dynamic DNS script.
Namespace
This field is used by CIM or SMI-S enabled scripts. It is not needed for the dynamic DNS script.
Port
This field is used by CIM or SMI-S enabled scripts. This field is not needed for the dynamic DNS script.
Secure
This field is used by CIM or SMI-S enabled scripts. This field is not needed for the dynamic DNS script.
Username
This field is used by CIM or SMI-S enabled scripts. This field is not needed for the dynamic DNS script.
Password
This field is used by CIM or SMI-S enabled scripts. This field is not needed for the dynamic DNS script.
Script Parameters
The script parameters are used to customize the dynamic DNS script to work with a particular DNS server. Go to Step 7 to enter the parameters.
Script
Copy and paste the dynamic DNS script into this edit box.
Synchronous
When enabled (selected), this option synchronizes the execution of multiple BCC load and unload scripts. This is not necessary for the dynamic DNS script, so leave it disabled (deselected).
Edit Flags
This is an advanced option that should only be enabled when instructed to do so by Novell Support, so leave it disabled (deselected).
-
Specify the Script Parameters.
Click to insert a new editable row into the Script Parameters table. The left field is the parameter name and the right field is the parameter value. When you are done adding the name/value pair, click to save the parameter.
The following are the name/value pairs that must be entered into the script parameters table for the dynamic DNS script.
Name
Sample Value
Description
DNS_SERVER_ADDR
10.1.1.172
Specify the IP address of the DNS master server.
HOST_NAME
cluspool1.clusters.site1.company.com
Specify the hostname of the cluster resource whose IP address needs to be updated when it is migrated to this peer cluster.
HOST_RECORD_TTL
60
Specify the time-to-live value of the DNS record in seconds.
HOST_IP
10.1.20.216
Specify the new IP address for the cluster resource in the subnet of this peer cluster.
KEY_FILE
/mnt/bcc-master/dyndns/keys/Kcluster1.clusters.sitel.company.com.+157+60303.private
Specify the location of the private key file. Remember that the public key must be in this same directory.
-
Click to return to the Cluster Resource Properties page for the resource you are modifying, then click again on the Cluster Resource Properties page to save the new dynamic DNS BCC load script.
E.3.2 Public and Private Keys
The BCC load and unload scripts always run on the node that is hosting the Novell Cluster Services master resource (that is, the Master_IP_Address_Resource). This resource can be hosted on any node in the Novell Cluster Services cluster, which means the BCC load and unload scripts can also be executed on any node in the cluster.
The Perl wrapper script for nsupdate utility needs access to both the private and public keys created in Section E.2.1, Creating the TSIG Keys for DNS Server Authentication. The nsupdate utility really needs access only to the private key. However, for historical reasons the public key must be in the same location as the private key. The files that contain the keys must be available on all nodes in the cluster. This can be accomplished in either of the following ways:
-
Copy to the same location on each node in the cluster. Although this is simple and relatively quick to do initially, it is a maintenance nightmare. If the keys ever change, they must be copied to all nodes in the cluster. Failure to copy the keys to all nodes in the cluster creates the potential for failure in the dynamic DNS update process. You must also remember to copy the keys to any nodes you add to the cluster at a later date.
-
Create a cluster resource that contains the keys. Create a shared volume using any standard journaled Linux POSIX file system such as Ext3. Configure the cluster resource with the setting enabled on the > area on the Cluster Resource Properties page. This setting forces the given resource to always be hosted by the same node that is hosting the Novell Cluster Services master resource. The keys can then be copied to the file system hosted by this resource, which makes them available to the same node that is hosting the Novell Cluster Services master resource, and to the BCC load and unload scripts. This option takes a bit more configuration time, but results in easier maintenance. If the keys change, they only need to be copied to the file system hosted by this resource. In addition, if a node is added to the cluster, the new node automatically has access to the keys if it ever becomes the Novell Cluster Services master.
-
Create a 10 MB shared volume with the Ext3 file system mounted at /mnt/bcc-master.
For example, name the resource bcc-master. Make sure it is configured with the enabled.
For information about creating a shared Linux POSIX file system, see
Configuring and Managing Cluster Resources for Shared Linux POSIX Volumes
in the OES 2 SP3: Novell Cluster Services 1.8.8 Administration Guide for Linux. -
Create the /mnt/bcc-master/dyndns/keys directory on the shared volume.
-
Copy the public and private key files to the directory.
-
Make sure the Linux POSIX permissions are set so that the root user is the only user who has access.
E.3.3 Testing the Perl Wrapper Script
The dynamic DNS script cannot be compiled directly by a Perl interpreter because it does not recognize the BCC variables on lines 62–66 of the script. It is a simple matter to manually test the dynamic DNS script by manually and temporarily replacing the variables with values.
-
Copy the script to the local file system on the Novell Cluster services master node (such as /tmp/bcc_dyn_dns.pl).
-
Open the copy of the script in a text editor, then modify the BCC variables by modifying lines 62 – 66 of the script.
The uppercase string surrounded by the percent character ( % ) is the BCC variable and should be replaced with the real value (such as %DNS_SERVER_ADDR%).
For example, lines 62–66 of the script could be modified like the following:
my $dns_server_addr  = "10.1.1.172";

my $host_name    = "ftp.clusters.sitel.company.com";

my $host_record_ttl  = "60";

my $host_ip      = "10.1.1.216";

my $key_file    = "/mnt/bcc/dyndns/keys/Kcluster1.clusters.site1.company.com.+157+60303.private";
Remember to replace the values with the actual values for your environment.
-
Test the solution by invoking the Perl interpreter on the script via the following command
perl -w /tmp/bcc_dyn_dns.pl
This executes the dynamic DNS script and modify your DNS server. You can test the results as outlined in Section E.2.4, Testing the DNS Server.