5.2 Installing iManager and Identity Manager on One Node in Each Peer Cluster
On one node in each peer cluster, install iManager and Identity Manager. This node will be referred to as the IDM node throughout the guide.
Each IDM node must be online in its peer cluster and Identity Manager must be running properly whenever you attempt to modify the BCC configuration or manage the BCC-enabled cluster resources.
5.2.1 Installing iManager and the Plug-Ins Used by BCC
-
Install the iManager Server software on one node in each peer cluster:
-
In YaST, add the OES 11 SP1 Add-on disk to the Installation Repository.
-
In YaST, Select .
-
On the Software Management page, scroll down to select the pattern.
-
Click .
-
On the OES Configuration page, enable configuration of iManager, then click the iManager link.
-
On the iManager Configuration page, select , then click .
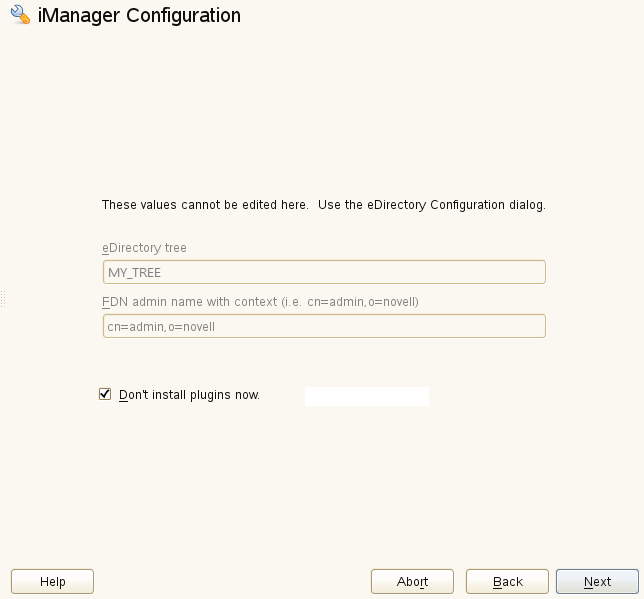
-
Click and complete the installation.
-
-
In a Web browser, access iManager, then log in to iManager as an administrator user.
https://server_ip_address/nps/iManager.htmlReplace server_ip_address with the IP address or DNS name of the node where you installed iManager in Step 1.
-
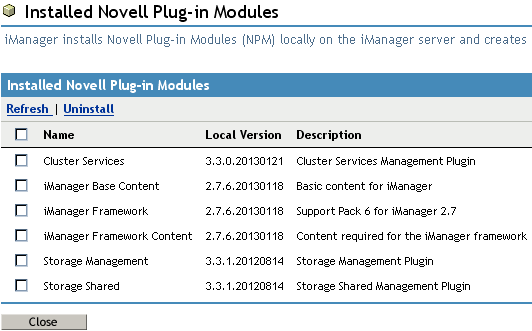
On the iManager Management page, install the plug-in modules.
For instructions, see
Downloading and Installing Plug-In Modules
in the iManager 2.7.6 Administration Guide.BCC requires the following iManager plug-ins to be installed on the IDM node in each peer cluster. Install the plug-ins in the following order:
-
iManager Base Content
-
iManager Framework
-
iManager Framework Content
-
Storage Shared (storagemgmt.npm, the common code for storage-related plug-ins)
-
Storage Management (nssmgmt.npm)
-
Cluster Services (ncsmgmt.npm)
-
Any other plug-ins
You will install the Identity Manager plug-ins later as part of the Identity Manager software installation.
-
-
View a list of installed plug-ins.
-
Exit iManager and close the browser.
-
Restart Tomcat. Enter
rcnovell-tomcat7 restart
-
Repeat this procedure on the IDM node in each peer cluster in turn.
-
Continue with Section 5.2.2, Installing the Identity Manager Components Used by BCC.
5.2.2 Installing the Identity Manager Components Used by BCC
The procedure in this section installs only the Identity Manager components used by BCC.
Install Identity Manager on the same node in each peer cluster where you installed iManager:
-
Log in to the node as the root user, then open a terminal console.
-
Securely copy the Identity Manager ISO file (Identity_Manager_4.0.2_BE_Linux.iso) to the first node in the peer cluster.
-
Compute the MDT sum and verify it with the download information.
-
Loop mount the ISO to /mnt.
-
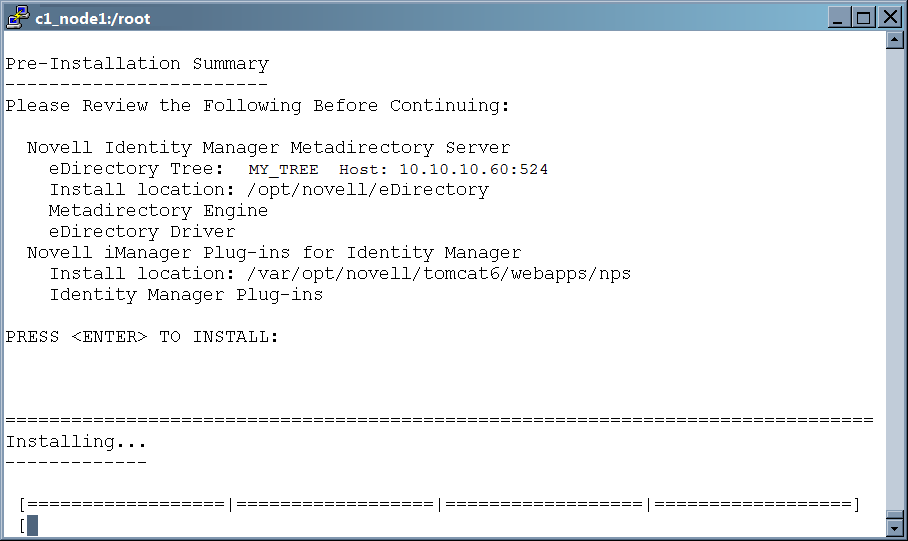
Start the Identity Manager installation, then follow the on-screen prompts.
/mnt/products/IDM/install.bin -i console
-
Choose the locale by specifying the number of the preferred language:
- 1 - Deutsch
- 2 - English
- 3 - Francais
-
Read the Introduction page, then press Enter to continue.
-
Read the End-User License Agreement. Press Enter to continue through the 25 screens. At the end of the license, press y (Yes) to accept the terms of the license agreement.
-
Select the components to install. Type 1,5,7 and press Enter.
You select the Identity Manager engine (Metadirectory Server), the iManager plug-ins, and the customize option so that you can select the eDirectory driver later from a more detailed list of components.
- 1 - Novell Identity Manager Metadirectory Server
- 5 - iManager Plug-ins for Identity Manager
- 7 - Customize the selected components
-
Verify that the selected components are 1, 5, and 7, then press Enter to continue.
-
Select the custom components to install. Type 1,4,33 and press Enter.
- 1 - Metadirectory Engine
- 4 - eDirectory Driver
- 33 - iManager Plug-in (this option is not displayed on the screen)
-
Verify that the selected components are 1, 4, and 33, then press Enter to continue.
-
Press Enter to acknowledge the notification that Identity Manager requires activation.
-
Provide the Identity Manager credentials, then press Enter.
-
View the pre-installation summary, then press Enter to confirm the installation.
-
When the installation is complete, it reports that the installation was successful but with some errors.
There are no logs in the /root/idm folder.
The debug log /tmp/idmInstall.log reports that the schema could not be extended because of missing schema files. The missing files are those associated with components that are not being installed, so this error message can be ignored.
-
Repeat this procedure on the IDM node in each peer cluster in turn.
-
When Identity Manager is running on one node in every peer cluster, continue with Section 5.2.3, Installing the Identity Manager Plug-in for iManager.
5.2.3 Installing the Identity Manager Plug-in for iManager
On the IDM node in each peer cluster, ensure that the Identity Manager plug-ins are installed:
-
In a Web browser, access iManager running on the IDM node in the peer cluster, then log in to iManager as an administrator user.
-
Verify that the Identity Manager plug-in has been added to iManager (an icon appears in the toolbar, or iManager opens by default to the Identity Manager page):
-
If Identity Manager is present, you are done with this task on this node. Repeat this procedure on the IDM node in each peer cluster in turn, then continue with Section 5.2.4, Adding Peer Clusters to Your My Clusters List.
-
If the Identity Manager plug-in is not present, continue with the next steps to install it.
-
-
In iManager, click the icon in the toolbar.
-
Click > .
-
Select , then click .
If this option is not in the list, click , browse to select the Identity Manager .npm file, then click .
-
Read the License Agreement, select , then click .
-
After the installation is complete, click twice.
-
Log out of iManager and close the browser.
-
Restart Tomcat. Enter
rcnovell-tomcat7 restart
-
Repeat this procedure on the IDM node in each peer cluster in turn.
-
After the iManager plug-in is installed for the iManager instance running on the IDM node in each peer cluster, continue with Section 5.2.4, Adding Peer Clusters to Your My Clusters List.
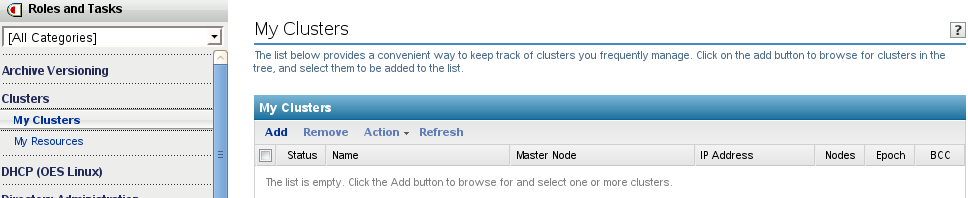
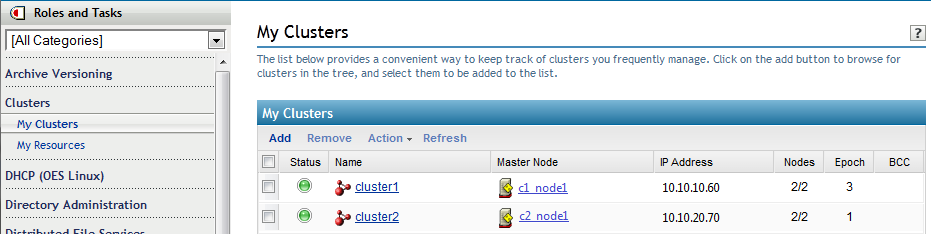
5.2.4 Adding Peer Clusters to Your My Clusters List
Add the peer clusters to the My Clusters page on the iManager instance on the IDM node in each peer cluster:
-
Log in to iManager on the IDM node as a cluster administrator.
-
In , select > .
The list of clusters is initially empty.
-
Click to open the eDirectory browser pop-up window.
-
Browse the tree where you are currently logged in to locate and select the Cluster objects for each of the peer clusters, then click .
Newly selected clusters are added to your personalized list.
-
Repeat the setup for the iManager instance on the IDM node in each peer cluster.
-
After a list is set up in iManager on the IDM node on each peer cluster, continue with Section 5.3, Configuring a BCC Administrator User and Group.