5.3 Configuring a BCC Administrator User and Group

You must specify an existing user to be the BCC Administrator user. This user should have at least Read and Write rights to the All Attribute Rights property on the Cluster object of the cluster.

Perform the following tasks to configure the BCC Administrator user and group:

5.3.1 Accessing iManager

  1. Launch a Web browser and enter the URL for iManager:

    https://server_ip_address/nps/iManager.html

    Replace server_ip_address with the IP address or DNS name of the server that has iManager and the Identity Manager installed (that is, the IDM node).

  2. Specify the administrator user name and password.

  3. Specify the IP address of the LDAP server in the tree.

  4. Click Login.

5.3.2 Creating the BCC Group and Administrator User

Before you configure BCC in the cluster, you must create a BCC group (bccgroup) and BCC Administrator user (bccadmin). Members of the group include the BCC Administrator user and the UNIX workstation objects of each node in every peer cluster. The group must be enabled for Linux User Management (LUM). The group allows the inter-cluster communication to function properly.

IMPORTANT:Linux User Management (LUM) requires case-insensitive names by default. The names you specify must be in all lowercase.

To use mixed case for the BCC group and user names, you must enable the Case Sensitive option in LUM before you attempt to create the BCC group and user.

  1. In iManager, select the Roles and Tasks view.

  2. Create a BCC group, such as bccgroup.

    1. Select Directory Administration > Create Object.

    2. On the Create Object page, select Group, then click OK.

    3. Specify the information for the group, then click OK.

  3. Create a BCC Administrator user, such as bccadmin.

    1. Select Directory Administration > Create Object.

    2. On the Create Object page, select User, then click OK.

    3. Specify the information for the user, then click OK.

  4. Add the BCC Administrator user to the BCC group.

    1. Select Directory Administration > Modify Object.

    2. Select the BCC group, then click OK.

    3. On the group’s Properties page, select the Members tab.

    4. Add the BCC Administrator user as a member of the BCC group.

  5. Enable the group for Linux.

    1. Select Linux User Management > Enable Groups for Linux.

    2. Browse to select the bccgroup, then click OK.

    3. Enable the group for Linux.

      Ensure that you do the following when you LUM-enable bccgroup:

      • On the Select Groups page, select the LUM enable all users in group option.

      • On the Select Workstations page, add all UNIXWorkstation objects for all BCC cluster nodes in all peer clusters for the BCC to the bccgroup.

        IMPORTANT:If you later add a node or reinstall a node in any of the peer clusters in the BCC, its UNIX workstation object must be added manually to this group.

      For information about LUM-enabling groups, see Managing User and Group Objects in eDirectory in the OES 2018 SP1: Linux User Management Administration Guide.

  6. On every node in every peer cluster, refresh the local cache for LUM-enabled users and groups. Log in as the root user, open a terminal console, then enter

    namconfig cache_refresh

5.3.3 Assigning Trustee Rights for the BCC Administrator User to the Cluster Objects

You need to assign trustee rights to the BCC Administrator user for each cluster you plan to add to the business continuity cluster.

  1. In iManager, select the Roles and Tasks view.

  2. Select Rights, then select Modify Trustees.

  3. Browse and select the Cluster object, then click OK.

  4. Click OK to view the trustee information for the Cluster object.

  5. If the BCC Administrator user is not listed as a trustee, click the Add (plus) button for Add Trustee, browse and select the User object, then click OK.

  6. Click Assigned Rights for the BCC Administrator user.

  7. Click Add Property, select ACL, then click OK.

    The [All Attributes Rights] and [Entry Rights] properties should automatically be listed. Add them if they are not present.

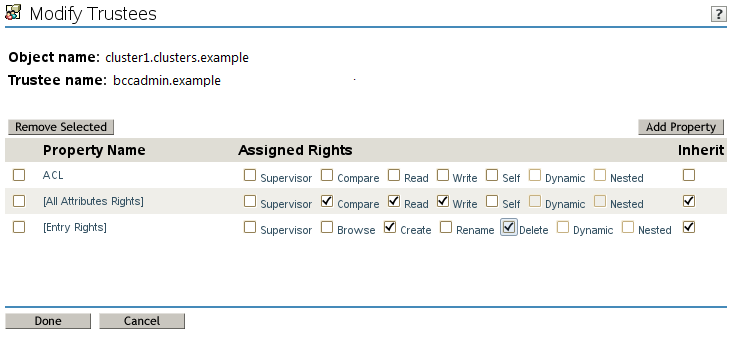
  8. Assign rights and inherit settings for each property:

    Property Name

    Assigned Rights

    Inherit

    Description

    ACL

    None

    No

    Explicitly removing the rights for the ACL property ensures that no rights flow from eDirectory to the file system.

    [All Attributes Rights]

    Compare, Read, Write

    Yes

    Read and Write are required.

    [Entry Rights]

    Create, Delete

    Yes

    The Create right allows the trustee to create new objects below the container and also includes the Browse right.

    The Delete right allows the trustee to delete the target from the directory.

    For example:

  9. Click Done to save your changes.

  10. Repeat Step 2 through Step 9 for the Cluster objects of each peer cluster in your business continuity cluster.

5.3.4 Adding the BCC Administrator User to the ncsgroup on Each Cluster Node

In order for the BCC Administrator user to gain access to the cluster administration files (/admin/novell/cluster) on other Linux cluster nodes in your BCC, you must add that user to the Novell Cluster Services administration group (such as ncsgroup) on each cluster node.

  1. Log in as root and open the /etc/group file.

  2. Find either of the following lines:

    ncsgroup:!:107:

    or

    ncsgroup:!:107:bccd

    The file should contain one of the above lines, but not both.

  3. Depending on which line you find, edit the line to read as follows:

    ncsgroup:!:107:bccadmin

    or

    ncsgroup:!:107:bccd,bccadmin
  4. Replace bccadmin with the BCC Administrator user you created.

    Notice the group ID number of the ncsgroup. In this example, the number 107 is used. The actual number is the same on each node in a given cluster; it might be different for each cluster.

  5. After saving the /etc/group file, execute the id command from a shell.

    For example, if you named the BCC Administrator user bccadmin, enter id bccadmin.

    The ncsgroup should appear as a secondary group of the BCC Administrator user.