2.2 Installing Novell Business Continuity Clustering Software
It is necessary to run the Novell Business Continuity Clustering installation program when you want to:
-
Install and configure Business Continuity Clustering engine software on the cluster nodes for the clusters that will be part of a business continuity cluster.
The Business Continuity Clustering for Linux installation installs to only one server at a time. You must run the installation program on each node of each cluster that you want to be part of a business continuity cluster.
-
Install the BCC-specific Identity Manager templates iManager snap-ins on either an OES 1 Linux server or an OES 1 NetWare server.
The templates add functionality to iManager so you can manage your business continuity cluster. You must have previously installed iManager on the server where you plan to install the templates.
-
Uninstall Business Continuity Clustering software.
IMPORTANT:Before you begin, make sure your setup meets the requirements specified in Section 2.1, Requirements.
-
Section 2.2.1, Business Continuity Cluster Component Locations
-
Section 2.2.2, Downloading the Business Continuity Clustering Software
-
Section 2.2.3, Configuring a BCC Administrator User and Group
-
Section 2.2.4, Installing and Configuring Business Continuity Clustering Core Software
-
Section 2.2.6, Manual (Quick) Business Continuity Clustering Installation
-
Section 2.2.7, Removing Business Continuity Clustering Core Software
2.2.1 Business Continuity Cluster Component Locations
The following figure illustrates where the various components needed for a business continuity cluster are installed.
Figure 2-1 Business Continuity Cluster Component Locations
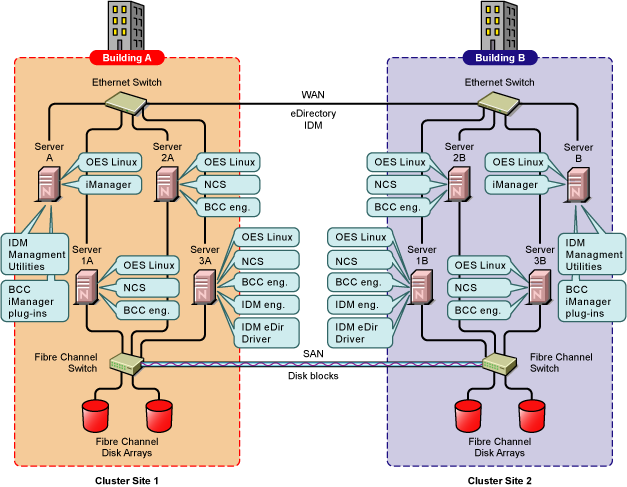
Figure 2-1 uses the following abbreviations:
- BCC eng.: Novell Business Continuity Clustering engine
- NCS: Novell Cluster Services for Linux
- IDM: Identity Manager
- IDM eng.: Identity Manager engine
- IDM eDir Driver: Identity Manager eDirectory driver
- eDir: Novell eDirectory
- OES Linux: Novell Open Enterprise Server 1 Support Pack 2 for Linux
2.2.2 Downloading the Business Continuity Clustering Software
Before you install Novell Business Continuity Clustering, download and copy the software to a directory on your workstation, then create a CD from the ISO. To download Novell Business Continuity Clustering 1.1 with SP1, go to The Novell Business Continuity Clustering download site.
The Business Continuity Clustering installation program and software is downloaded to an ISO image. You can either burn the ISO image to a CD and use that CD to install Business Continuity Clustering software on each Linux server that will be part of the business continuity cluster, or follow the instructions in Section 2.2.6, Manual (Quick) Business Continuity Clustering Installation to install from the network without using a CD.
2.2.3 Configuring a BCC Administrator User and Group
During the install, you specify an existing user to be the BCC Administrator user. This user should have at least Read and Write rights to the All Attribute Rights property on the Cluster object of the remote cluster.
Creating the BCC Group and Administrative User
For Linux, ensure that the BCC Administrator user is a Linux-enabled user by creating a BCC Group object (bccgroup), adding the BCC Administrator user to the group, then Linux-enabling the group by configuring Linux User Management (LUM) for the group. You also add the member Linux nodes (Node objects) of the BCC to this BCC group.
IMPORTANT:Having a LUM-enabled BCC group and user and adding the Linux cluster nodes to the BCC group is necessary for inter-cluster communication to function properly.
Prior to installing and configuring Business Continuity Clustering 1.1 for Linux software you must complete the following tasks:
-
Create a BCC group and name the group bccgroup (all lowercase).
-
Create a BCC Administrator user and add that user to the BCC group (bccgroup).
-
Linux-enable the BCC group by using Linux User Management.
To Linux-enable a group with Linux User Management, see
Managing User and Group Objects in eDirectory
in the Novell Linux User Management Technology Guide.Linux-enabling the BCC group automatically Linux-enables all users in that group.
-
Add all Linux nodes (Node objects) in the cluster to the BCC group.
Assigning Trustee Rights for the BCC Administrator User to the Cluster Objects
Assign trustee rights to the BCC Administrator user for each cluster you plan to add to the business continuity cluster.
-
Start your Internet browser and enter the URL for iManager.
The URL is http://server_ip_address/nps/iManager.html. Replace server_ip_address with the IP address or DNS name of the Linux server where you have installed iManager and the Identity Manager preconfigured templates for iManager.
-
Specify your username and password, specify the tree where you want to log in, then click .
-
In the column, click , then click the link.
-
Specify the Cluster object name, or browse and select it, then click .
-
If the BCC Administrator user is not listed as a trustee, click the button, browse and select the User object, then click .
-
Click for the BCC Administrator user, and then ensure the and check boxes are selected for the property.
-
Click to save your changes.
-
Repeat Step 3 through Step 7 for the other clusters in your business continuity cluster.
Adding the BCC Administrator User to the ncsgroup on Each Cluster Node
In order for the BCC Administrator user to gain access to the cluster administration files (/admin/novell/cluster) on other Linux cluster nodes in your BCC, you must add that user to the ncsgroup on each cluster node.
-
Log in as root and open the /etc/group file.
-
Find either of the following lines:
ncsgroup:!:107:
or
ncsgroup:!:107:bccd
The file should contain one of the above lines, but not both.
-
Depending on which line you find, edit the line to read as follows:
ncsgroup:!:107:bccadminor
ncsgroup:!:107:bccd,bccadmin -
Replace bccadmin with the BCC Administrator user you created.
Notice the group ID number of the ncsgroup. In this example, the number 107 is used. This number can be different for each cluster node.
-
After saving the /etc/group file, execute the id command from a shell.
For example, if you named the BCC Administrator user bccadmin, enter id bccadmin.
The ncsgroup should appear as a secondary group of the BCC Administrator user.
2.2.4 Installing and Configuring Business Continuity Clustering Core Software
You must install the Business Continuity Clustering engine software on each cluster node for the clusters that will be part of a business continuity cluster. You install the software on the nodes of one cluster at a time.
To install and configure Business Continuity Clustering, complete the following steps:
-
Using the KDE* desktop environment, log in as user root, insert the CD you created into an OES 1 SP2 Linux server, then wait for the Business Continuity Clustering installation script to launch.
For download information, see Section 2.2.2, Downloading the Business Continuity Clustering Software.
If you are using the GNOME* desktop environment instead of KDE, the installation does not automatically launch. To start the installation, browse the installation CD by using My Computer, double-click the autorun.sh file, and select .
-
Select the and options, then click .
Both options are selected by default when you start the Business Continuity Clustering installation program. If you deselect the option, Business Continuity Clustering software is copied to the server, but not configured. You will need to run the Business Continuity Clustering installation program again when you want to configure the Business Continuity Clustering software or to run the YaST2 Business Continuity Clustering module.
The Business Continuity Clustering core software contains the software engine files that make up the Business Continuity Clustering product. The core software must be installed on all cluster nodes in each Novell Cluster Services cluster that will be part of a business continuity cluster.
-
Choose whether eDirectory is installed locally or remotely, accept or change the Admin name and enter the Admin password, then click .
-
Specify the fully distinguished eDirectory name for the cluster (this cluster) where the Business Continuity Clustering software will run, select whether you want Business Continuity Clustering software to start immediately following the installation, click then click again.
-
Repeat the above steps for each cluster node on each Novell Cluster Services cluster that will be part of a business continuity cluster.
2.2.5 Installing the Identity Manager Management Templates for Business Continuity Clustering
The Identity Manager management templates for Business Continuity Clustering consist of driver templates used for synchronizing objects between clusters. The templates are required to configure your business continuity cluster. You must have previously installed iManager on the server where you plan to install the templates.
You should install the management templates on the same server where you installed the Identity Manager 2.x or later management utilities. (For information, see Installing and Configuring Identity Manager).
If you have installed Novell iManager on an OES 1 SP2 NetWare server or a Windows* server, you can alternatively install the Identity Manager templates on these servers by using the Business Continuity Clustering 1.1 for NetWare installation program. See Installing the Identity Manager Templates for Business Continuity Clustering
in the Novell Business Continuity Clustering 1.1 Administration Guide for NetWare for information on installing the Identity Manager management templates on either NetWare or Windows.
To install Business Continuity Clustering Identity Manager management templates on Linux:
-
Using the KDE desktop environment, log in as user root, insert the CD that you created in Section 2.2.2, Downloading the Business Continuity Clustering Software into an OES 1 SP2 Linux server, and wait for the Business Continuity Clustering installation script to launch.
If you are using the GNOME desktop environment instead of KDE, the installation does not automatically launch. To start the installation, browse the installation CD by using My Computer, double-click the autorun.sh file, and select .
-
Deselect the and options and select the option, then click .
Selecting the option installs the iManager snap-ins on this Linux server.
2.2.6 Manual (Quick) Business Continuity Clustering Installation
You can install Business Continuity Clustering for Linux core software and Identity Manager management utilities without taking the Business Continuity Clustering CD to different nodes in your cluster. To do this, you must perform the following tasks:
Creating a YaST Auto-Configuration Profile
-
In a text editor, create a YaST auto-configuration profile XML file named bccprofile.xml.
The file should appear similar to the example below.
<?xml version="1.0"?>
<!DOCTYPE profile SYSTEM "/usr/share/autoinstall/dtd/profile.dtd">
<profile xmlns="http://www.suse.com/1.0/yast2ns" xmlns:config="http://www.suse.com/1.0/configns">
<configure>
<bcc><config-type>New</config-type><start-now>Yes</start-now><cluster-dn>cn=my_cluster.o=novell</cluster-dn><ldap-server>10.1.1.0</ldap-server><ldap-port>389</ldap-port><ldap-secure-port>636</ldap-secure-port><admin-dn>cn=admin.o=novell</admin-dn><admin-password>password</admin-password></bcc></configure>
</profile>
Edit the above example to apply to your own specific system settings.
-
Copy the XML file you created in Step 1 to each node in the cluster.
You can use the scp command to copy the file securely. See the scp man page for information on using scp.
Setting Up an NFS Server to Host the Business Continuity Clustering 1.1 Installation
-
Prepare a directory for an NFS share from within a shell.
To do this, you can either copy the contents of the CD you created to a local directory, or you can mount the ISO image as a loopback device.
To copy the contents of the CD to a local directory, you could enter commands similar to the following:
mkdir /tmp/bcc_installcp -r /media/dvdrecorder /tmp/bcc_installTo mount the ISO image as a loopback device, enter commands similar to the following:
mkdir /mnt/isomkdir /tmp/bcc_installmount path_to_BCC_ISO /tmp/bcc_install -o loop
Replace path_to_BCC_ISO with the location of the Business Continuity Clustering software ISO image.
-
Create an NFS share by opening a shell and running yast2 nfs_server. Then continue with Step 3 below.
-
Select , then click .
-
Click and enter the following:
/tmp/bcc_install
-
Enter a host wildcard if desired, click , then click .
Installing and Configuring Business Continuity Clustering on Each Cluster Node
-
Create a new YaST software installation source by opening a shell and running yast2 inst_source.
-
Add nfs as the source type.
-
Specify the server and directory you entered in Step 4, click , then .
-
Install Business Continuity Clustering software by opening a shell and running the following commands in the order indicated:
yast2 sw_single -i \
novell-business-continuity-cluster \
novell-cluster-services-cli \
yast2-bcc
-
Autoconfigure Business Continuity Clustering software by running the following command from a shell:
yast2 bcc_autoconfig path_to_XML_profileReplace path_to_XML_profile with the path to the file you created in Step 1.
-
Remove the installation source you created in Step 1 above by completing the following steps:
-
Open a shell and run yast2 inst_source.
-
Select the Business Continuity Clustering installation source, click , then click .
-
Removing the NFS Share from Your Server
-
Open a shell and run yast2 nfs_server
-
Select , then click .
-
Select the Business Continuity Clustering installation directory, click , then click .
Cleaning Up the Business Continuity Clustering Installation Source
Clean up the Business Continuity Clustering installation source by opening a shell and running one of the commands below, depending on which method you chose in Step 1.
rm -rf /tmp/bcc_install
or
unmount /mnt/iso
2.2.7 Removing Business Continuity Clustering Core Software
If you need to uninstall Novell Business Continuity Clustering, you can do so by using the Business Continuity Clustering installation program.
-
Using the KDE desktop environment, log in as user root, insert the Business Continuity Clustering CD you created into an OES 1 Linux server, and then wait for the Business Continuity Clustering installation script to launch.
If you are using the GNOME desktop environment instead of KDE, the installation does not automatically launch. To start the installation, browse the installation CD using My Computer, double-click the autorun.sh file, and select .
-
Deselect the Software and options, select , then click .