7.1 Managing Partitions
By default, a small eDirectory tree is stored as a single partition that is replicated on the first three servers in the tree. The procedures below explain how to perform further partitioning operations. For concepts and guidelines on partitioning your tree, see “ Guidelines for Partitioning Your Tree” and “ Managing Partitions and Replicas” in the Novell eDirectory Administration Guide.
In This Section
7.1.1 Viewing Information about a Partition
-
In the left pane, right-click the root container of the partition (it should have an
 icon next to it) > click Views > click Partition and Replica View.
The right pane displays a list of the servers that the partition is replicated on, along with the type and state of each replica. For descriptions of the replica types, see “ Replicas” in the Novell eDirectory Administration Guide. For descriptions of the replica states, see Section 7.3, About Replica States.
-
View more information about the partition, such as when its replicas were last synchronized.
-
Make sure the partition root is still selected in the left pane.
-
On the toolbar, click Information.
The Partition Information dialog box appears. Click Help for details on individual information fields.
-
7.1.2 Splitting a Partition (Creating a Child Partition)
-
Make sure you understand the overall process for creating a partition.
See “ Creating a Partition” in the Novell eDirectory Administration Guide.
-
Right-click the container that will be the root of the new (child) partition > click Views > click Partition and Replica View.
The right pane should display an empty replica list. If the list isn't empty, the container is already a partition root—select a different container.
-
On the toolbar, click Create Partition > OK.
7.1.3 Merging a Child Partition with Its Parent Partition
-
Right-click the root container of the child partition (it should have an
icon next to it) > click Views > click Partition and Replica View.
The right pane displays a list of the servers that the partition is replicated on, along with the type and state of each replica. For descriptions of the replica types, see “ Replicas” in the Novell eDirectory Administration Guide. For descriptions of the replica states, see Section 7.3, About Replica States.
-
Make sure the child partition is ready to be merged as explained in “ Merging a Partition” in the Novell eDirectory Administration Guide.
-
Make sure the child partition's root container is still selected in the left pane.
-
On the toolbar, click Merge Partition > OK.
7.1.4 Moving a Partition
-
Make sure the partition is ready to be moved as explained in “ Moving Partitions” in the Novell eDirectory Administration Guide.
-
Select the root container of the partition (it should have an
icon next to it).
-
Click File > Move.
-
Click the browse button next to the Destination field > select the container to move the partition into > click OK.
-
(Recommended) Select the Create an Alias for All Objects Being Moved check box.
-
Click OK.
7.1.5 Checking Partition Continuity
Partition Continuity helps you identify whether any of a partition’s replicas are experiencing synchronization errors. It does this by examining all of the servers holding replicas of a selected partition and verifying that each server has the same information for the partition’s replica list (or replica ring). This operation is also known as “walking the replica ring.”
If each server holding a replica of the chosen partition does not have an identical replica list, or if a replica cannot synchronize with the eDirectory Tree for any reason, the Partition Continuity Table displays one or more errors. Errors appear as exclamation points inside the replica icons.
The Partition Continuity Table displays the replica list (columns) of each server (rows) that holds a replica of the chosen partition. To understand the partition grid, read it horizontally, one server at a time. Each row represents the replica list of that server.
Figure 7-2 Partition Continuity Table
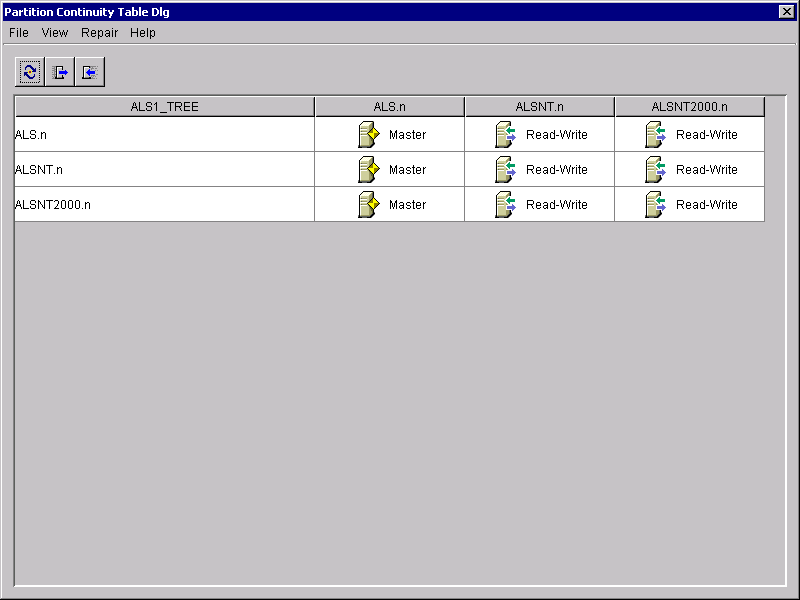
You might also see icons representing unreadable replicas. This does not necessarily signify that the servers can’t talk. It might simply indicate that the client cannot contact the server for information.
You can check partition continuity in ConsoleOne® from the Partition and Replica View.
-
Click View > Partition and Replica View.
-
Select the partition whose synchronization status you want to view.
-
Click Partition Continuity
 .
.
Using the Partition Continuity Table
You can use the Partition Continuity table for doing the following:
Viewing Replica Information
From the Partition Continuity Table, you can view information about a replica, such as its type, current state, and any synchronization errors.
-
Select a row in the Partition Continuity Table.
-
Click View > Information > Replica.
-
Select the replica (column) you want to view.
-
Click OK.
You can also double-click the replica icon in the table to view replica information.
Viewing Server Informations
From the Partition Continuity Table, you can view information about a server and the replicas it holds.
-
Select a row in the Partition Continuity Table.
-
Click View > Information > Server.
You can also double-click the server column in the table to view server information.
Synchronizing Replica Information
You can synchronize the replica information of every server that holds a replica of the selected partition with the replica information on the other servers.
-
Click Repair > Synchronize Immediately.
Receiving Updates
This operation forces the replica on the chosen server to receive all eDirectory objects from the master replica of the partition. While in process, this operation marks the replica on the chosen server as a new replica.
The replica state can be seen in the replica list of the server from the Tree View or the list of Partitions and Servers. The replica’s current data will be overwritten with the data from the master replica.
Although eDirectory automatically synchronizes the directory data among replicas (so that each replica is sent the most recently updated directory objects), this operation lets you manually synchronize the directory objects of replicas if any non-master replicas get out of sync.
Perform this operation if a replica becomes corrupted or has not received updated data for an extended period of time.
From the Partition Continuity Table, you can identify which replicas are out of sync with the data of the master replica. They will appear in the partition grid with an exclamation point (!) on the replica icon.
You cannot select this option from a master replica. The master replica is assumed to be the most current and accurate copy of the partition. If it’s not, assign one of the other replicas to be the master using the Change Replica Type operation. The current master replica will be changed automatically to read/write.
This operation may create a lot of network traffic, so it is best to run this operation during a period of light network traffic.
-
Click Repair > Receive Updates.
Sending Updates
When you send updates from a replica, the eDirectory objects in that replica are broadcast from the server the replica resides on to all the other replicas of the partition, including the master replica.
The other replicas of the partition will combine the new objects sent with the objects they already have. If the other replicas have data in addition to the data sent to them, they will retain that data.
Although eDirectory automatically synchronizes the directory data among replicas (so that each replica is sent the most recently updated directory objects), this operation lets you manually synchronize the directory objects of replicas if any replicas get out of sync.
-
Click Repair > Send Updates.