17.6 Advanced Editing of a Document Style
In addition to selecting and deselecting the content of a document style, you can also change the layout and usability of your document style. You do this by editing the attributes that are associated with certain sections. You can also create additional sections for your documents as you see fit.
17.6.1 What’s In the Advanced Editing Mode
The Advanced Editing icon
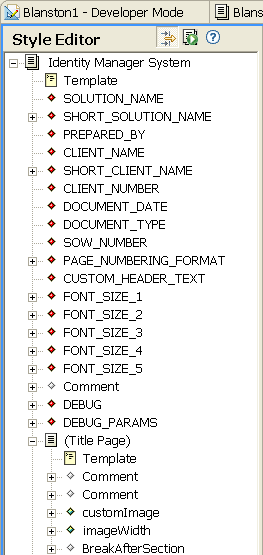
 lets you toggle between simple editing and advanced editing modes. By using the advanced editing mode, you can define information and a structure that is different from the default template already attached to a predefined style. In this example, the Title Page template is shown in its XSL format, which you must maintain.
Figure 17-2 Viewing a Predefined Template
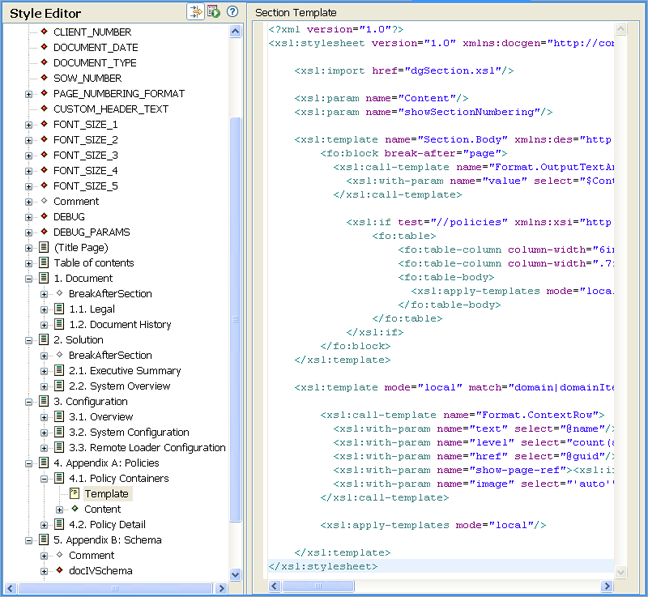
Table 17-2 Style Editor Legend


Advanced editing mode allows you to add the following:
You can have multiple sections in a document, but only one template per section. The template defines the section’s layout; however, you can use the default template for newly created sections. You can also have multiple attributes defining how the section looks, as well as multiple controls. You use parameters (such as names and values) to specify options for a Control type. A Parameter is a general name for a child item of a Control. The name of the Control denotes the type of control and what you can perform by using that type.
Sections
Sections are blocks of the documentation composed of attributes, parameters, templates, and controls through XSL programming. Section content includes a Title, Body, and children or subordinate information. The following example shows the Section Properties page of the Identity Manager System as seen through the simple edit mode.
Figure 17-3 Section Properties Page
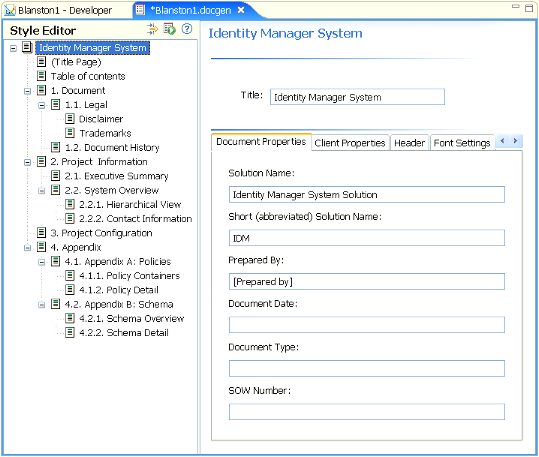
The Identity Manager System section contains a Section Title (this can be changed), along with a number of tabs (attributes): , , , , and . Each of these tabs contain fields that are editable; for instance, you can give the Section Title a different name. When you click the icon, you see that the Identity Manager System section contains one template but several attributes, controls, and parameters underneath the heading.
Figure 17-4 Advanced Editing Mode

Viewing or Editing Properties of a Section
If you click a section within the Style Editor and look in the Properties view (by default the lower left corner of Designer), you see the values associated with the selection. (If you do not see the Properties view by default, right-click a Section and select Show Properties View.)
Figure 17-5 The Properties View of the Appendix B: Schema
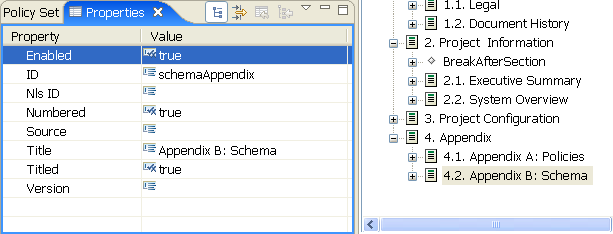
These values are edited in the Properties view, and for the Section heading the values are listed in the following table:
Table 17-3 Values of a Section
NOTE:Values change, depending on what you select under the Style Editor view. For example, an attribute shows different properties than a section or a template.
Templates
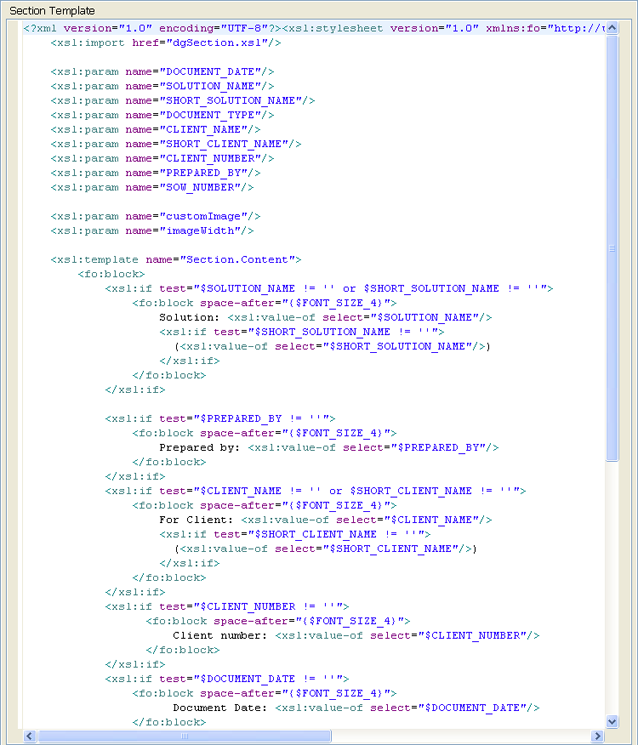
A template is the XML source that defines the overall layout of a generated page. For instance, the Title Page contains a template, as well as a number of other headings. The following figure illustrates the parts of the Executive Summary template. For more information about templates, see A Walk-through Tutorial.
Figure 17-6 Parts of the Executive Summary Template
Attributes
Attributes are the child elements of a Section. For example, clicking the Advanced Editor mode while selecting the section title Identity Manager System reveals the following attributes in red (global), green (local), and grey (comment):
Figure 17-7 Attributes
Controls and Parameters
You can add parameters to control how things appear. In the Advanced Editing mode, the structure of the Short (abbreviated) Solution Name entry is a global attribute that contains a control and a label. For example, the control type known as textbox allows anyone to type a name that appears in the generated document. Use the Properties view to edit controls.
Designer’s supported parameters or values for controls include the following:
Table 17-4 Supported Parameters
17.6.2 A Walk-through Tutorial
Now that you better understand what components are necessary in order to add advanced functionality to your template, use this section to create a new section, add an attribute, and view the source.
Creating a New Section in a Style
To insert an additional section into the Style Editor:
-
Create or open an existing .docgen file in the Style Editor.
-
Click the icon.
The tree view of the document outline expands to include additional objects, (such as attributes, template, and parameters).
-
Right-click the parent section where you want to add your new section, then select . Specify a new section name; for this example, call it “My Section.”
-
(Optional) Reorder the section by dragging the section object to a different location in the navigation tree. You can also copy and paste within this style or other styles.
-
Click the icon, then continue with the next section.
Adding an Attribute to a Style
-
Right-click a section under the Style Editor view. Select .
-
Specify the attribute name in the Attribute Name window. For example, MyAttribute with no spaces. Click .
-
Specify a value under the Value property in the Properties view. For example, .
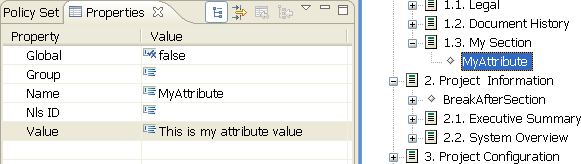
The Properties view shows the following values of Attributes (attributes are defined through controls and parameters).
-
Global: passed down to subsections
-
Group: used to group attributes together--these appear as part of a tab in Style Editor’s simple mode
-
Name: the attribute’s name
-
NLS ID: the attribute’s NLS identification
-
Value: the attribute’s value
You can also show your attribute with another control type. The following example first creates a control, then changes the control type from check box (the default) to something else, such as a text area.
-
Right-click and select .
-
With your cursor on the control you just created, change the control type value to in the Properties view.
-
Click your section to see the changes take place.

Getting Documents to Recognize Your Additions
After you have added attributes, your generated document doesn’t include information from these attributes until you do one of the following:
-
Make sure your section is a leaf section (does not contain child sections).
-
Create a template that uses the attribute explicitly. This is usually the preferred method because you can display the attribute values exactly the way you want by describing the layout using the template.
Method 1: Set the Section Source to “Style”
If you create a section without a template (and the template is a leaf section containing no section children), the default template generates the attribute values with the document. You do not need to do anything. You can generate a document for just that section by right-clicking the section head and selecting . Or you can click the icon at the top to generate the whole document.
NOTE:Text boxes, text areas, and tables are the only attributes that are generated through the default template (check boxes, selects, and comments are not generated).
Method 2: Add a Template for a Custom Layout
Complete the following tasks:
Creating a Template
-
Right-click your newly created section.
-
Select .
The template has some default content that consists mostly of comments, which helps you get started on your first template. This is shown in the next task; for now, replace the comments in this template with the following XSL commands:
	<xsl:param name="MyAttribute"/>   	<xsl:template name="Section.Body">
             	MyAttribute:
	    <xsl:call-template name="Format.OutputTextArea">   		                 	                    <xsl:with-param name="value" select="$MyAttribute"/>		 	           </xsl:call-template>
	</xsl:template>
There is a Format.OutputTextArea call in the XSL that is a helper function included with the DocGen Core Support Templates. Because HTML code is allowed in text areas, this ensures that it’s interpreted and escaped properly. If you want to see the core XSL library calls for documentation generation, see Document Generator Core Support Templates.
Your template should look like this:
Figure 17-8 Example Template

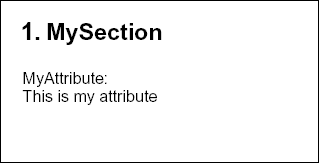
Generating a document for this section should give you something like this:
Figure 17-9 Sample Section
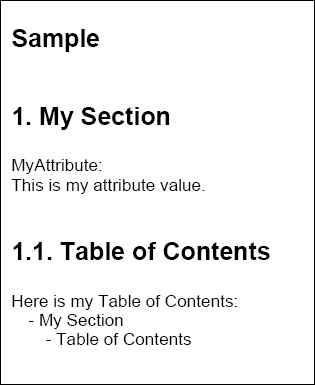
Creating Another Section and Template
-
Right-click your newly created section and select . In the Section Name window, name the new section Table of Contents and click .
-
Right-click this new section and select . Carefully read through the comments in this template. These details are important.
When you create a custom section, you are inserting some information into the document. As the comments mention, developers usually override one of the following template functions:
-
Section Body (most common)
-
Section Content
-
Section Title
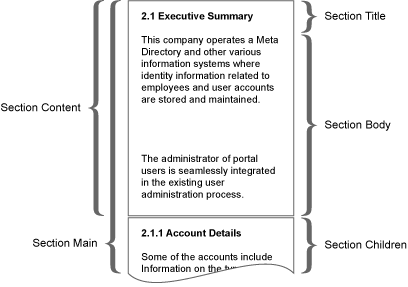
The following image illustrates which section is being defined. As a developer of the style, you write this template to overwrite the area that is of interest.
For this example, we are going to overwrite the Section.Body because we don’t want to change the default behavior of the Title, nor do we want to change the way other sections are related to this one. (You can use the hierarchical view to control this with the default template anyway).
-
-
To overwrite the Section Body, we simply uncomment the sample function that is shown in the default template. This is shown below:

If you render your document at this point, you get no content in your Table of Contents (other than the surrounding text). This is because this template assumes that the style source has been specified for this Section. To specify the source:
-
Click the Table of Contents section.
-
From the Properties view, set the source to .
-
Right-click and select .
Viewing the Source
When your generate your document, you’ll notice there is an option to . Click the box next to this option to turn it on. You’ll see . xml source files appear where you are generating the document. These source files are the XML data that is used in your template when you set the source (for example, to “style”). Designer 1.1 and above include the following sources:
Table 17-5 Sources
17.6.3 Selecting a Language for Generated Documents
You can also select the language you want to print the document in.
-
Click . Under the heading, select the language you want to use for document generation.
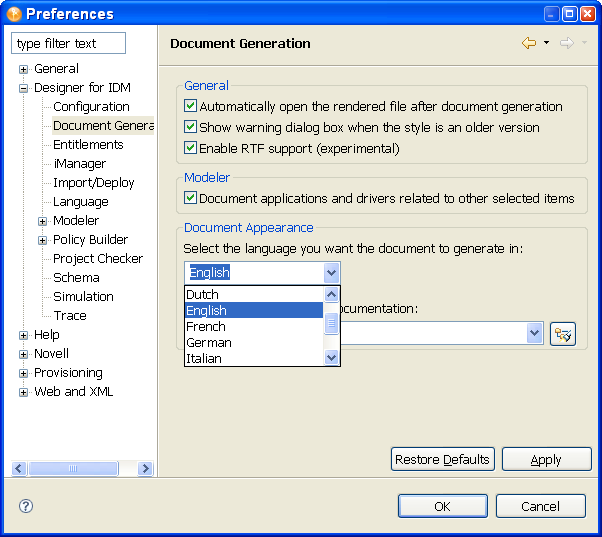
Present languages include:
-
Chinese simplified
-
Chinese traditional
-
Dutch
-
English (default)
-
French
-
German
-
Italian
-
Japanese
-
Portuguese Brazil
-
Spanish
-
-
Once you select a language, click .
-
Click to close the Preference page.
17.6.4 Double-Byte Font Support
Designer now has double-byte font support for the Document Generation feature. If you select a language that uses double-byte fonts, such as Chinese Simplified, Chinese Traditional, and Japanese, Designer automatically installs the font Proportional Mincho.
Figure 17-10 Selecting a Double-Byte Font Language
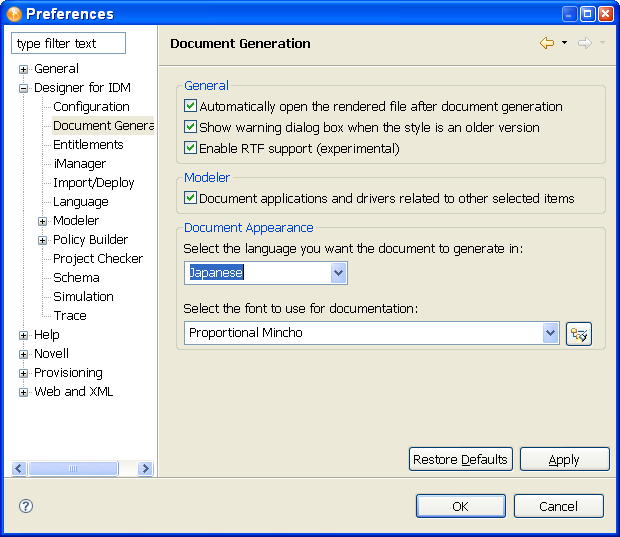
For English and other languages, the default font is Arial.
To add a font for your specific language:
-
Click . Under , select the font you want to use.
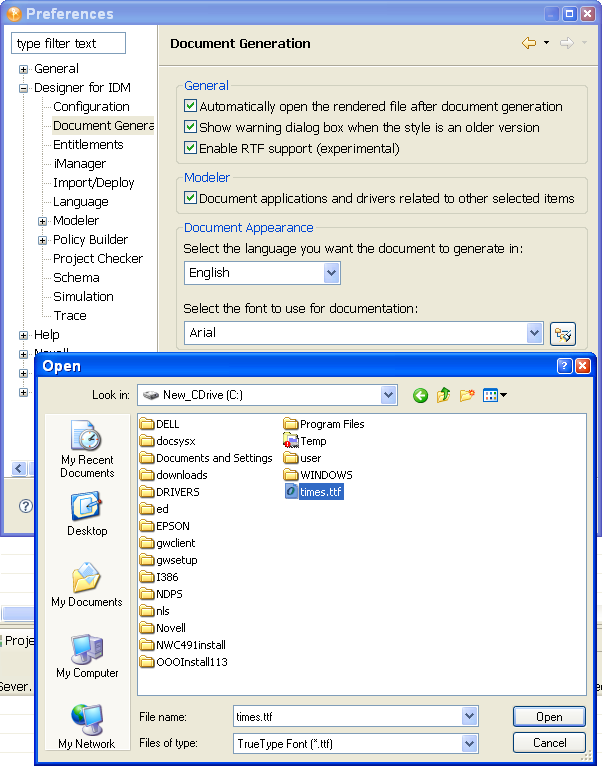
To change the font on a Windows workstation, you must first copy the font file from the C:\Windows\Fonts directory to another directory. You can then use the button to select the font.
To change the font on a Linux workstation, browse to the usr/share/fonts/truetype directory, or to another directory containing the fonts you want.
-
Click the button to bring up the Open window, then change to the directory where you placed the font, then click .
You can also type the directory and font file name into field, or use the pull-down menu to select a font that you have previously selected.
-
Click , then click .
Using the above steps will change the font globally in the generated document, as well as add double-byte font support for such selections.
17.6.5 Saving a Style File in the Styles Template Library
Designer provides one or more default styles that you can use to generate documentation for your project. The Default_Style.docgen file is stored in the Novell\designer\eclipse\plugins\ com.novell.designer.idm.docgen.editor_2.0\content\styles folder and is displayed as an option when you choose a new style.
You can add your own style files to the ...\content\styles folder so that you can easily find them when choosing a basis for a new style.
-
Locate the .docgen file you want to add.
By default, the file is in a directory inside the project where you saved it. For example, the Blanston2.docgen file was created in the workspace\Blanston2\documentation directory.
-
Copy the .docgen file into the Styles Library ( Novell\designer\eclipse\plugins\ com.novell.designer.idm.docgen.editor_2.0\content\styles). The . docgen file appears in the styles folder the next time you open Designer and generate a document.