18.2 Creating Entitlements through the Entitlement Wizard
Designer comes with an Entitlement Wizard. This wizard steps you through the creation of entitlements by asking a series of questions about how the entitlement will be used in the enterprise. Use one of the following methods to access the Entitlement Wizard:
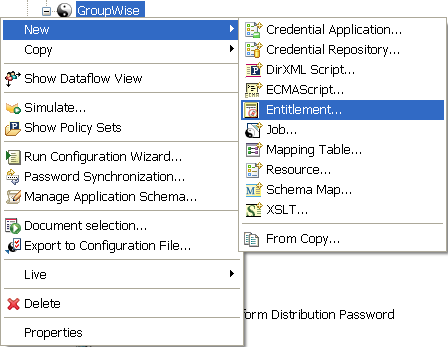
From the Outline View
To access the Entitlement Wizard from the Outline view, right-click a Driver object, then click .
Figure 18-2 Adding an Entitlement through the Outline View
From the Modeler View
To access the Entitlement Wizard from the Modeler view, right-click the driver icon, then click .
There are two types of entitlements that you can create: valueless and valued. The type you use depends on whether you need to pass additional information to the policies.
18.2.1 Valueless Entitlements
A valueless entitlement has no values to go with it. An example is the Account Entitlement for Active Directory, which is used to turn on account capabilities. You use valueless entitlements if you don’t need to pass any extra information to driver policies.
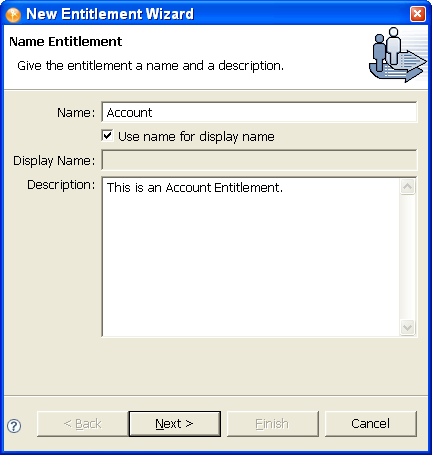
To create a valueless entitlement:
-
Right-click the driver icon in the Outline view or in the Modeler view, then click .
-
Type the name and description information. For this example, the entitlement is named Account, with a description of “This is an Account Entitlement.” Click .
-
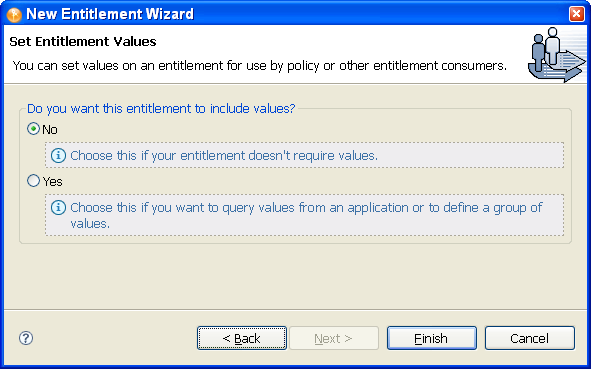
Because this first example is valueless, select to
-
Click .
-
In the Add To Filter dialog box, answer if you want the driver to listen for this entitlement. This enables entitlements for the driver.
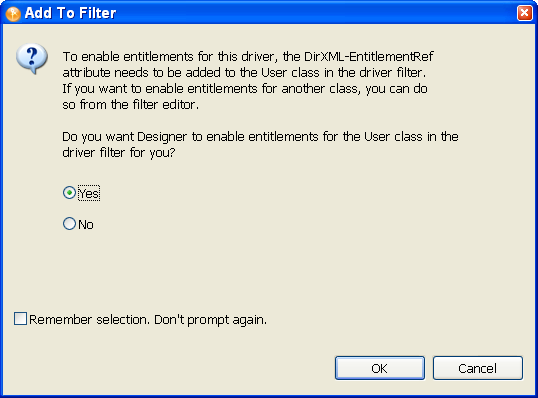
The DirXML-EntitlementRef attribute allows the driver filter to listen for entitlement activities. This is necessary in order to use the entitlements you are creating.
If you don’t want to see the Add To Filter window on every entitlement you are creating for any driver in Designer, select , then click . However, after the attribute is added to this driver filter, you won’t see the Add To Filter window again.
18.2.2 Valued Entitlement that Queries an External Application
Values are a way of passing data that you might need to use in policies. Valued entitlements can get their values from an external query; they can be administrator-defined, or they can be free-form. Below are four examples of the entitlements that you can create.
The second example is an application query entitlement. Use this entitlement when you need values from a connected system in order to implement entitlements in that system.
-
Right-click the driver icon in the Outline view or in the Modeler view, then click .
-
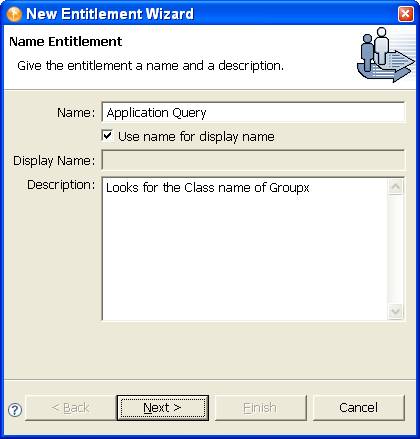
Give the entitlement a name. This example uses Application Query, with the option selected. In the Description box, type Looks for the Class name of Groupx, then click .
-
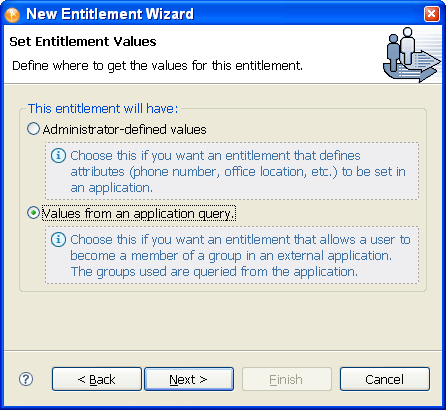
On the Set Entitlements Values page, select so you can query values from an application or define a group of values, then click .
-
The next Set Entitlements Values page allows you to define where you get the values for this entitlement. Valued entitlements can get their values from an external query, or they can be administrator-defined. For this example, select the option, then click .
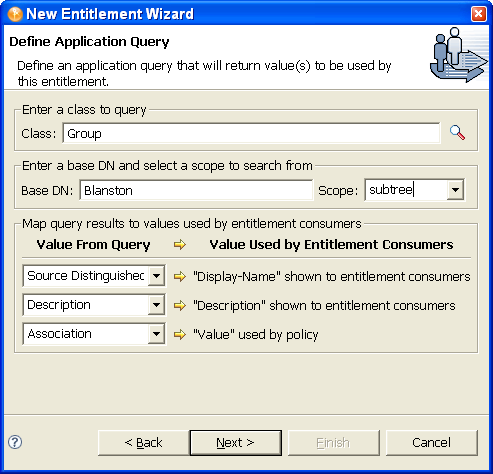
The Define Application Query window combines two steps: defining the query and mapping the query results. To define the query, fill in the Class, the Base DN (Distinguished Name), and the Scope (subtree, entry, or subordinates). Then map the query results to values that are used by the entitlement consumers (either iManager for Role-Based Entitlement policies, or the User Application for workflow entitlements).
-
To fill in the Class Query, click the button on the right side of the Class entry.
-
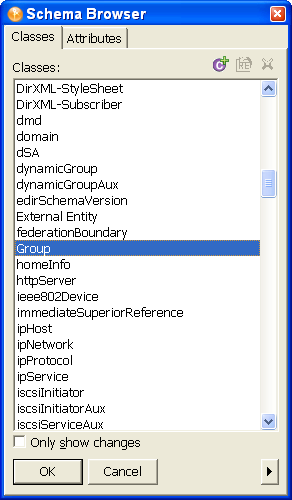
The Schema Browser shows you the Classes in the eDirectory namespace that are available to choose from (the Attributes tab shows you which attributes are part of the Class). If you know the name of the Class type you want to query, click to select a selection in the Classes tab, then start typing the Class name. The browser jumps to the alphabetical order of what you type. Select the Class name, then click .
-
Type the base distinguished name (DN) and the scope. For this example, select the Class Group, at the Base Distinguished Name of Blanston, with the Scope of subtree (choices are subtree, entry, and subordinates).
Our example maps the query results from the connected system to certain values that entitlement consumers can use. At present, the consumers are iManager managing Role-Based Entitlement policies and the User Application managing workflow-based provisioning entitlements. The Value From Query information pre-populates the consumer’s user interface with the following:
-
Display Name: Defines the attribute that displays in the list of values. The example selects Source Distinguished Name for the display name. Click the drop-down button on the to see a list of Attributes associated with the class you selected through the Schema Browser. The list includes both the Attributes and the Inherited Attributes for the selected class.
-
Description: Defines the attribute that displays as a description for that value. For the description, select from the Value drop-down list to map the query results from the connected system to the entitlement.
-
Value: Defines the attribute or token that is the actual value. The entry is not seen in the entitlement consumer, but it is the value that is assigned when the entitlement is granted or revoked. In this case, choose .
If you do not use the button when selecting the class, you see only two selections in the Value From Query lists: and . If these attributes suit your needs, use them. You can also type the attribute name into the text field. However, if you want to select the attributes from the lists, use the button when selecting a class for the query. You see the attributes and inherited attributes for the selected class.
-
-
When the values are filled out, select .
-
In the Assign Multiple Values window, select if you want the entitlements to be granted more than once and with different values. If you select , the entitlement can only be granted once.For our example, click , then click .
It makes sense to assign group entitlements with multiple values, but it would not make sense to assign an account entitlement more than once.
-
You are asked if this entitlement is intended to be used by Role-Based Entitlement policies through iManager. If you want this entitlement to be granted or revoked automatically, select to the Role-Based Entitlements question, click , then continue with Step 11.
Or
If you want the granting or revoking of this entitlement to be a manual process (approved by someone), select to use the User Application, then skip to Step 12.
We recommend that you have only one agent control an entitlement. If multiple agents are in control, you have the following consequences:
-
Whoever comes last controls the entitlement results
-
Results are unpredictable
-
Using both agents to control an entitlement is not supported by Novell
-
-
(Conditional) If you select to the Role-Based Entitlements question, you are asked if you want to use the Role-Based Entitlements priority to resolve any conflicts that might happen when this entitlement is assigned more than once with different values. You can resolve the conflict by either using Role-Based Entitlements priority, or by merging the values.
Merging the values merges the entitlements of all involved Role-Based Entitlement policies, so if one policy revokes an entitlement but another policy grants an entitlement, the entitlement is eventually granted. Solving conflicts by priority works if you need to ensure that only one policy is applied to this entitlement at any time. This example uses priority.
-
Click .
For this example, the query values look for the Source Distinguished Name attribute of the Class name of Group, starting from the Base DN (Blanston) and checking through the subtree from that beginning point. The values that come back from the query are similar to the following:
<instance class-name="Group" src-dn="o=Blanston,cn=group1">
   <association>o=Blanston,cn=group1</association>
   <attr attr-name="Description"> the description for group1</attr>
</instance>
<instance class-name="Group" src-dn="o=Blanston,cn=group2">
   <association>o=Blanston,cn=group2</association>
   <attr attr-name="Description"> the description for group2</attr>
</instance>
<instance class-name="Group" src-dn="o=Blanston,cn=group3">
   <association>o=Blanston, cn=group3</association>
   <attr attr-name="Description"> the description for group3</attr>
</instance>
<!-- ... ->
The information received from the query fills in the various fields. For instance, the < display-name> field receives o=Blanston,cn=group1. The < description> field receives the description for Group1, and the < ent-value> field receives o=Blanston,cn=group1. Because more than one group exists and meets the query criteria, this information is also collected and shown as other instances of the query.
The association format value is unique for every external system, so the format and syntax are different for each external system queried.
-
At the Add To Filter window, click if you want the driver to listen for this entitlement. This enables entitlements for the driver.
The DirXML-EntitlementRef attribute allows the driver filter to listen for entitlement activities. This is necessary in order to use the entitlements you are creating.
If you don’t want to see the Add To Filter window on entitlements you are creating for any driver in Designer, select , then click . However, after the attribute is added to this driver filter, you won’t see the Add To Filter window again.
18.2.3 Administrator-Defined Entitlements with Lists
The example in the following procedure is an administrator-defined entitlement that allows you to select a listed entry. This type of entitlement is best used through Workflow entitlements rather than Role-Based Entitlements.
-
Right-click the driver icon in the Outline view or the Modeler view, then click .
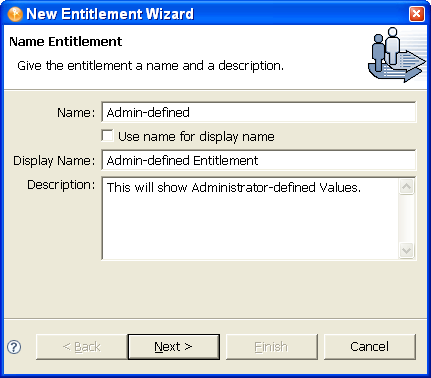
In this example, the entitlement name is Admin-defined, but the defined display name is Admin-defined Entitlement. You need to define a display name only if you want the display name to be different from the name you called the entitlement; otherwise, you can just use the entitlement name as the display name. In this example, the field is defined as .
-
Click .
-
In the Set Entitlement Values window, select to the question “Do you want this entitlement to include values?” Click .
-
In the next Set Entitlement Values window, select , then click .
-
In the Define Values window, type the values you want to add to the Entitlement Value entry, click to add the value to the Defined List pane, then click .
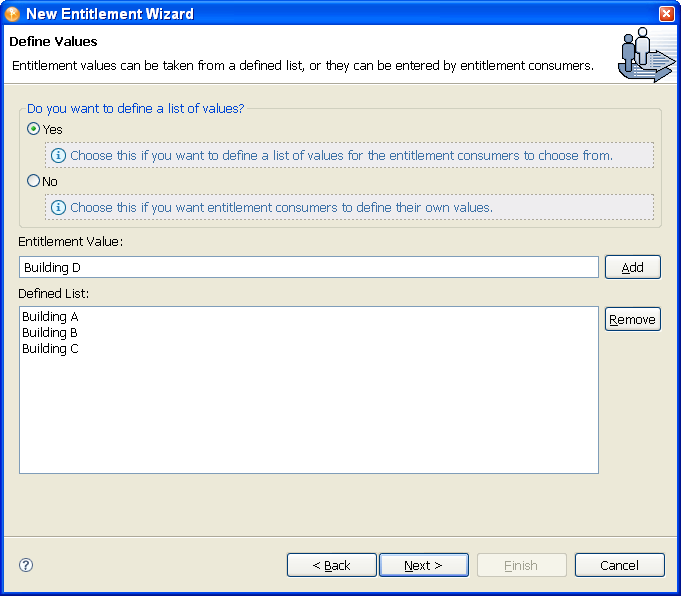
In this example, the values are corporate buildings: Building A through Building D. Through an entitlement client, such as an iManager Role-Based Entitlement task or through the user application, users or defined-task managers can specify the building information, which is then included in an external application, such as Novell eDirectory.
-
In the Assign Multiple Values window, select if you want the entitlements to be granted more than once and with different values. If you select , the entitlement can only be granted once. For the example, click , then click .
It makes sense to assign group entitlements with multiple values, but it does not make sense to assign building letters more than once.
-
You are asked if this entitlement is intended to be used by Role-Based Entitlement policies through iManager. If you want this entitlement to be granted or revoked automatically, select to the Role-Based Entitlements question, click , then continue with Step 8.
Or
If you want the granting or revoking of this entitlement to be a manual process (approved by someone), select to use the User Application, then skip to Step 9.
We recommend that you have only one agent control an entitlement. If multiple agents are in control, you have the following consequences:
-
Whoever comes last controls the entitlement results
-
Results are unpredictable
-
Using both agents to control an entitlement is not supported by Novell
-
-
(Conditional) If you select to the Role-Based Entitlements question, you are asked if you want to use the Role-Based Entitlements priority to resolve any conflicts that might happen when this entitlement is assigned by different Role-Based Entitlement Policies with different values. You can resolve the conflict by either using the Role-Based Entitlements priority, or by merging the values. This example merges the values.
Merging the values merges the entitlements of all involved Role-Based Entitlement policies, so if one policy revokes an entitlement but another policy grants an entitlement, the entitlement is eventually granted. Solving conflicts by priority works if you need to ensure that only one policy is applied to this entitlement at any time.
-
Click .
-
If you see the Add To Filter window, answer if you want the driver to listen for this entitlement. This enables entitlements for the driver. The DirXML-EntitlementRef attribute allows the driver filter to listen for entitlement activities, which is necessary in order to use the entitlements you are creating.
Or
If you don’t want to see the Add To Filter window on entitlements you are creating for any driver in Designer, select , then click . However, after the attribute is added to this driver filter, you won’t see the Add To Filter window again.
18.2.4 Administrator-Defined Entitlements without Lists
The example in the following procedure is an administrator-defined entitlement that forces the administrator to type a value. You can use this kind of entitlement if you do not have all of the information at the initial setup, so you cannot create a task list.
-
Right-click the driver icon in the Outline view or the Modeler view, then click .
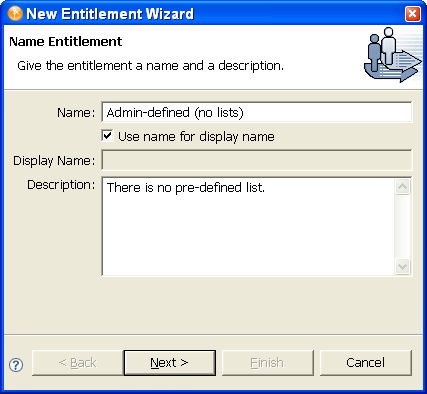
In this example, the entitlement name is Admin-defined (no lists), and it uses the entitlement name as the displayed name because the option is selected.
-
Click .
-
Select on the Set Entitlement Values page, then click .
-
Select on the second Set Entitlement Values page, then click .
-
Select to the question “Do you want to define a list of values?” on the Define Values page, then click .
This displays a text field, where the administrator or users must type information. Using this option can be risky; if the information is wrong or is misspelled, the value is incorrect and the action in the entitlement fails.
-
Select to the question “Allow this entitlement to be assigned multiple times with different values?” on the Assign Multiple Values page, then click .
-
You are asked if this entitlement is intended to be used by Role-Based Entitlement policies through iManager. If you want this entitlement to be granted or revoked automatically, select to the Role-Based Entitlements question, click , then continue with Step 8.
Or
If you want the granting or revoking of this entitlement to be a manual process (approved by someone), select to use the User Application, then skip to Step 9.
We recommend that you have only one agent control an entitlement. If multiple agents are in control, you have the following consequences:
-
Whoever comes last controls the entitlement results
-
Results are unpredictable
-
Using both agents to control an entitlement is not supported by Novell
-
-
(Conditional) If you select to the Role-Based Entitlements question, you are asked if you want to use the Role-Based Entitlements priority to resolve any conflicts that might happen when this entitlement is assigned by different Role-Based Entitlement Policies with different values. You can resolve the conflict by either using the Role-Based Entitlements priority, or by merging the values. This example uses priority.
Merging the values merges the entitlements of all involved Role-Based Entitlement policies, so if one policy revokes an entitlement but another policy grants an entitlement, the entitlement is eventually granted. Solving conflicts by priority works if you need to ensure that only one policy is applied to this entitlement at any time.
-
Click .
-
If you see the Add To Filter window, answer if you want the driver to listen for this entitlement. This enables entitlements for the driver. The DirXML-EntitlementRef attribute allows the driver filter to listen for entitlement activities, which is necessary in order to use the entitlements you are creating.
Or
If you don’t want to see the Add To Filter window on entitlements you are creating for any driver in Designer, select , then click . However, after the attribute is added to this driver filter, you won’t see the Add To Filter window again.