4.7 Configuring Drivers
A driver provides the connection between an application and the Identity Vault. The driver is the connector that enables data synchronization and sharing between systems. To view or change settings, double-click a driver or driver line in the Modeler.
4.7.1 Driver General Settings
Figure 4-8 The Driver’s General Property Page
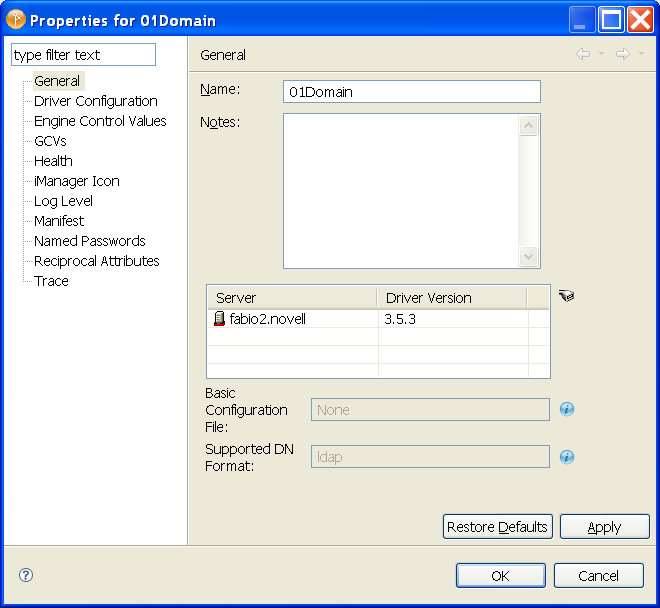
NOTE:Driver versions vary for each driver.
Table 4-9 The Driver’s General Settings
The driver property page is dynamic. Labels and descriptions are dynamically read from the driver configuration file for the Authentication ID and connection information
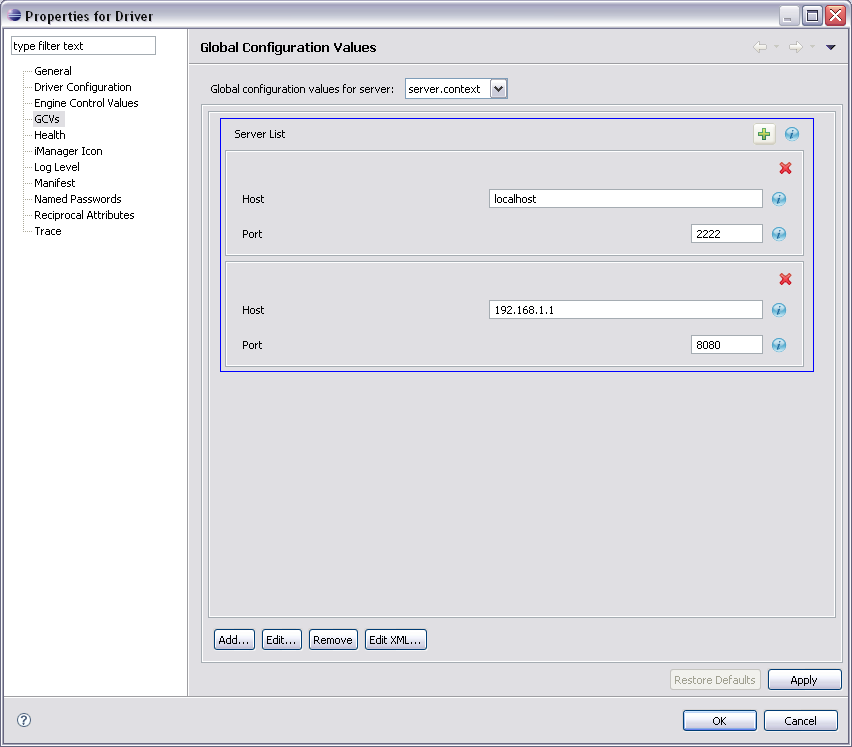
4.7.2 Driver Global Configuration Values
Global configuration values (GCVs) are settings that are similar to driver parameters. GCVs can be specified for an individual driver as well as a driver set. If a driver does not have a GCV, the driver inherits the value for that GCV from the driver set.
GCVs allow you to specify settings for Identity Manager features such as password synchronization and driver heartbeat, as well as settings that are specific to the function of an individual driver configuration. Some GCVs are provided with the drivers, but you can also add your own. You can refer to these values in a policy to help you customize your driver configuration.
To edit the driver set’s GCV settings, double-click the Driver Set object in the Modeler view. From the Global Configuration Values page, you can add, edit, remove, or edit the XML for GCVs.
Figure 4-9 The Global Configuration Values Page

To view or change the driver’s GCV settings, double-click the driver. From the Global Configuration Values page, you can add, edit, or remove values, or edit the XML file for the driver. To select a value, click on the value or the control field to the right of the value’s name. Use the , , , and buttons at the bottom of the page.
You can add, edit, and remove GCVs on the Global Configuration Values page, except for those values found under the Password Management heading. Password values are accessed through the Password Synchronization page; click the icon to the right of the control field and the icon.
In Identity Manager 3.6, GCVs play a much bigger role in configuring drivers. The two required options for configuring a driver are and . However, because each driver contains different values and parameters, you need to consult the driver manual for specific values. Go to the Identity Manager Drivers Web site, then select the manual for the driver you are configuring.
Structured Global Configuration Values
Structured global configuration values allow you to place GCVs into a group. You do this by creating a template containing the GCVs that you want in the group, along with their default values. Then, you create instances of the template with the values you want to change. You can create instances by selecting a Structured GCV and clicking , then modifying the values.
Figure 4-10 Structured Global Configuration Values Page
|
Icon |
Description |
|---|---|
|
|
Adds an instance to the Structured GCV template. |
|
|
Deletes an instance from the Structured GCV template. |
Save the changes by clicking, then click .
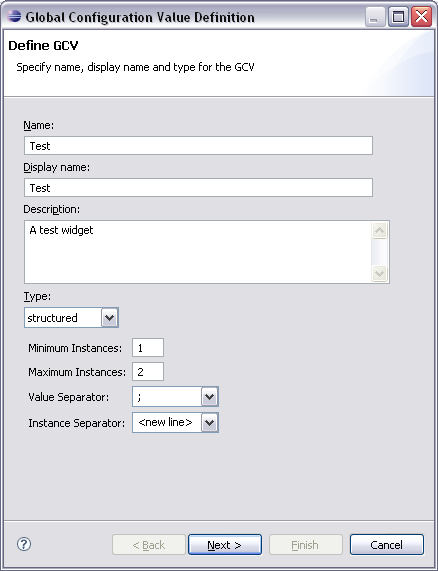
Adding or Editing a Structured GCV Element
-
To open the Global Configuration Values Definition Wizard, click on the Global Configuration Values page.
Figure 4-11 Define GCV Page
-
Specify the values for different fields in the Define GCV page:
-
Click .
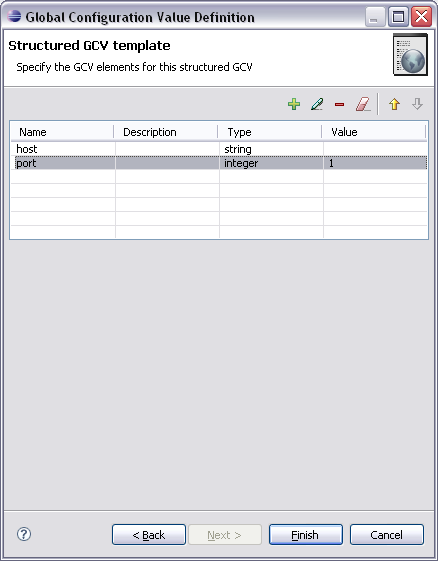
The Structured GCV template page displays a list of GCV elements in a table.
Figure 4-12 Structured GCV Template Page
-
Use the toolbar to add, edit, or remove GCV elements from the template table.
A GCV element is displayed as a row in the table. You can specify a value for it by clicking the cell in the column. Other fields of the table are automatically populated.
-
Click to complete the Structured GCV configuration.
GCVs added to the table are actually the elements of the template. When a GCV element is removed from the template, it is also removed from all the instances of the structured GCVs. In addition, any Edit operation changes the GCV elements in all the instances of the structured GCVs.
4.7.3 Driver Log Level
The Driver Log Level options enable you to view high-level information. For lower-level information, use the Trace option. See Section 4.7.8, Driver Trace Levels.
Figure 4-13 Settings for the Driver Log Level
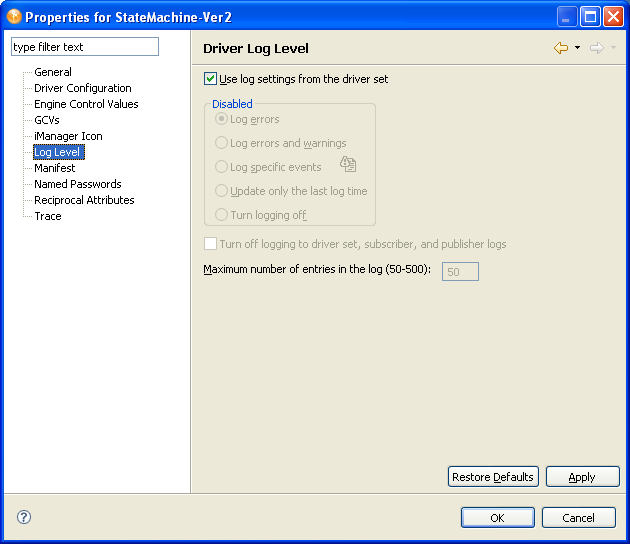
By default, logging inherits the setting from the driver set. To change the default:
-
Double-click the driver.
-
Select
-
Select a logging option.
The option that you select determines which information is available in the log.
To configure the audit instrumentation, select, click the event selector button, select events, then click .
-
Specify the number of entries in the log.
The default is 50 entries (lines) in the log. If you want a longer history, increase the number.
-
Save changes by clicking .
The driver log contains messages from the driver. The messages are related to operations that the driver performed or tried to perform. To view the log, use iManager. Select the log icon on the Driver object in the Identity Manager Overview.
4.7.4 Driver Configuration
Identity Manager 3.6 Driver Configuration Wizard adds all policies when the driver is imported, and are not lost if you did not select an option in the Import Information Request forms when you initially import or create a driver. If this is a driver configuration file that came with Identity Manager 3.6, you can change the driver’s values through the option in the driver’s Properties page.
The two required options for every driver are and . With the option selected, fill out the required values and parameters that are necessary to have the driver run in your network environment. However, because each driver contains different values and parameters, you need to consult the driver manual for specific values. Go to the Identity Manager Drivers web site, then select the manual for the driver you are configuring.
Driver Module
Table 4-10 Driver Module Settings
|
Field |
Description |
|---|---|
|
J |
Specify the name of the Java class that will be instantiated for the shim component of the driver. This class can be located in the classes directory as a class file, or in the lib directory as a .jar file. |
|
|
Specify the name of the .dll file that will be instantiated for the application shim component of the driver. |
|
|
Select this option if you want to connect the driver to the Metadirectory engine that uses the Remote Loader. |
|
|
Set a password for the Driver object. If you are using the Remote Loader, you must enter a password on this page or the remote driver cannot run. The Remote Loader uses this password to authenticate itself to the remote driver. |
|
|
Enables you to document your Remote Loader configuration for the driver. From the drop-down list, select a name that you specified on the driver’s documentation property page. To use this option, see Section 4.7.9, Engine Control Values. |
Authentication
Table 4-11 Authentication Settings
Driver Cache Limit
Figure 4-14 Options for the Driver Cache
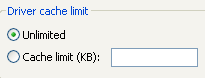
The driver cache is a file that holds Identity Vault events until a driver can process them.
This file can become very large in the following situations:
-
If events occur at a steady rate that is faster than Identity Manager can process them over a long period of time.
-
If the driver is shut down for long period of time but is not disabled.
By default, the driver cache (file) size is limited only by available disk space. This is the recommended setting.
The only reason to set some other limit is to protect against accidentally filling up the disk. The number that you use depends on the difference between projected amount of available disk space without anything in the cache and the amount of free disk space that you want to ensure will always be left available, divided by the number of drivers on the server.
The primary reason that the cache file becomes very large is if the driver is left not running over a long period of time. In this case, the recommendation is to disable the driver rather than set a cache limit. After the limit is reached, all the cached events are discarded.
Startup Option
Table 4-12 Startup Settings
Driver Parameters
From this tab, you can enter common driver options, Subscriber and Publisher channel options, as well as edit XML. Because the Driver Parameters options are different for each driver, refer to the Identity Manager Drivers web site for configuration information on the driver you have selected.
ECMAScript
Displays an ordered list of ECMAScript resource files that are loaded when the driver starts. The ECMAScript files contain extension functions that can be used in policies. For more information, see Using ECMAScript in Policies
in Policies in Designer 3.5.
4.7.5 Driver Manifest
The driver manifest is like a resume for the driver. The driver manifest states what the driver supports, and includes a few configuration settings. The driver developer should provide the driver manifest. Usually a network administrator does not need to edit the driver manifest.
For more information, see the developer documentation for Identity Manager drivers.
4.7.6 Driver Named Passwords
The Named Passwords property page allows you to manage (add, edit, delete) named passwords for the selected driver. You can define named passwords on both drivers and driver sets.
Named Passwords let you store multiple passwords securely by referring to each password by a key, or name. When you refer to the named password in a driver policy, you use the name only, not the password value. Then, when the driver needs the password value to execute the policy, it requests the password value from the Metadirectory engine. This method lets you avoid revealing the password value in the code for a driver policy.
The following example shows how a Named Password can be referenced in a driver policy on the Subscriber channel in XSLT: <xsl:value-of select=”query:getNamedPassword($srcQueryProcessor,’mynamedpassword’)” xmlns:query=”http://www.novell.com/java/com.novell.nds.dirxml.driver.XdsQueryProcessor/>
You can store and retrieve named passwords for any driver without making changes to the driver shim.
As a security measure, in addition to using named passwords, you should control access to all Identity Manager objects in eDirectory.
NOTE:A driver developer can also customize a driver to use named passwords in other ways, such as retrieving Named Passwords when the driver starts up, instead of requesting them from the Metadirectory engine each time they are needed.
For example, the Identity Manager Driver for Lotus Notes driver has been customized to support additional ways of using named passwords, and examples of those methods are included in the sample driver configurations. For more information, see the Identity Manager driver guides.
4.7.7 Driver iManager Icon
You can see and edit the iManager icons that each driver uses. This is important because iManager renders driver icons in a particular way. However, those icons don't appear in Designer. Conversely, Designer's application icons don't appear in iManager's user interface.
To help bridge that gap, you can view the iManager icon to be used in Designer:
-
In the Modeler, right-click a driver (for example, eDirectory), then select .
-
In the left navigation area, select .
Designer displays an icon. It is associated with the driver in Designer, unless a different one was imported and stored on the driver.
For information about editing or changing icons, see Section 17.0, Editing Icons for Drivers and Applications.
4.7.8 Driver Trace Levels
You can add a trace to your driver. With the driver trace level set, DS Trace displays driver-related Identity Manager events, at the level of detail specified by the driver trace level, as the engine processes the events. The driver trace level affects only the driver or driver set where it is set.
WARNING:You should use the trace level only for testing or for troubleshooting driver issues. Setting a driver trace level on a production driver can cause Identity Manager server to process events slowly.
To set a driver’s trace characteristics:
-
In the Outline view or Modeler, right-click the driver, then select .
-
In the driver properties, select in the left-side navigation.
-
On the Trace page, specify the driver’s trace settings, then click .
The following methods help you capture and save Identity Manager trace information.
Windows
Open the Control Panel, select , then click > . A window named NDS Server Trace Utility opens.
To set the filters to capture the DirXML trace information:
-
Click > > .
-
Click the boxes next to and, then click .
To save the information to a file:
-
Click > .
A dialog box prompts for a filename.
-
Enter a filename with the extension of .log.
-
To stop capturing information, click > .
The file is saved.
UNIX
Use the ndstrace command at the console to display the Identity Manager events. The exit command quits the trace utility.
Table 4-13 ndstrace Commands
iMonitor
Use iMonitor to get DS Trace information from a Web browser.
Table 4-14 Platforms and Commands for Web Browsers
|
Platform |
Command |
|---|---|
|
Windows |
ndsimon.dlm |
|
Linux/Solaris/AIX/HP-UX |
ndsimonitor |
-
Access iMonitor from http://server_ip:8008/nds (the default port).
-
Click .
-
Click .
-
Click and .
-
Click , then click .
-
Click the document icon to view the live trace.
4.7.9 Engine Control Values
The engine control values enable you to change certain default behaviors of the Metadirectory engine can be changed. You can access the values only if a server is associated with the Driver Set object. The values are populated based on the Identity Manager version of the servers that are associated with the driver set (servers can be associated through the entry).
Changing a version of an Identity Manager server affects the engine controls for all drivers in a driver set that is associated with the server. When the Identity Manager version is changed, the engine controls for all associated drivers are updated to match the specified version. During the update process, all current settings for existing engine controls are merged into the new engine controls. If the engine controls are not valid for the version of the selected server, they are removed as options.
In Designer:
-
In the Modeler, right-click the driver line.
-
Select .
-
Click the tooltip icon to the right of the field. If a server is associated with the Identity Vault, and if you are authenticated, the engine control values display in the large pane.
Table 4-15 Engine Control Values
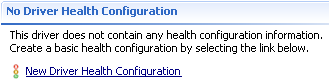
4.7.10 Driver Health Configuration
This properties page is only available if the Identity Manager server version is set to 3.6 or newer.
The Driver Health Configuration allows you to monitor a driver’s state of health (green, yellow, or red), and to specify the actions to perform in response to each of these health states.
To do so, you define the conditions (criteria) that determine each of the health states, and the associated actions to perform whenever the driver’s health state changes. For example, if the driver’s health changes from a green state to a yellow state (based on the conditions you’ve established), you can perform such actions as restarting the driver, shutting down the driver, and sending an e-mail to the person designated to resolve issues with the driver.
You can also define custom driver states that are independent of the standard green, yellow and red. Whenever the driver meets the conditions for the custom statet, Designer performs the associated actions.
To monitor a driver’s health state using the Driver Health Configuration, you must complete the following tasks:
Additionally, you can perform the following tasks to further configure the Driver Health Check environment:
NOTE:Monitoring driver health is applicable only to deployed drivers. Designer does not indicate driver health in the Modeler or any other pre-deployment interface. Use iManager to monitor the health of deployed drivers. For more information about driver health monitoring in iManager, see Monitoring Driver Health
in the Identity Manager 3.6 Common Driver Administration Guide.
Creating a Driver Health Configuration
The health configuration of drivers at version 3.6 (or newer) is configured automatically. Skip this section if your drivers are version 3.6 (or newer). If you have drivers older than version 3.6, you must create the health configuration for each driver you want to monitor.
To create a driver health configuration:
-
In the Modeler or Outline view, right-click the driver, then select Properties.
-
In the left-side navigation, select .
-
Select .
Designer creates a basic health configuration with sample conditions for the green and yellow states (none for red).
-
Continue with Modifying the Health State Conditions.
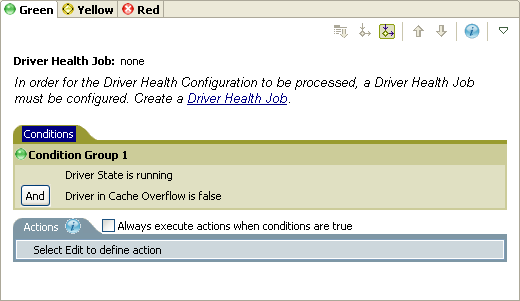
Modifying the Health State Conditions
The driver health configuration lets you define the conditions that determine each health state. The green state contains conditions intended to represent a healthy driver, while a red state represents an unhealthy driver, having failed conditions for both green and yellow states.
The Driver Health job evaluates the conditions for the green state first. If the driver fails to meet the green conditions, it evaluates the yellow conditions. If the driver fails to meet the yellow conditions, it is automatically assigned a red state.
To modify the conditions for a state:
-
In the Modeler or Outline view, right-click the driver where you want to modify the health check configuration, then select .
-
In the left-side navigation, select .
-
Click the state tab (Green or Yellow) that you want to modify.
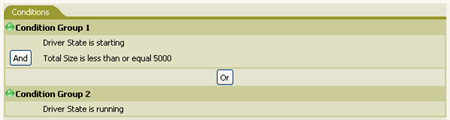
The tab displays the current conditions for the health state. Conditions are organized into groups, with logical operators (either AND or OR), to link each condition and condition group.
Table 4-16 describes the conditions that the Driver Health job can evaluate.
Table 4-16 Driver Health Check Conditions
Condition
Description
Driver State
Running, stopped, starting, not running, or shutting down. For example, one of the default conditions for the green health state is Driver State is running.
Driver in Cache Overflow
The state of the cache used for holding driver transactions. If the driver is in cache overflow, all available cache has been used. For example, the default condition for the green health state is Driver in Cache Overflow is false and the default for the yellow health state is Driver in Cache Overflow is true.
Newest
The age of the newest transaction in the cache.
Oldest
The age of the oldest transaction in the cache.
Total Size
The size of the cache in bytes.
Unprocessed Size
The size of all unprocessed transactions in the cache.
Unprocessed Transactions
The number of unprocessed transactions in the cache. You can specify all transactions types or specific transaction types (such as adds, removes, or renames).
Transaction History
The number of transactions processed at various points in the subscriber or publisher channel over a given period of time. This condition uses multiple elements in the following format:
<transaction type> <transaction location and time period > <relational operator> <transaction number>.
-
<transaction type>: Specifies the type of transaction being evaluated. For example, adds, removes, renames, and so forth.
-
<transaction location and time period>: Specifies the point in the subscriber or publisher channel and the time period being evaluated. For example, you might evaluate the total number of transactions processed as publisher reported events over the last 48 hours. The time period cannot exceed the Transaction Data Duration setting, which is configurable in the Driver Health job. For more information, see Modifying the Driver Health Job Settings.
-
<relational operator>: Specifies the relationship between the identified transactions and the <transaction number> (equal to, less than, greater than, and so forth.)
-
<transaction number>: Specifies the number of transactions being used in the evaluation.
For example:
<number of adds> <as publisher commands> <over the last 10 minutes> <is less than> <1000>
Available History
The amount of transaction history data that is available for evaluation. This condition helps ensure that a Transactions History condition does not cause the current state to fail because it does not have enough transaction history data collected for the time period being evaluated.
For example, assume that you want to use the Transactions History condition to evaluate the number of “Add as Publisher” commands over the last 48 hours. However, you don't want the condition to fail if there is less than 48 hours of data. You could create condition groups similar to the following:
Group1 Available History <is less than> <48 hours> or Group2 Available History <is greater than or equal to> <48 hours> and Transactions History <number of adds> <as publisher commands> <over the last 48 hours> <is less than> <1000>
The state evaluates to true if either condition group is true.
The state evaluates to false if both conditions evaluate to false.
-
-
Modify the condition criteria as desired.
-
To add a new group, select the tab, then click
 .
.
-
To add a condition, select an existing condition group, then click
 .
.
-
To reorder condition groups or individual conditions, select the condition group or condition, then click
 or
or  . You can also use these buttons to move a condition from one group to another.
-
Cut, copy and paste a condition group or condition to the clipboard by right-clicking the item, then selecting the appropriate clipboard action.
-
-
Click to save your changes without closing the Properties page.
-
If you want to change the actions associated with the conditions you’ve set, continue with Modifying the Health State Actions.
Creating a Driver Health Job
The driver health job is available only for Identity Manager server version 3.6 or newer.
The Driver Health job executes periodically to evaluate the health of a driver configured for health checks. The job evaluates the conditions defined for each of the driver’s health states, then assigns the driver the appropriate state. The job also executes any actions associated with the assigned state.
If a Driver Health job does not exist, the Driver Health Configuration page displays a link from which you can configure the Driver Health job. If a Driver Health job already exists, the Driver Health Configuration page does not display this prompt.
To create a Driver Health job:
-
In the Modeler or Outline view, right-click the driver, then select Properties.
-
In the left-side navigation, select .
-
Click to open the Job dialog box. Select the appropriate job, then click .
Follow the prompts to import the configuration file for the Driver Health job. Refer to the following information for details:
-
Where to place the driver: Place the job in the same driver set as the driver. The correct driver set is selected by default. You can only have one driver health job per driver set.
-
Import a configuration: Import the configuration from the server. In the Show field, select Identity Manager 3.6 configurations, then select the Driver Health job in the Configurations field.
-
Email server: Select the e-mail server that you want used for any actions that initiate e-mail. If you have not defined additional e-mail servers, select the Default Notification Collection server.
-
Servers: If the driver set is associated with only one server, that server is selected and cannot be changed. If the driver set is associated with multiple servers, select the server where you want to run the job.
-
After creating the Driver Health job, you can modify job settings as needed. For example, you can configure how often the job runs, which drivers use the job, and how much data the job maintains to support transaction history. For more information, see Modifying the Driver Health Job Settings.
Modifying the Health State Actions
The Driver Health Configuration lets you define the actions that the Driver Health job performs when the driver health state changes. For example, if the state changes from green to yellow, you can shut down or restart the driver, generate an event, or start a workflow.
The Driver Health job performs a health state’s actions only once each time the conditions are met; as long as the driver state remains the same, the actions do not repeat. If the driver state changes because its conditions are no longer met, the Driver Health job performs the state’s actions again the next time its conditions are met.
-
In the Modeler or Outline view, right-click the driver where you want to modify the health check configuration, then select .
-
In the left-side navigation, select .
-
Select the state tab (Green or Yellow) that you want to modify.

The tab displays the current actions for the health state. If no action is assigned, the Driver Health Configuration displays in the tab.
-
Select the tab, then click
 to add an action to the health state.
Select an action from the dropdown list.Table 4-17 describes the actions that the Driver Health job can perform.
NOTE:Some actions require additional information before they will execute.
Table 4-17 Driver Health Check Actions
-
If you want the actions executed every time the conditions evalute to true, click .
By default, actions are performed only one time while a driver's health state remains the same; regardless of the number of times the conditions are evaluated, as long as the health state remains in effect (true), the actions are not repeated. For example, when the driver's health state changes from red to green, the green state's actions are executed. The next time the conditions are evaluated, if the health state is still green, the actions are not repeated.
Selecting the setting causes the actions to be repeated each time the condition evaluates to true. For example, if the driver's health state repeatedly evaluates to green without changing to another state, the green state's actions are repeated after each evaluation.
-
Click to save your changes without closing the Properties page.
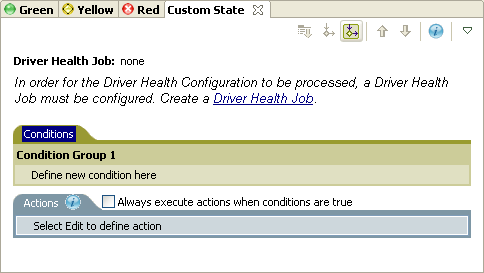
Creating a Custom State
The Driver Health Configuration lets you create one or more custom states to perform actions independent of the driver’s current health state (green, yellow, red). If the driver meets the custom state’s conditions, the Driver Health job performs its actions.
As with the standard driver health states (green, yellow, red), the Driver Health job performs a custom state’s actions only once each time the conditions are met; as long as the driver state remains the same, the actions do not repeat. If the driver state changes because the custom state’s conditions are no longer met, the Driver Health job performs the custom state’s actions again the next time its conditions are met.
-
In the Modeler or Outline view, right-click the driver where you want to create a custom state, then select .
-
In the left-side navigation, select .
-
Select the pulldown menu
 , then select .
-
Define the conditions and actions for the custom state, then click to save the changes without closing the Properties page.
For information about defining state conditions, see Modifying the Health State Conditions. For information about defining state actions, see Modifying the Health State Actions.
Modifying the Driver Health Job Settings
NOTE:The driver health job is available only for Identity Manager server version 3.6.
The Driver Health job evaluates the conditions for the health states and assigns the driver the appropriate state. The job also executes any actions associated with the assigned state.
As with all driver jobs, there are several settings that you can modify to optimize the job’s performance for your environment, including how often the job runs, which drivers use the job, and how much data the job maintains to support transaction history.
To modify the job settings:
-
In the Modeler or Outline view, open the driver set object where the driver health job is stored.
-
Right-click the appropriate job object, then select .
-
Change the desired settings on the following tabs, then click to save your changes:
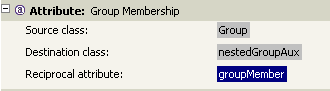
4.7.11 Reciprocal Attributes
NOTE:This properties page is only available if the Identity Manager server version is set to 3.6.
The Reciprocal Attributes propoerties lets you create and manage backlinks between objects. For example, the Group object includes a Members attribute that contains pointers to all User objects that belong to that group. Similarly, each User object includes a Group Membership attribute that points to the Group objects of which that user is a member. These two-way links between objects are known as reciprocal mappings.
Figure 4-15 Custom Reciprocal Attribute Mapping Property Page for Driver Objects
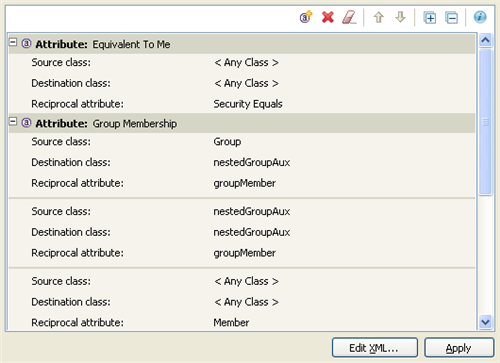
You can manage all reciprocal mapping configuration from the toolbar in the property page, which contains the following toolbar icons:
The Custom Reciprocal Mapping page lets you do the following:
Adding a Reciprocal Attribute Mapping
When creating a reciprocal attribute mapping, you must first add one of the attributes to the reciprocal mapping list:
-
In the Reciprocal Attributes page, click
 .
.
-
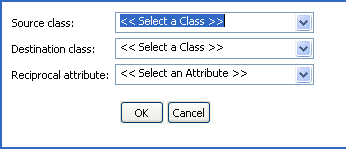
In the new attribute entry, select the desired attribute from the dropdown list, then click .

-
Specify the specifics of the reciprocal mapping, then click .
Removing a Reciprocal Attribute Mapping
To remove a reciprocal mapping between attributes:
-
Select the reciprocal mapping you want to remove by selecting it in the reciprocal mapping list.
When selected, the attribute name in the tab is highlighted.
-
Click
 .
.
Removing an Attribute from the Reciprocal Mapping List
To remove an attribute from the reciprocal mapping list:
-
Select the attribute you want to remove by selecting it in the reciprocal mapping list.
When selected, the attribute name in the tab is highlighted.

-
Click
.
To remove all attributes from the reciprocal attribute mapping list, click
 .
.
Editing Reciprocal Attribute XML
If desired, you can edit the XML for a reciprocal attribute directly. To do so, click in the Custom Reciprocal Attribute Mapping page. This opens a basic XML editor that lets you modify the XML directly. When finished, click or to close the XML editor.