3.10 Connecting Applications
3.10.1 Automatic Connections
When you drag an application into the Modeler space, and the Modeler contains a driver set, Designer automatically draws a connecting line between the Driver Set object and the application.
When you use the palette’s Connection function to connect an application to an Identity Vault, you can begin or end your driver line at the Identity Vault. The line automatically connects to a driver set in an Identity Vault.
If the Identity Vault contains more than one driver set, the Connection function connects the driver line to the first driver set. This functionality also works for multi-driver connections.
All multi-driver driver lines are bendable. You can lay them out so that the lines don’t overlap at any angle. Also, you can reconnect multi-driver connections.
If an Identity Vault has multi-driver connections in a Domain Group and you minimize that Domain Group, a single collapsed line represents all of the multi-driver connections.
3.10.2 Connection Target Highlights
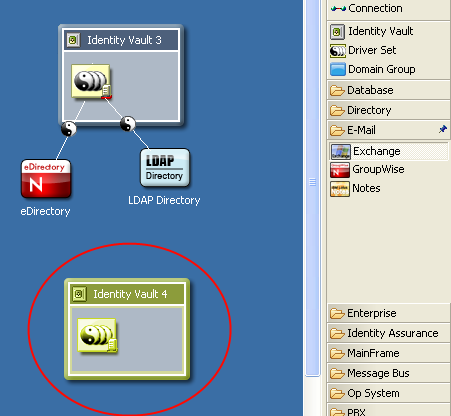
When you drag an application across the Modeler space, the closest Identity Vault and closest driver set in that Identity Vault are highlighted. The highlights indicate the item that the application will connect with when you drop the application.
Figure 3-26 Connected Objects
3.10.3 Automatically Creating Objects
If you drop an application into the Modeler space, and that space has no Identity Vaults, Designer automatically creates an Identity Vault.
If you add a driver application in the Modeler by right-clicking in the Modeler, then selecting > , the driver application is now added at the place where you right-clicked. This makes it easier to locate items in the view.
3.10.4 Auto Redraw
If you move items, lines are automatically redrawn.
3.10.5 Manually Connecting
To manually connect an application to a driver set:
-
Click in the palette.
-
Draw a line between the application and the driver set.
To reconnect an application, select the driver line, then drag one end of the line to another driver set or application.
The drag gesture gravitates the line towards the nearest connectable point. This functionality helps you know what you can connect to and where you can connect the item. If you try to connect to something that isn’t allowed, the cursor usually indicates so, or nothing happens when you drop the item.
3.10.6 eDir-to-eDir Connections
Figure 3-27 eDir-to-eDir Connections

An eDir-to-eDir connection is a special type of connection. It is used frequently in Identity Manager environments. This connection is a way to configure two eDirectory drivers to communicate directly with each other. (No other drivers are able to communicate directly with any other type of driver.) This type of connection is most commonly used for synchronizing a local directory tree with a Metadirectory Identity Vault.
To create an eDir-to-eDir connection, do one of the following:
-
Drag a line between two Identity Vaults
-
Drag a line between two driver sets
When you connect a line between two eDirectory applications, the line automatically turns into an eDir-to-eDir connection. See the illustration in Section 7.2.6, Viewing an eDir-to-eDir Driver.
To disconnect an eDir-to-eDir connection, right-click an eDir item, then select . Designer creates two new eDirectory applications and redirects each driver to its respective application. A new driver is not created. No data is lost. Designer keeps the same drivers.
If you delete one side of an eDir-to-eDir connection, Designer converts the remaining half into a regular driver connection to an eDirectory application.
3.10.7 Multiple Driver Connections
To connect more than one driver from a driver set to an application:
-
Select in the palette.
-
Connect the driver set and the application again and again.
Each time you connect, a new line is added. All lines are bendable, so that the lines don’t overlap. To get the model to look optimal, you probably need to move the application slightly from its default position.
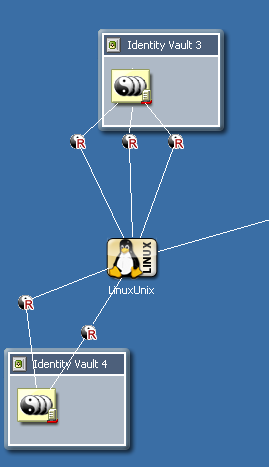
You can also connect more than one driver to a single application. This actually causes the application to act as a hub. Each driver can connect to and authenticate to the application or system the same or differently, depending on your needs. Each driver can access the same part of the application or system or different parts (for example, different tables in a database). The Modeler lets you diagram a layout according to your needs.
Figure 3-28 Multi-Driver Connections
3.10.8 Straightening Connections
To straighten connecting lines:
-
Press Ctrl, then select one or more items in the Modeler.

-
Right-click, then select s.
What is straightened depends on what you select:
Table 3-4 Straightened Connections
Lines are straightened only if they are less than 20 pixels from a north, west, south, or east alignment. The intent of this operation is to quickly nudge lines that are almost straight, so that they become perfectly straight.
This nudging removes the tedium of meticulously dragging items into perfect alignment and being concerned with the pixels. If a line isn’t almost straight, it is left alone. In fact, the Straighten Connection operation is disabled unless the selected items qualify to be straightened. If some of the selected items qualify but others don’t, the operation is still enabled, but only eligible lines are straightened.
3.10.9 Reconnecting
To reconnect components, do one of the following:
-
Drag the end of a line (driver) from one application to another.
-
Drag the end of a line (driver) from one driver set to another.
3.10.10 Driver Icons
Table 3-5 Driver Icons


The following figure illustrates these icons.
Figure 3-29 Driver Icons

To see, turn on, or turn off driver icons:
-
Right-click a driver line.
-
Select an option (for example, ) to turn on or turn off.
3.10.11 Selected Drivers
As you move the mouse over a driver, the line thickens so that it is more obvious. You can click and interact with this line.
3.10.12 Auto-Layout of Imported Objects
When you import objects from the directory, they are automatically laid out, connected with lines, and assigned an icon that matches objects and relationships as closely as possible.
For example, if you import a Driver Set object, Designer imports all of the drivers and connects them with lines. Also, each driver points to an application icon. Application icons include the following:
-
The exact Application icon (for example, Avaya or PeopleSoft)
-
The image stored on the driver
The image is embedded in a square application icon.
-
A generic application icon
If no image is stored on the driver, Designer supplies an icon for one of the following applications:
-
Generic
-
JDBC
-
LDAP
-
Delimited Text
The auto-layout mechanism uses the layout topology that you have selected. The default is Fan Out - Bottom. You can customize this setting in Preferences. See Modeler.
-