After the systems hosting DirXML drivers have been set up, you will configure the drivers by importing driver preconfiguration files and then testing data synchronization. These tasks can be completed using Novell iManager 2.0 plug-ins, which were installed when you completed the section, Setting Up iManager .
NOTE: ConsoleOne can also be used to configure DirXML drivers. For ConsoleOne information, see DirXML Administration.
To configure the drivers, complete the steps in the following sections:
Using application information that you provide, the Import Drivers Wizard completes configuration for the DirXML drivers.
You'll need the data you collected and recorded in the Configuration Information tables at the beginning of each system's setup.
Launch iManager by going to http://serveripaddress/nps/iManager.html.
IMPORTANT: This URL is case sensitive.
Authenticate to the NetWare 6.5 tree.
Click DirXML Management > Import Drivers.
Mark In a New Driver Set, then click Next.
Specify a driver set name, browse to the context where you want the driver set object to be created, then browse to the server object representing the server where you installed DirXML.
Leave Create a New Partition checked, then click Next.
Select the appropriate driver configuration files for your installation.
Driver configuration files are available for drivers licensed with this release (eDirectory, Active Directory, and NT Domain) and for evaluation drivers.
Click Next, then fill in the prompts for application information using the data you recorded in Configuration Information tables.
You will be presented with a page of information prompts for each driver you selected.
IMPORTANT: Scroll to the bottom of the page to see all the prompts. If you quit before configuring all of the drivers, the drivers will not have enough information to function properly.
Click Define Security Equivalence, add Admin, then click OK.
Drivers need rights to read and update data in eDirectory. Assigning a security equivalent is a quick way to provide necessary rights assignments. This option does not provide access to data in the target application. Access to the target application is provided through other driver parameters.
These objects will not be replicated to the application. We recommend that you add all objects that represent an administrative role (for example, the Admin object) to this list. These objects typically have no function outside of the directory that they were created in. Maintaining these objects in only one directory prevents potentially disruptive changes, such as access control or password changes, from causing problems.
After providing all the required information, click Finish with Overview.
Configuring Secure Data Transfers for the DirXML Driver for eDirectory
The DirXML driver for eDirectory requires Novell Certificate ServerTM and a Certificate Authority (CA) to ensure data security. All transactions between trees must be secured through an SSL connection. We recommend that you use the Certificate Authority from the tree containing the driver to issue the certificates used for SSL.
On the Welcome page, enter the requested information for the first tree.
Default values are provided using objects in the tree that you authenticated to when you launched iManager. You must enter or confirm the following information:
Driver DN: Use the distinguished name of the eDirectory driver, such as EDir-Driver.DriverSet.Services.YourOrganization.
The tree name: Enter the IP address for the first tree.
A username for an account with administrative rights, such as Admin.
The password for the administrative user.
The user's context, such as Services.YourOrganization.
Click Next.
The wizard uses the information you entered to authenticate to the first tree, verify the driver DN, and verify that the driver is associated with a server.
Enter or confirm the following information for the second tree:
Driver DN: Use the distinguished name of the eDirectory driver, such as EP-EDir-Account.DriverSet.YourOrganization.
The tree name: Enter the IP address for second tree.
A username for an account with administrative rights, such as Admin.
The password for the administrative user.
The user's context, such as HQ.YourOrganization.
Click Next.
The wizard uses the information you entered to authenticate to the second tree, verify the driver DN, and verify that the driver is associated with a server.
Review the information on the Summary Page, then click Finish.
If Key Material Objects (KMOs) already exist for these trees, the wizard deletes them and then does the following:
Exports the trusted root of the CA in the first tree
Creates KMO objects
Issues a certificate signing request
Places certificate key pair names in the drivers' Authentication ID
Configuration for secure data synchronization is complete. Continue with the next section, Testing Data Synchronization .
Testing Data Synchronization
After participating systems are set up and their drivers have been configured, use the following procedures to verify that data is synchronized correctly.
Start Each Driver
Start one driver at a time to validate proper DirXML configuration. By default, drivers are set for Manual startup.
NOTE: After you have a driver configuration that works in your environment, use iManager to change the startup option to Auto Start. Auto Start will re-start the driver whenever eDirectory is re-started.
Ensure that the Remote Loader service is running on the systems where you set it up and that you can view the trace screen for the Remote Loader.
NOTE: To open the Trace Screen: at a command prompt enter dirxml_remote -window on.
Open a DSTrace screen on the computer where the DirXML engine is installed by typing dstrace on screen on file off at the console prompt.
To configure dstrace.nlm to display only DirXML trace messages, enter dstrace -all +dxml +dvrs.
To include message tags and time stamps, enter dstrace -all +dxml +dvrs +tags +time.
In iManager, select DirXML Management > Overview.
Browse to the DirXML driver set.
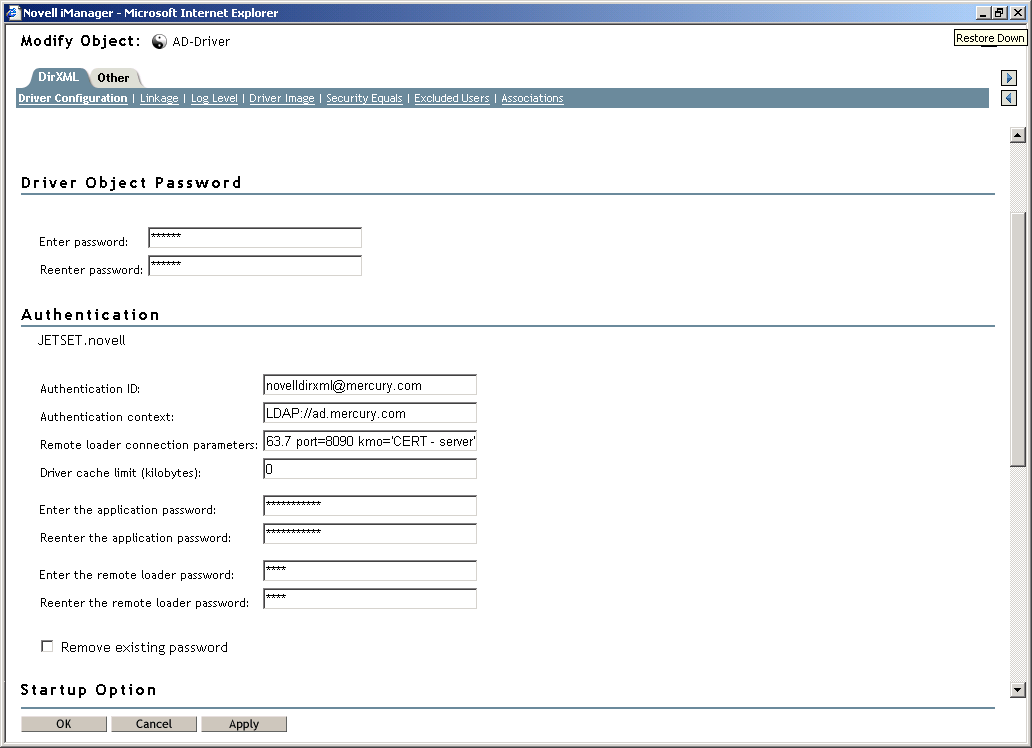
(Conditional) If you configured the Remote Loader Service to use SSL, before you start the drivers, you must edit the Authentication section of the Driver Parameters and re-enter passwords.
Add a reference to the certificate as shown in the following example. hostname=192.168.0.1 port=8090 kmo=servernamecert
Figure 21 Referencing the KMO
Click the status icon in the upper right corner of the driver's icon, then click Start Driver.
Review the messages in the DSTrace screen and the remote trace screen to verify successful driver start.
Add a New User: In any of your participating systems, create new user. Verify that an account was created for the new user in each of the participating systems. Log in to each system as the new user.
Modify User Information: Log in as administrator on any of the participating systems. Modify an attribute that is synchronized on the new user object. Verify data synchronization in participating systems.
Delete a User: Delete the new user account. Verify that the account was removed from all participating systems.