6.6 Configuring the Notification Service
Storage or system administrators might want to receive notices for Dynamic File Services pair and policy management events or for policy run events. The Notification Service allows you to configure which events trigger notifications and where the notification messages are sent. The notification messages include information about the event, such as the server name, pair name, policy name, a brief description of the event, and the event time stamp.
The Email notification add-on lets you set up one or more email addresses, then separately configure which events trigger messages to be sent for the address.
The selected notification events apply globally to all of the pairs and policies on a server.
The Dynamic File Service can be running or not running when you configure notifications. It is not necessary to restart the Service to apply the changes.
6.6.1 Understanding Notification and Audit Events
You can specify which event types trigger notifications to be sent for each configured recipient. Notification messages for the selected events are sent to the configured recipients only when the Notification Service is enabled.
Pair Management Events
The following pair management events can be configured for notification and auditing:
- Pair Created
- Pair Modified
- Pair Unlinked
- Added Exclude/Include Folders to Pair
- Removed Exclude/Include Folders from Pair
- Stop Running Processes on Pair
- Manual Move on Pair
Policy Management Events
The following policy management events can be configured for notification and auditing:
- Policy Created
- Policy Modified
- Policy Delete
- Policy Associated to Pair
- Policy Disassociated from Pair
- Policy Execute Now on Pair
- Policy Preview Now on Pair
- Policy Scheduled to Run on Pair
- Policy Ran on Pair
Policy Schedule Management Events
The following policy schedule management events can be configured for notification and auditing:
- Schedule Created
- Schedule Modified
- Schedule Delete
- Schedule Associated to Policy
- Schedule Disassociated from Policy
Cloud Account Management Events
The following cloud account management events can be configured for notification and auditing:
- Cloud Account Created
- Cloud Account Deleted
- Cloud Account Modified
- Cloud Path Included in a Pair
Retention Review Events
The following retention review management events can be configured for notification and auditing:
- Retention Review Notification
- Retention Review Check (Audit only)
- Retention Review Delete on Pair
- Retention Review Move Files Back to Primary
- Retention Pair Review Modification
Registration Events
The following registration event can be configured for notification and auditing:
- Registration
Service Events
The following service event can be configured for notification and auditing:
- Change Logging Options
6.6.2 Setting Up Email Notifications
The Email add-on for the Dynamic File Services Notification Service allows you to set up email addresses where you want to send notifications about pair and policy events. For each address, you configure which events trigger a message.
Setting Up the Outgoing Mail Server
Before you configure email notifications, the following setup is required:
-
Outgoing Mail Service: You must have an outgoing email service to relay email alerts and notifications.
The Email add-on supports the Simple Mail Transfer Protocol (SMTP), a standard server-to-server protocol that is used to transfer mail between computers. You need the DNS name of the SMTP mail server to use. You can also use an IPv4 IP address if your mail service provider allows it. The SMTP server must have Internet access if you want to send messages to external email addresses.
-
Mail Relay: You must configure the outgoing email service to support and allow mail relay.
The Email add-on supports using either authenticated or anonymous SMTP relay. Your email service provider must support and allow the method you choose.
When you use authenticated mail relay, you must provide a valid email address and password to use for the notification sender. The email address does not need to be the address of a specific individual. It can be a friendly address that is recognizable to recipients, such as ndfs_administrator@example.com.
The email address is authenticated against the authentication mechanisms each time notification emails are sent. If the password changes for this account, you must update the password in the Email add-on.
-
Port: You must specify the port number of the message submission port to use for the outgoing email service. Typical outgoing ports are 25 and 587. If you have a firewall protecting your perimeter network, you must enable an exception for the port to ensure that the traffic is allowed to pass.
-
SSL: Determine if your outgoing email service provider requires SSL. Security-enhanced communication uses SSL to encrypt the SMTP session, including the user name, the password, and the message data.
-
Log in to the DynamicFS server as the Administrator user or as a user with Administrator privileges.
-
Right-click the icon (
 ) in the notification area, then select >
-
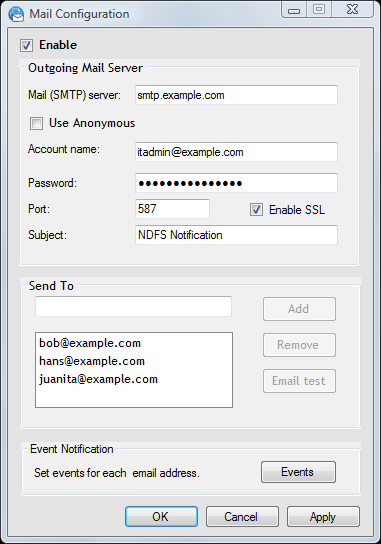
In the Mail Configuration dialog box, click the check box to enable the add-on.
-
Specify the settings.
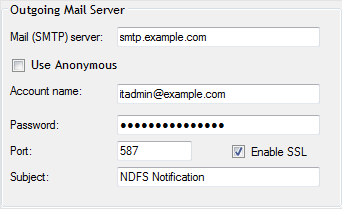
Use the following sample values as a guide. Ensure that you use the values for your outgoing mail server.
Mail Server Parameter
Description
Sample Value
Mail (SMTP) server
Specify the DNS name or IP address (IPv4 format) of the outgoing SMTP mail server used by your email service provider.
smtp.example.com
Use anonymous
You can use anonymous mail relay only if it is supported by your mail service provider. The option disables the fields for using an authenticated email address.
Select the check box.
Account name and password
If you use authenticated mail relay, specify an email address and password for a valid account with the email service provider. This address is used as the sender of outgoing email messages.
itadmin@example.com
password
Port
Specify the port number to use for outgoing email messages. The number is required by your outgoing email service provider. (Default: 587)
587
Enable SSL
Specify this option if your service provider requires SSL.
Select the check box.
Subject
Specify the text to use as the default portion of the subject in your outgoing email notification messages. The server name and notification event type are automatically appended to this text. (Default: NDFS Notification)
SiteA NDFS Notification
-
Click or to save and apply the changes.
The changes take effect without restarting the Service.
-
To configure notifications, continue with Setting Up the Email Address and Events to Send.
Setting Up the Email Address and Events to Send
After you have enabled Email notifications and set up the outgoing mail server information, you can set up email addresses and events to send.
-
Log in to the DynamicFS server as the Administrator user or as a user with Administrator privileges.
-
Right-click the icon (
) in the notification area, then select >
-
Under , specify one to nine email addresses that receive email notifications:
-
Add: Type an email address (such as bob@example.com), then click .
-
Remove: Select an email address in the list, then click .
-
-
For each recipient, use the Events dialog box to set which events trigger messages to be sent to the user. No events are configured by default.
-
After you have entered the email addresses, click .
-
Select an email address.
-
Select the check box next to the events that will trigger messages to be sent to the selected address, or click to choose all events.

-
Click to save the settings.
-
Repeat this process for each email address.
-
-
(Optional) Select an email address in the list, then click to send a test message.
-
Click or to save and apply the changes.
The changes take effect without restarting the Service.
Removing or Modifying an Email Address
You can remove an email address from the Notification Service by using the Email Configuration dialog box. You cannot modify an email address for a user. To use a different email address for the user, you must remove the old email address, then configure the new email address and assign events for it.
-
Log in to the DynamicFS server as an Administrator user or Domain Admin user.
-
Right-click the icon, then select >
-
In the Email Configuration dialog box, select the old email address, then click .
-
Specify the new email address, click , then click to accept the changes.
-
Click , select the new email address, set the events for the address, then click .
-
(Optional) Select an email address in the list, then click to send a test message.
-
Click or to save and apply the changes.
The changes take effect without restarting the Service.
Viewing or Modifying the Events for an Email Address
You can modify the events selected for an email address by using the option in the Email Configuration dialog box.
-
Log in to the DynamicFS server as an Administrator user or Domain Admin user.
-
Right-click the icon, then select >
-
In the Email Configuration dialog box, select .
-
In the Email Event Selection dialog box, select an email address, then view or change the events that are selected.
-
Click to accept the changes and return to the Email Configuration dialog box.
-
Click or to save and apply the changes.
The changes take effect without restarting the Service.