8.2 Creating a Pair
Two wizards are available for configuring Dynamic File Services pairs:
-
Setup Wizard: Sets up a new pair, a new policy, and a new policy schedule. It automatically associates the pair to the policy, and the policy schedule to the policy. The pair, policy, and schedule are configured when you click . The associated policy is enforced for the pair at its next scheduled run, or you can start policy runs manually by using .
The Setup Wizard opens automatically when you connect to a DynamicFS server if there are no pairs or policies currently defined for the server. The Setup Wizard is convenient to use when you want to create a new pair and its policy at the same time. You can associate additional policies at any time.
-
Pair Wizard: Sets up a new pair and allows you to select none, one, or multiple existing policies to associate with the pair. The associated policies are enforced for the pair at their next scheduled runs, or you can start policy runs manually by using . You can associate additional policies at any time.
IMPORTANT:No data is moved between the primary and secondary locations in a pair until you set up policies to do so. You can also use the option for the pair.
-
If you plan to use a remote share when creating a pair, create the share in the secondary location.
Shares in an Active Directory Domain: You must publish the share as described in Section 8.3, Preparing Remote Shares for Use in a Pair. Ensure that your system meets the requirements in Section 4.9, Using Remote Shares in an Active Directory Domain.
Shares in a Workgroup: Ensure that your system meets the requirements in Section 4.10, Using Remote Shares in a Workgroup.
-
Launch the Management Console, then connect to the DynamicFS server that you want to manage.
-
Launch the Setup Wizard or the Pair Wizard:
-
Setup Wizard: Select the server, then select > . You can also right-click the server, then select .
If no pairs or policies exist on the server when you connect to it, the Setup Wizard opens automatically to an overview of benefits. Review them, then click .
-
Pair Wizard: Select the folder, then select > . You can also right-click the folder, then select .
The wizard opens to the Pair Type page.
-
-
Specify the pair type as or , then click .
-
On the Pair Paths page, specify the primary and secondary paths to use for the pair:
-
Browse to select the primary path, then click :
-
Local path:
Browse the local drives on the DynamicFS server. You can right-click a folder, then select to add a folder if the path is on a local device, and not on a remote share.
-
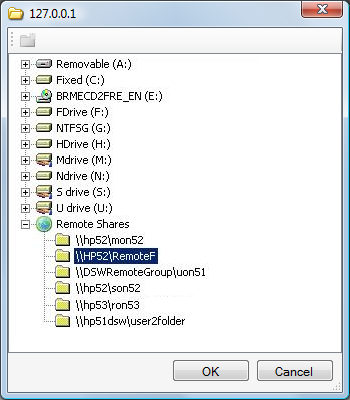
Remote share path:
Remote shares are available if you are specifying the primary path for a retention pair. Browse the remote shares that have been published in Active Directory. For information, see Section 8.3, Preparing Remote Shares for Use in a Pair.
You can alternately type the UNC path of a local or remote share. The path name entry is case-insensitive for local paths, but it is case-sensitive for remote paths.
-
-
Browse to select a secondary path, then click :
-
Local path:
Browse the local drives on the DynamicFS server. You can right-click a folder, then select to add a folder if the path is on a local device, and not on a remote share.
-
Remote share path:
Browse the remote shares that have been published in Active Directory. For information, see Section 8.3, Preparing Remote Shares for Use in a Pair.
You can alternately type the UNC path of a local or remote share. The path name entry is case-insensitive for local paths, but it is case-sensitive for remote paths.
-
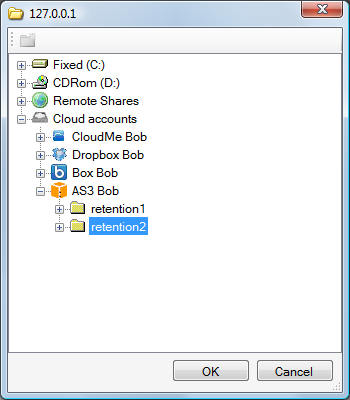
Cloud storage path:
For a retention pair, if you have predefined the cloud account, you can browse the cloud accounts to select a path in your cloud storage.
-
-
Click to continue.
-
-
If a network share does not exist on the primary path of a standard pair, a message pops up to remind you that the share is required for users to access files on the pair via the merged view. Click to dismiss the message.
You can create the share at any time before you give users access to the files. For information, see Section 8.4, Providing Users with a Merged View of the Files in a Standard Pair.
-
On the Pair Name page, specify a unique name (up to 32 characters) for the pair on the selected server, then click .
For information, see Section 4.12, Naming Conventions for Pairs and Policies.
-
If you are using the Setup Wizard, create a policy for the pair and a schedule for the policy. Otherwise, skip this step and go to Step 9.
-
Create a new policy.
For details, see Section 9.2, Creating a Policy. The new policy is automatically associated with the pair.
-
On the Policy Direction page, specify the direction that files are to be moved, then click .
Retention pairs are allowed to move files only from primary to secondary.
-
On the Policy Filters page, specify one or more filter options to apply for this policy, then click .
-
On the Policy Name and Description page, specify a unique name for the policy on the selected DynamicFS server, optionally add a more detailed description for the policy, then click to continue.
-
-
Create a new policy schedule.
For details, see Section 10.2, Creating a Policy Schedule. The new schedule is automatically associated with the policy.
-
On the Policy Schedule page, select a frequency option from the drop-down list.
-
Specify when the policy will run, then click .
-
On the Schedule Name and Description page, specify a unique name for the schedule on the selected DynamicFS server, optionally add a more detailed description for the schedule, then click .
-
-
Review the setup summary for the , , and , then click .
In the Management Console, the newly created pair, policy, and schedule are listed under the appropriate folders under the server. The policy is automatically associated with the pair. The schedule is automatically associated with the policy. The policy rules are enforced for the pair at the next scheduled run time of the policy. You can also run the policy manually by using the option.
-
-
If you are using the Pair Wizard, click to select one or more existing policies to associate them with the pair, click , then click .
The pair is created and appears in the list for the server. The selected policies are associated with the pair. If the policy is associated with a schedule, the policy rules are enforced for the pair at the next scheduled run time of the policy. Unscheduled and scheduled policies can be run manually by using the option.
-
(Optional) After you have configured the pair, you can use any of the following methods to associate the pair with other policies:
-
Policy Wizard: Use the Policy Wizard to create a new policy and associate it with the pair.
-
Pair Properties > Policies: Use the > tab to select one or more policies to associate with a selected pair. For information, see Section 9.6.4, Associating or Disassociating Policies with a Pair.
-
Policy Properties > Pairs: Use the > tab to select one or more pairs to associate with a selected policy. For information, see Section 9.6.3, Associating or Disassociating Pairs with a Policy.
-
-
If a network share does not exist on the primary path of a standard pair, continue with Section 8.4, Providing Users with a Merged View of the Files in a Standard Pair.