iMonitor Architecture
- Anatomy of an iMonitor Page
- Modes of Operation
- iMonitor Features Available on Every Page
- NetWare Remote Manager Integration
- Configuration Files
Anatomy of an iMonitor Page
Each iMonitor page is divided into four frames or sections: the Navigator frame, the Assistant frame, the Data frame, and the Replica frame.
Figure 26iMonitor Frames

Navigator Frame: Located across the top of the page. This frame shows the server name where the data is being read from, your identity, and the icons you can click to link to other screens, including online help, login, server portal, and other iMonitor pages.
Assistant Frame: Located at the left side of the page. This frame contains additional navigational aids, such as links to other pages, items that help you navigate data in the Data frame, or other items to assist you with obtaining or interpreting the data on a given page.
Data Frame: Shows the detailed information about your servers that you request by clicking one of the links listed above. This is the only page you will see if your Web browser does not support frames.
Replica Frame: Lets you determine which replica you are currently viewing and provides links to view the same information from another replica or server's point of view. This frame appears only when you view pages where another replica of the requested data exists or where another replica might have a different view of the information being presented in the Data frame.
Modes of Operation
Novell iMonitor can be used in two different modes of operation: Direct mode and Proxy mode. No configuration changes are necessary to move between these modes. Novell iMonitor automatically moves between these modes, but you should understand them in order to successfully and easily navigate the eDirectory tree.
Figure 27Modes of Operation
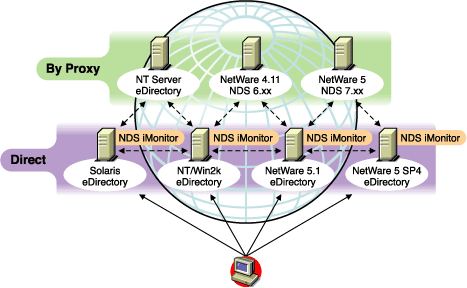
Direct Mode: Use this mode when your Web browser is pointed directly at an address or DNS name on a machine running the iMonitor executable and reading information only on that machine's local eDirectory DIB.
Some iMonitor features are server-centric; that is, they are available only to the iMonitor running on that machine. These features use local API sets that cannot be accessed remotely. Server-centric features in iMonitor include the DSTrace, DSRepair, and Background Process Schedule pages. When using Direct mode, all iMonitor features will be available on that machine.
Key features of Direct mode:
- Full server-centric feature set
- Reduced network bandwidth (faster access)
- Access by proxy still available for all versions of eDirectory
Proxy Mode: Use this mode when your Web browser is pointed at an iMonitor running on one machine, but is gathering information from another machine. Because iMonitor uses traditional eDirectory non-server-centric protocols for non-server-centric features, all previous versions of eDirectory beginning with NDS 6.x can be monitored and diagnosed. However, server-centric features use APIs that cannot be accessed remotely.
If you are in Proxy mode and want to switch to Direct mode for a different server, you can do so as long as the server has a version of eDirectory in which iMonitor has shipped. If the server you are gathering information on by proxy has iMonitor running, you will see an additional icon button in the Navigator frame. When you move the mouse pointer over the icon, you will see a link to the remote iMonitor on the remote server. If the server you are gathering information on by proxy is an earlier version of eDirectory, no additional icon is shown and you will always need to gather information on that server by proxy until it is upgraded to a version of eDirectory that includes iMonitor.
Key features of Proxy mode:
- Not every server in the tree must be running iMonitor in order to use most iMonitor features
- Only one server must be upgraded
- There is a single point of access for dial-in
- You can access iMonitor over a slower speed link while iMonitor accesses eDirectory information over higher speed links
- Previous NDS version information is accessible
- Server-centric features are available only where iMonitor is installed
iMonitor Features Available on Every Page
You can link to the Agent Summary, Agent Information, Agent Configuration, Trace Configuration, DSRepair, Reports, and Search pages from any iMonitor page by using the icons in the Navigator frame. You can also log in or link to the Novell Support Web page from any iMonitor page.
Login/Logout: The Login button is available if you are not logged in. A Logout button, which closes your browser window, is displayed if you are logged in. Unless all browser windows are closed, your iMonitor session remains open, and you will not need to log in again. You can see your login status on any page by looking at Identity in the Navigator frame.
Support Connection Link: The Novell logo in the upper right corner is a link to the Novell Support Connection Web page. This provides a direct link to the Novell Web site for current server patch kits, updates, and product-specific support.
NetWare Remote Manager Integration
On NetWare 5 and later servers, a link to NetWare Remote Manager is available to provide you with Web-based monitoring, diagnosis, and troubleshooting information for NetWare servers.
iMonitor is integrated with NetWare Remote Manager in the following ways:
- NetWare Remote Manager's lightweight Web server (httpstk.nlm) provides the first layer of the iMonitor architecture on the NetWare platform.
- iMonitor registers with NetWare Remote Manager (portal.nlm) so that links to iMonitor and other eDirectory-specific information are available through the NetWare Remote Manager interface.
These links are found under the Manage eDirectory section in the Remote Manager interface. Links to eDirectory agent health information are also found in the Diagnose Server section under Health Monitor in the eDirectory-related categories.
NetWare Remote Manager also registers with eDirectory, which allows iMonitor and NetWare Remote Manager to cross-reference each other for a more seamless movement between each tool.
Configuration Files
Configuration files are included with iMonitor to allow you to change or set default behavior or values in the utility.
The configuration files are text files containing configuration parameter tags together with their desired values. These files are located in the same directory as the iMonitor executable (which is usually in the same location as the Novell eDirectory executables) on NetWare and Windows, and in the /etc directory on Linux, Solaris, AIX, and HP-UX.
ndsimon
The ndsimon configuration file lets you modify trace file settings, control access to the server, set the maximum number of object to be displayed when listing a container or displaying search results, and specify the number of minutes of inactivity allowed before a connection is logged out.
| Server | Configuration File |
|---|---|
NetWare |
sys:\system\ndsimon.ini |
Windows NT and Windows 2000 |
install directory\novell\NDS\ndsimon.ini |
Linux, Solaris, AIX, and HP-UX |
/etc/ndsimon.conf |
There are two groups of parameters that you can set in the ndsimon configuration file.
- Parameters that apply to how the iMonitor executable itself runs
Except on NetWare, when the iMonitor executable loads, it will attempt to listen on the traditional HTTP port 80. If that port is in use, it will back off to port 8008. If that port is in use, iMonitor will then back off again, increasing the port by 2 (8010, 8012, etc.) up to 8078.
Where SSL is configured and available, a similar bind pattern is attempted. First, port 81 is tried, and then 8009, 8011, 8013, etc.
This allows iMonitor to coexist with a Web server running on the same server. However, on some platforms, iMonitor might load before the installed Web server does, or you might want iMonitor to bind to a port of your choice. Both regular and SSL ports can be configured using the HttpPort and the HttpsPort parameters respectively. Commented-out examples exist in the shipping configuration file. By default, iMonitor binds to all NIC addresses on the server where it loads. However, there is an Address parameter that you can use to specify a list of addresses, in comma delimited format, to bind to.
On NetWare, similar port selection rules are used, but they are controlled by the NetWare Remote Manager HTTP stack (httpstk.nlm) and work as specified in the NetWare Remote Manager documentation.
- Parameters that apply to specific features or pages
The configuration file that ships with iMonitor contains samples of the parameters that can be modified. These parameters are preceded by a pound sign (#). This indicates that they are commented out or not used when iMonitor parses the configuration file. For the shipping configuration file, iMonitor uses all internally bound default values for these parameters. To enable any of these parameters or to add any parameters, simply delete the # character from the beginning of the line.
ndsimonhealth
The ndsimonhealth configuration file lets you modify default settings for the Agent Health page. You can enable or disable Agent Health options, set reporting levels and ranges for options, and set server reporting levels.
| Server | Configuration File |
|---|---|
NetWare |
sys:\system\ndsimonhealth.ini |
Windows NT and Windows 2000 |
install directory\novell\NDS\ndsimonhealth.ini |
Linux, Solaris, AIX, and HP-UX |
/etc/ndsimonhealth.conf |
There are three types of options you can set in the ndsimonhealth configuration file.
- Enable/disable only options
To disable an option, remove the pound sign (#) from in front of the option and replace any levels listed after the colon (:) with OFF. To set reporting levels of these options, remove the # character from in front of the option and add a reporting level after the colon. Valid levels are WARN, MARGINAL, and SUSPECT. For these options, you can input only one reporting level.
- General options that take a range of settings
These options can be enabled and disabled or have their reporting level set, as well as the ranges for those reporting levels.
To set the reporting level for any of these options, use the option name followed by -active: and the reporting levels you want. For example, to set time_delta active, add the following line to the configuration file:
time_delta-active: WARN
To set time_delta inactive, add the following line to the configuration file:
time_delta-active: OFF
When entering ranges, the specified range is the range that this reporting level should not be displayed for.
See the time_delta example below for an example of how to set an option to be active for all three reporting levels and how to set the ranges. In this example, anything not in the range -2 to 2 is at least marginal, anything not in the range -5 to 5 is at least suspect, and anything not in the range -10 to 10 is a warning.
time_delta-active: WARN | SUSPECT | MARGINAL
time_delta-Min_Warn:      -10
time_delta-Min_Suspect:    -5
time_delta-Min_Marginal:   -2
time_delta-Max_Marginal:    2
time_delta-Max_Suspect:     5
time_delta-Max_Warn:        10
For help on any of these options, enter the following URL in iMonitor:
http://XXX.XXX.XXX.XXX:PORT/nds/help?hbase=/nds/health/OPTION_NAME
XXX.XXX.XXX.XXX:PORT is the IP address and port where iMonitor can be reached, and OPTION_NAME is the name of the option you want help on (for example, time_delta).
To view the currently set levels and ranges, use your browser to go to the health page that contains the option you are interested in, then add the following to the end of the URL line in the browser:
&op=setup
- Options that need custom or complex settings
There are three different server reporting levels that can be set:
- WARN detects servers running a version of eDirectory that should be upgraded as soon as possible.
- SUSPECT detects servers running a version of eDirectory that should be noted for upgrade.
- MARGINAL detects servers running a version of eDirectory that is not current.
These options set the reporting level if the server version falls within the specified range.