Installing Novell eDirectory on Windows
This section contains the following information:
- Installing or Updating Novell eDirectory 8.7.3 on Windows NT, 2000, or Server 2003
- Communicating with eDirectory through LDAP
- Installing NMAS Server Software
- Installing NMAS Client Software
- Installing into a Tree with Dotted Name Containers
Installing or Updating Novell eDirectory 8.7.3 on Windows NT, 2000, or Server 2003
You can install eDirectory 8.7.3 for Windows without the Novell Client. If you install eDirectory 8.7.3 on a machine already containing the Novell Client, eDirectory will use the existing Client, or update it if it is not the latest version.
-
At the Windows server, log in as Administrator or as a user with administrative privileges.
-
To resolve tree names, make sure that SLP is correctly configured on your network and that SLP DAs are stable.
For more information, see one of the following:
-
If you have Autorun turned off, run setup.exe from the NT directory on the Novell eDirectory 8.7.3 CD or from the downloaded file.
-
Select the components you want to install or upgrade.
You can install the following components separately or together.
- Install Novell eDirectory
Installs or upgrades eDirectory in a Windows-only or mixed server environment.
- Install Novell Client
Installs the Novell Client for Windows, or updates an existing version of the Novell Client.
- Install Novell eDirectory
-
Click Install.
The installation program checks for the following components before it installs eDirectory. If a component is missing or is an incorrect version, the installation program automatically launches an installation for that component.
- Novell eDirectory License
You can obtain an evaluation license file from the Novell eDirectory Eval License Download Web site.
To purchase eDirectory licenses, see the Novell eDirectory How To Buy Web site.
- NICI 2.6.4
For more information on the Novell International Cryptographic Infrastructure (NICI), see the NICI Administration Guide.
You might have to reboot the server after the NICI installation. The eDirectory installation will continue after the reboot.
- Novell Client for Widows NT/2000/XP.
IMPORTANT: The Novell Client is updated automatically if you have an older version of the Client already installed on the machine. For more information on the Client, see the Novell Client for Windows online documentation.
- Novell eDirectory License
-
Click Next to start the eDirectory installation.
-
View the license agreement, then click I Accept.
-
Select a language for the installation, then click Next.
-
Specify or confirm the installation path, then click Next.
-
(New installations only) Select an eDirectory installation type, then click Next.
Install eDirectory into an Existing Tree incorporates this server into your eDirectory network. The server can be installed into any level of your tree.
Create a New eDirectory Tree creates a new tree. Use this option if this is the first server to go into the tree or if this server requires a separate tree. The resources available on the new tree will not be available to users logged in to a different tree.
-
Provide information in the eDirectory Installation screen, then click Next.
- If you are installing a new eDirectory server, specify a Tree name, Server object context, and Admin name and password for the new tree.
- If you are installing into an existing tree, specify the Tree name, Server object context, and Admin name and password of the existing tree.
- If you are upgrading an eDirectory server, specify the Admin password.
For information on using dots in container names, see Installing into a Tree with Dotted Name Containers.
-
(New installations only) In the HTTP Server Port Configuration page, specify the ports to use for the eDirectory administrative HTTP server, then click Next.
IMPORTANT: Make sure that the HTTP stack ports you set during the eDirectory installation are different than the HTTP stack ports you have used or will use for Novell iManager. For more information, see the Novell iManager 2.0.x Administration Guide.
-
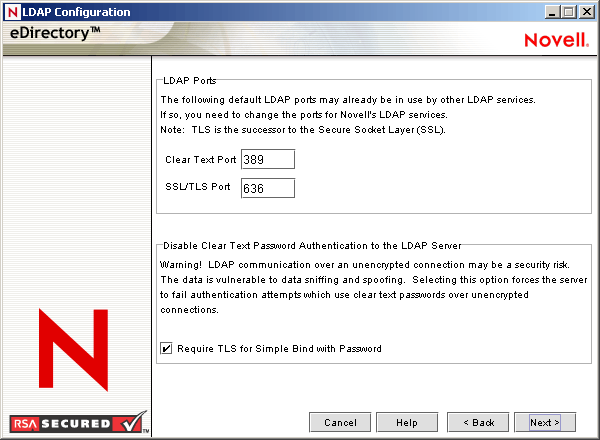
(New installations only) In the LDAP Configuration page, specify which LDAP ports to use, then click Next.
For more information, see Communicating with eDirectory through LDAP.
-
Select the NMASTM login methods you want to install, then click Next.
See Installing NMAS Server Software and Installing NMAS Client Software for more information.
-
Click Finish to complete the eDirectory installation.
Communicating with eDirectory through LDAP
When you install eDirectory, you must select a port that the LDAP server monitors so that it can service LDAP requests. The following table lists options for various installations:
Port 389, the Industry-Standard LDAP Clear-Text Port
The connection through port 389 is not encrypted. All data sent on a connection made to this port is clear. Therefore, a security risk exists. For example, LDAP passwords can be viewed on a simple bind request.
An LDAP Simple Bind requires only a DN and a password. The password is in clear text. If you use port 389, the entire packet is in clear text. By default, this option is disabled during the eDirectory installation.
Because port 389 allows clear text, the LDAP server services Read and Write requests to the Directory through this port. This openness is adequate for environments of trust, where spoofing doesn't occur and no one inappropriately captures packets.
To disallow clear passwords and other data, select the Require TLS for Simple Bind with Password option during installation.
As the following figure illustrates, the page gives defaults of 389, 636, and Require TLS for Simple Bind with Password.
Figure 2Defaults for the LDAP Configuration Screen
Scenario: Require TLS for Simple Bind Is Enabled: Olga is using a client that asks for a password. After Olga enters a password, the client connects to the server. However, the LDAP server does not allow the connection to bind to the server over the clear-text port. Everyone is able to view Olga's password, but Olga is unable to get a bound connection.
The Require TLS for Simple Bind discourages users from sending observable passwords. If this setting is disabled (that is, not checked), users are unaware that others can observe their passwords. This option, which does not allow the connection, only applies to the clear-text port.
If you make a secure connection to port 636 and have a simple bind, the connection is already encrypted. No one can view passwords, data packets, or bind requests.
Port 636, the Industry-Standard Secure Port
The connection through port 636 is encrypted. TLS (formerly SSL) manages the encryption. By default, the eDirectory installation selects this port.
The following figure illustrates the selected port.
Figure 3LDAP Server Connections Page in iManager
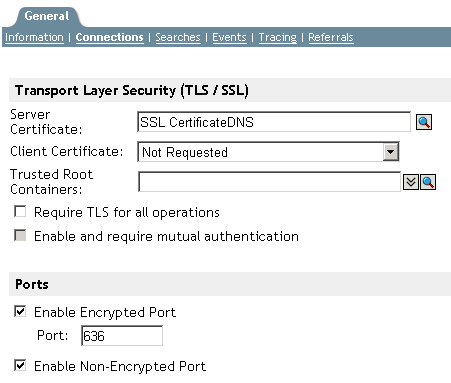
A connection to port 636 automatically instantiates a handshake. If the handshake fails, the connection is denied.
IMPORTANT: This default selection might cause a problem for your LDAP server. If a service already loaded on the host server (before eDirectory was installed) uses port 636, you must specify another port.
Installations earlier than eDirectory 8.7 treated this conflict as a fatal error and unloaded nldap.nlm. The eDirectory 8.7.3 installation loads nldap.nlm, places an error message in the dstrace.log file, and runs without the secure port.
Scenario: Port 636 Is Already Used: Your server is running Active Directory*. Active Directory is running an LDAP program, which uses port 636. You install eDirectory. The installation program detects that port 636 is already used and doesn't assign a port number for the Novell LDAP server. The LDAP server loads and appears to run. However, because the LDAP server does not duplicate or use a port that is already open, the LDAP server does not service requests on any duplicated port.
If you are not certain that port 389 or 636 is assigned to the Novell LDAP server, run the ICE utility. If the Vendor Version field does not specify Novell, you must reconfigure LDAP Server for eDirectory and select a different port.See ""Verifying That the LDAP Server Is Running"" in the Novell eDirectory 8.7.3 Administration Guide for more information.
Scenario: Active Directory Is Running: Active Directory is running. Clear-text port 389 is open. You run the ICE command to port 389 and ask for the vendor version. The report displays Microsoft*. You then reconfigure the Novell LDAP server by selecting another port, so that the eDirectory LDAP server can service LDAP requests.
Novell iMonitor can also report that port 389 or 636 is already open. If the LDAP server isn't working, use Novell iMonitor to identify details. See ""Verifying That the LDAP Server Is Running"" in the Novell eDirectory 8.7.3 Administration Guide for more information.
Installing NMAS Server Software
Novell Modular Authentication ServiceTM (NMAS) server components are installed automatically when you run the eDirectory installation program. You will need to select the login methods you want to install.
Select the login methods that you want to install into eDirectory by checking the appropriate check boxes. When you select a login method, a description of the component appears in the Description box. For more information on login methods, see "Managing Login and Post-Login Methods and Sequences" in the Novell Modular Authentication Service Administration Guide.
Click Select All if you want to install all the login methods into eDirectory. Click Clear All if you want to clear all selections.
The NDS login method is installed by default.
Installing NMAS Client Software
The NMAS client software must be installed on each client workstation where you want to use the NMAS login methods.
-
At a Windows client workstation, insert the Novell eDirectory 8.7.3 CD.
-
From the NMAS directory, run nmasinstall.exe.
-
Select the NMAS Client Components check box.
Optionally, you can select the NICI check box if you want to install this component.
-
Click OK, then follow the on-screen instructions.
-
Reboot the client workstation after the installation completes.
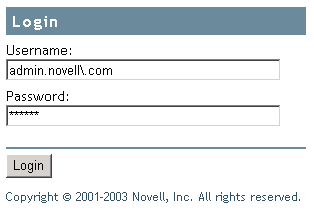
Installing into a Tree with Dotted Name Containers
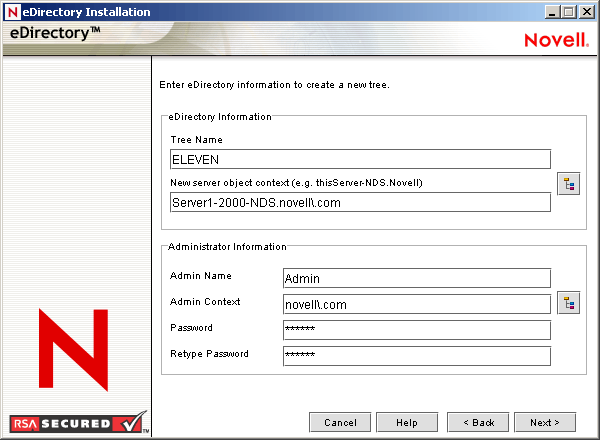
You can install a Windows server into an eDirectory tree that has containers with dots in the names (for example, O=novell.com or C=u.s.a). Using containers with dotted names requires that those dots be escaped with the backslash character. To escape a dot, simply put a backslash in front of any dot in a container name. See Figure 4 for an example.
You cannot start a name with a dot. For example, you cannot create a container named ".novell" because it starts with a dot ('.').
Figure 4eDirectory Installation Information Screen
IMPORTANT: If your tree has containers with dotted names, you much escape those names when logging into utilities such as iMonitor, iManager, and DHost iConsole. For example, if your tree has "novell.com" as the name of the O, enter username.novell\.com in the Username field when logging in to iMonitor (see Figure 5).
Figure 5iMonitor Login Screen