

At the NT/2000 server, log in as Administrator or as a user with administrative privileges.
Insert the eDirectory CD. If you have Autorun turned off, run SETUP.EXE from the NT directory.
Select Install Novell Directory Services.
Installing the other listed components is not necessary unless you are also provisioning GroupWise® as the messaging system. If you are using GroupWise, then you must install ConsoleOne®.
Click Install.
The installation program checks for the following components before it installs eDirectory. If a component is missing or is an incorrect version, the installation program automatically launches an installation for the component.
The installation of these components might take several minutes.
- Novell ClientTM for Windows NT/2000/XP.
For more information on the Novell Client for Windows NT/2000/XP, see the Novell Client for Windows online documentation.
NOTE: If the Novell Client must be installed or updated, the computer will be restarted after this installation. When prompted to log in, log in to the Workstation Only.
- Novell licensing
You can obtain an evaluation license file from the Novell eDirectory Eval License Download Web site.
To purchase eDirectory licenses, see the Novell eDirectory How To Buy Web site.
- NICI 2.4.0
For more information on the Novell International Cryptographic Infrastructure, see the NICI Administration Guide.
At the Welcome screen, click Next.
Follow the online instructions in the Novell eDirectory Product Installation Wizard to view and accept the license agreement, then click Next.
Select a language for the installation, then click Next.
Specify an installation path, then click Next.
Select Create a New eDirectory Tree, then click Next.
Enter information in the eDirectory Installation dialog box.
IMPORTANT: Use only characters that are valid in LDAP. LDAP supports alphanumeric characters, does not support spaces in a name, requires an alpha character to begin a name, and supports only one non-alphanumeric character, the dash (-).
Figure 12
eDirectory Installation Information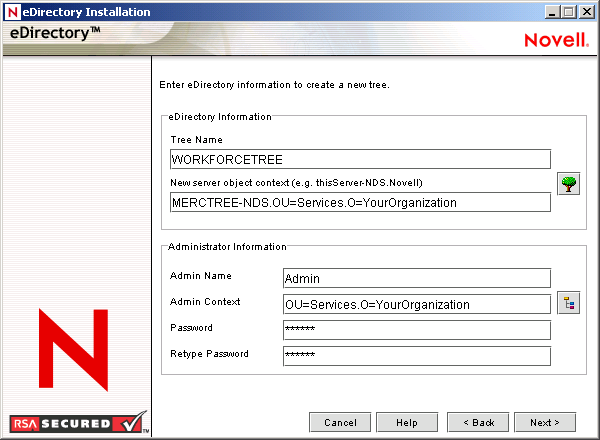
Tree Name: You are setting up the Workforce Tree that will be used by all Novell Nsure Resources components. Choose a tree name that will indicate that this is the Workforce Tree.
New Server: For New Server object context, enter the server name inside the Services container inside the organization name you choose.
You must use Services as the container. This container is referenced by all of this solution's rules and style sheets.
Admin Name: The Admin name can be simply Admin. The context for this object should be inside Services.
Admin Context: Use Services as the container for the admin user.
Password/Retype Password: Set the password for the admin user.
Click Next, then in the HTTP Server Port Configuration dialog box, specify which ports to use for the eDirectory administrative HTTP server, then click Next.
IMPORTANT: Make sure that the HTTP stack ports you set during the eDirectory install are different than the HTTP stack ports you have used or will be using for Novell iManager. If you're installing eDirectory and iManager on the same computer, you'll need to change the port. For more information, click Help.
In the Certificate Server dialog box, select Create an Organizational Certificate Authority, then click Next.
With the exception of an eDirectory account system, lab systems will not use secure connections. If you are provisioning an eDirectory account tree as part of the lab configuration, you'll use the Certificate Authority at a later time.
In the LDAP Configuration dialog box, specify which LDAP ports to use.
IMPORTANT: The default settings should work for the lab implementation. However, if you'll be running other LDAP applications, like the Exchange driver or Active Directory driver on this same computer, you should change the Clear Text Port number to a different number now to prevent conflicts later.
Deselect the Require TLS for Simple Bind option so that clear text passwords will be allowed in the lab implementation, then click Next.
Accept the defaults on the NMAS Login Methods dialog box, then click Next.
At the Summary page, click Finish.
For more detailed information about eDirectory, refer to the eDirectory Documentation Web site.
Continue with the next section, Setting up DirXML on a Windows NT/2000 Server .