7.2 Adding Your Exchange Account to Evolution
After you have installed Evolution Exchange, you need to set up access for your Exchange account on both the Exchange server and within Evolution.
7.2.1 Exchange Server Settings
Check with your system administrator to ensure that:
-
You have a valid account on the Exchange server.
-
You are permitted to access the account with WebDAV. This is the default setting for the Exchange server, so unless your system administrator has specifically turned it off, no changes should be necessary.
The Novell® Web site Knowledgebase has additional information about checking to make sure that your Exchange server accepts connections from Evolution.
7.2.2 Standard Configuration Tool for Evolution Exchange
When you know that your server is ready for you to connect, you are ready to add your Exchange account to Evolution Exchange.
Simple Configuration Tool for Evolution Exchange
Evolution Exchange comes with a simple account creation tool for Exchange accounts.
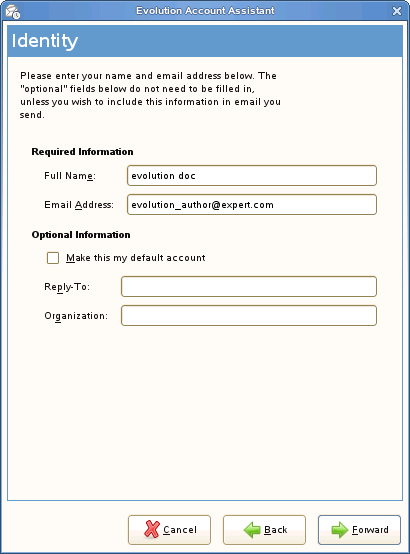
If you have no accounts configured, the simple account configuration assistant starts when you start Evolution. It asks only for the Outlook Web Access URL, and your username and password. Evolution Exchange determines the remaining information for you.
If the simple account configuration tool does not run automatically, you need to create an account manually. For more information on how to do this, see Creating a New Exchange Account.
Creating a New Exchange Account
-
Click Edit > Preferences or press Shift+Ctrl+S
-
Click Add.
-
Create the account following the procedure in Section 2.1, Starting Evolution for the First Time. Remember to select Microsoft Exchange as server type in the Receiving Mail section.
NOTE:You may configure only one Microsoft Exchange account in Evolution.
Configuring an Existing Account for Evolution Exchange Account
Use the following procedure to configure your existing account for Evolution Exchange:
-
Click Edit > Preferences or press Shift+Ctrl+S, then click Mail Accounts.
-
Select the account you want to convert, then click Edit to appear the Account Editor.
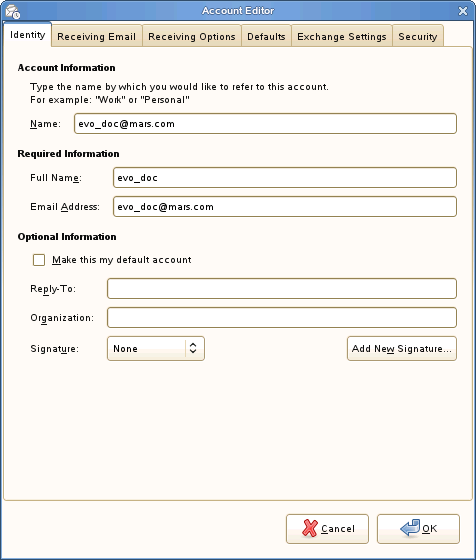
You can view Identity tab enabled.
-
Change your e-mail address as needed.
-
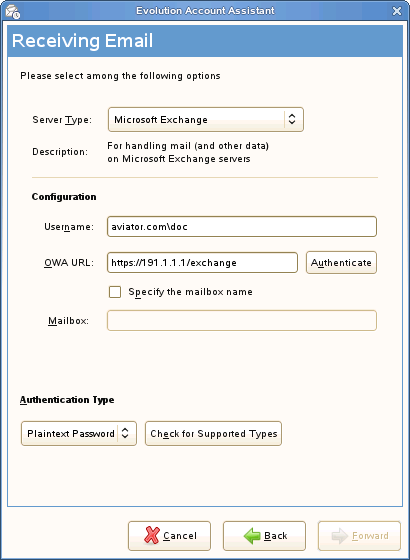
Click the Receiving Mail tab, then select Microsoft Exchange as your server type.

-
Type your user name, and the Outlook Web Access (OWA) URL. Click Authenticate, then enter the password at the prompt. The Exchange server authenticates your account.
-
Select your authentication method.
-
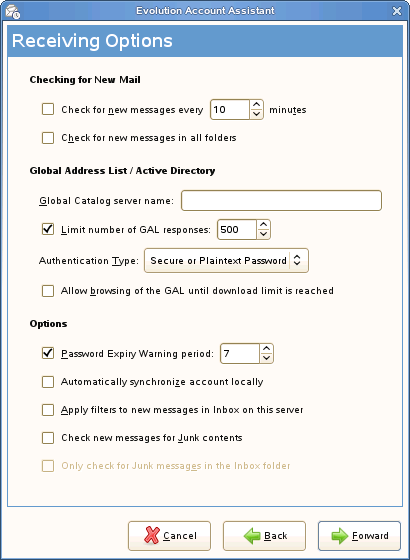
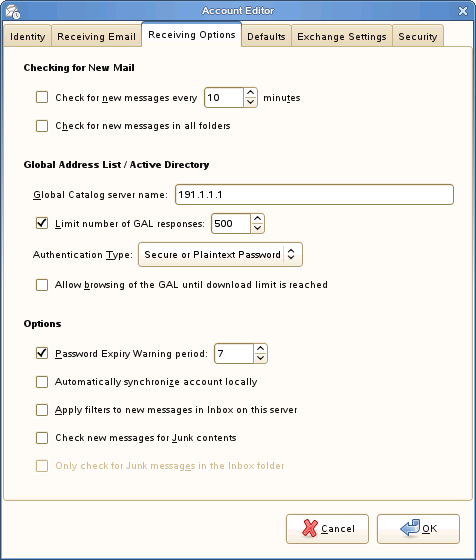
Click the Receiving Options tab, then specify how often to check for new mail, your Global Catalog server name and whether to apply filters to messages in your Inbox, check for junk, set a password expiry period, and any other settings you want to include.
-
Use the Defaults tab to define folders, send cc: or bcc: messages to certain IDs, and set options for message receipts.
-
Use the Security tab to set PGP and s/MIME options.
-
Quit Evolution and restart it.
Changes to Evolution Exchange accounts configuration are not active until you have restarted the application.