6.2 Scheduling With the Evolution Calendar
There are two types of events you can schedule with Evolution: appointments and meetings. An appointment is an event you schedule for yourself only, and a meeting is an event that you schedule multiple people for. You can also use the busy/free search for meetings to determine the availability of invitees.
6.2.1 Appointments
In Evolution, an appointment is an event you schedule for yourself.
Creating Appointments
-
Click File > New > Appointment.
or
Click Calendars on the Switcher, then click New > Appointment.
or
Double-click in a blank space on the calendar view to open an Appointment dialogue box. The appointment is created for that particular time on the calendar view against which you have double clicked on.
or
Select the required duration on the calender view and enter the summary.
-
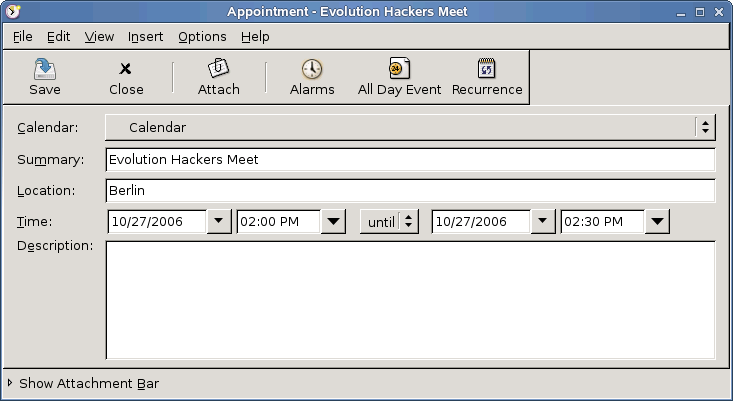
Select a calendar in the Calendar drop-down list. Type a brief summary of the appointment in the Summary field.
-
Type a location for the appointment in the Location field.
-
Select the date, time and set the duration
-
Enter a brief summary of the appointment in the description field.
-
To select this appointment as an all day event, click Options > All Day Event.
or
Click the All Day Event button on the toolbar.
-
If the event is an all day event, specify a starting and ending date.
-
If the event is not an all day event, specify a starting and ending time.
-
Select For to specify the duration.
or
Select Until to specify the ending time of the event.
-
Type the time zone information in the Time Zone field.
or
Click the globe to customize the time zone.
To hide or show the Time Zone field, click View > Time Zone.
-
To show the time as busy, click Options > Show Time as Busy.
-
(Optional) Type a category in the Categories field. To show or hide the Categories field, click View > Categories.
For more information on categories, see Classifications.
-
Type a description in the Description field.
-
To select an alarm for this appointment, click Alarm on the toolbar.
If you select an alarm, specify when and how you want the alarm to notify. For more information on reminders, see Reminders.
-
(Optional) To add an attachment to the appointment, drag and drop the attachment into the attachment bar.
or
Click the Attach button on the toolbar, or click Insert > Attachment and then browse to the attachment.
-
(Optional) Select a classification (Public, Private, or Confidential) by clicking > Options > Classifications.
-
(Optional) Click the Recurrence button on the toolbar.
or
Click Options > Recurrence, and specify whether you want the appointment to recur and how often.
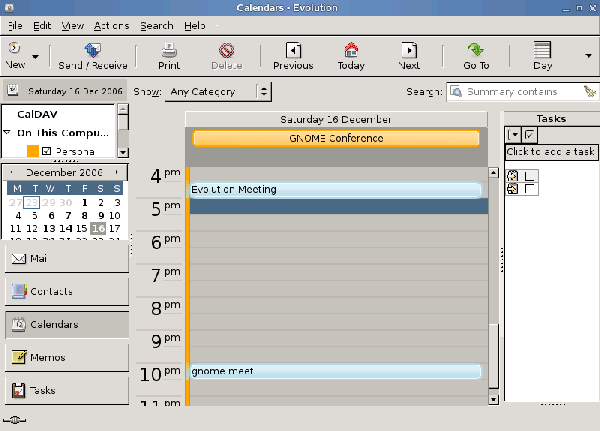
All Day Event
An All Day event appears at the top of a day's appointment list, in the header under the date, rather than inside. That makes it easy to have appointments that overlap and fit inside each other. For example, a conference might be an All Day appointment, and the meetings at the conference could be timed appointments. Appointments with specific starting and ending times can also overlap. When they do they display as multiple columns in the day view of the calendar.
If you create calendar appointments that overlap, Evolution displays them side by side in your calendar.
Reminders
You can have several Reminders for individual appointments, any time prior to the appointment you schedule. You can have one reminder of each of the following types:
-
Display: A notification pops up on your screen to remind you of your appointment.
-
Audio: Your computer delivers a sound alarm.
-
Program: You can run a program as a reminder. You can enter its name in the text field, or find it with the Browse button.
Apart from the above notifications, the Evolution alarm icon blinks in the notification area. To pause the alarm or view the event, click the notification icon.
To create a reminder:
-
When creating an appointment, click Alarms on the toolbar, or click Options > Alarms.
-
Select the alarm for the event.
-
Select Customize to add or remove customized alarms for the event.
If you have stored reminders in a local calendar, they work from the moment you log in. However, for reminders stored on any remote server like GroupWise Exchange which requires authentication, you must run Evolution at least once after logging in. No matter where the reminders are stored, you can quit Evolution and still be reminded of an upcoming appointment.
Classifications
If you are using a calendar on a Novell GroupWise® or Microsoft Exchange server, select a classification for the appointment to determine who can view it. Public is the default category, and a public appointment can be viewed by anyone on the calendar-sharing network. Private denotes one level of security, and Confidential an even higher level. The different levels vary depending on your server settings; check with your system administrator or adjust your delegation settings.
If you are using a Novell GroupWise or Microsoft Exchange server, other people on the server can check your schedule to see if you are available at any given time. If you have an appointment that is flexible or that you want to designate as Free rather than Busy time, select the Free box in the Show Time As section. Normally, appointments display as Busy.
You can categorize appointments in the same way you can categorize contacts.
-
Type a category in the Categories field.
-
Select the check box next to each category that matches the appointment you are creating.
-
To show or hide Categories field, click View > Categories.
HINT:You can add a new category to your category list by clicking Edit Master Category List, then click Click Here To Add A Category.
After you have selected your categories, click OK to assign these categories to the appointment. The categories you selected are now listed in the text box to the right of the Categories button.
Appointments with categories appear with icons in the calendar display, and you can also search for appointments by category. To display only the appointments in a particular category, select Category Is in the search bar at the top of the calendar, and select a category.
Recurrence
The Recurrence tool button lets you describe repetition in appointments ranging from once every day up to once every 100 years. You can then choose a time and date when the appointment stops recurring, and, under Exceptions, pick individual days when the appointment does not recur. Make your selections from left to right, and you form a sentence: “Every two weeks on Monday and Friday until January 3, 2008” or “Every month on the first Friday for 12 occurrences.”
After you have finished settings, click the disk icon in the toolbar to save and close the appointment editor window. If you want, you can alter an appointment summary in the calendar view by clicking it and typing. You can change other settings by right-clicking the appointment then choosing Open, or double-clicking the appointment.
6.2.2 Sending a Meeting Invitation
A meeting is an event you schedule for multiple people. Evolution can be used to schedule group meetings and help you manage responses to meeting requests.
When you create a meeting or group appointment, you can specify the attendees in several categories, such as “chair” or “required.” When you save the meeting listing, each attendee is sent an e-mail with the meeting information, which also gives them the option to respond.
If you don't need to collect attendance information when you're scheduling an event, and would rather just announce the event, right-click the meeting and select Forward as iCalendar. This opens a new e-mail message with the event notification attached as an announcement. Recipients can add the event to their calendars with one click, but it won't automatically send you e-mail about whether they plan to attend.
To schedule a meeting:
-
Click File > New > Meeting.
-
If you have multiple e-mail accounts, select the one to use by selecting an item in the Organizer field.
-
Select a calendar in the Calendar drop-down list.
-
Click Add to add the e-mail addresses of people you want to invite.
-
To remove an attendee from the list, select an attendee and press Remove.
-
To edit a field, select the field and click Edit.
-
Click View on the menu bar to show or hide the Type, Role, Status, and RSVP fields.
-
Type summary of the meeting in the Summary field.
-
Type a location for the meeting in the Location field.
-
To select this meeting as an all day event, click the All Day Event button on the toolbar.
-
If the event is an all day event, specify a starting date and an ending date.
-
If the event is not an all day event, specify a starting time and an ending time.
-
Select For to specify the duration or select Until to specify the ending time of the event.
-
Type the time zone information in the Time Zone field.
or
Click the globe to customize the time zone.
To hide or show the Time Zone field, click View > Time Zone.
-
(Optional) To set an alarm for this meeting, click Alarms on the toolbar, then specify when and how you want to the alarm to notify you.
For more information on reminders, see Reminders.
-
(Optional) To add an attachment to the appointment, drag and drop the attachment into the attachment bar.
or
Click the Attach button on the toolbar, or click Insert > Attachment and then browse to the attachment.
-
(Optional) Select a classification (Public, Private, or Confidential) by clicking > Options > Classifications.
-
(Optional) Click the Recurrence button on the toolbar.
or
Click Options > Recurrence, and specify whether you want the appointment to recur and how often.
-
To query free/busy information for the attendees, click the Free/Busy button on the toolbar.
or
Click Options > Free/Busy.
-
Click Save to save the meeting.
An e-mail is sent out to all the recipients, inviting them to your event.
NOTE:A meeting can have only one organizer, and only the organizer can add participants. You can designate yourself the organizer of the meeting, but if you are not the original organizer, you can create confusion in the scheduling process. If you want to invite additional people to a meeting without changing the organizer, it is best to forward the first organizer's message to the additional participants.
6.2.3 Accepting and Replying to a Meeting Request
Meeting requests are sent as iCal attachments. To view or respond to one, click the attachment icon and view it inline in the mail window. All the details are shown about the event, including time and dates. Then you can choose how to reply to the invitation. Your choices are:
-
Accept
-
Tentatively Accept
-
Decline
Click OK to send an e-mail to the organizer with your answer. The event is also added to your calendar if you accept.
After you add the meeting to your calendar, you can make changes to the information, but if the original organizer sends out another update, your changes might be overwritten.
6.2.4 Reading Responses to Meeting Requests
When you get a reply to a meeting invitation you sent, you can view it inline by clicking the attachment and selecting View Inline. At the bottom, you can click OK to update your attendee list.
6.2.5 Using the Free/Busy View
In addition to the standard meeting scheduling tools, you can use the Free/Busy view to check whether people are available in advance. The Free/Busy feature is normally a function of dedicated groupware servers such as Microsoft Exchange and Novell GroupWise. However, you can also publish Free/Busy information online, and access Free/Busy information published elsewhere. If not everyone you collaborate with publishes Free/Busy data, you can still use iCal event invitations to coordinate schedules with other people.
To access the free/busy view:
-
Click File > New > Meeting.
-
Click Add to add the e-mail addresses of people you want to invite.
-
Click the Free/Busy button on the toolbar, or click Options > Free/Busy.
-
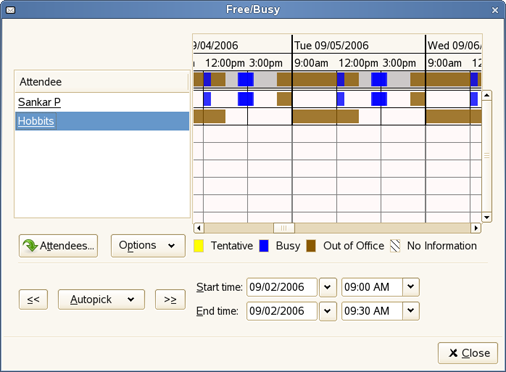
Adjust the meeting time, either by dragging the meeting borders or by using the Autopick buttons to choose a time automatically, then click Save and Close. Attendees on an Exchange server have the appointment updated automatically; others receive e-mail notification of any change in plans.
Attendee List: The Attendee List shows the people who have been invited to the appointment.
Schedule Grid: The Schedule Grid shows the published Free/Busy information for the people you have invited. This is where you compare schedules to find free time to schedule the appointment. Individuals have visible scheduling information only if they use the same Novell GroupWise or Microsoft Exchange server you do (that is, if they are in the same organization as you), or if they publish free/busy information at a URL you can reach and you have entered that URL into their contact cards using the contact editor.
Publishing Calendar and Free/Busy Information Without a Groupware Server
You can publish Calendar and Free/Busy information to a WebDAV, FTP server, or remote machine through secure shell or other Web server with HTTP PUT support. Check with your system administrator if you are not sure you have this functionality.
To set up Calendar or Free/Busy publishing:
-
Click Edit > Preferences, then click Calendar and Tasks.
-
Click the Calendar Publishing tab, click Add, then select the information you want to publish.
-
Select the frequency with which you want to upload data.
-
Select the calendars you want to display data for.
-
Specify the publishing location for the upload server.
-
Type your username and password.
-
Click OK.
To immediately publish calendar information, go to the Calendar tool and click Actions > Publish Calendar Information.
NOTE:Evolution allows you to specify a template to use when posting to the Free/Busy server.
Accessing Free/Busy Data Without a Groupware Server
If individuals give you a URL for Free/Busy data or for their Web calendar, you can enter it as part of the contact information in the Contacts tool. Then, when you schedule a meeting with them, Evolution looks up the schedule and displays it in the Free/Busy data.