 For detailed information about the Java Portlet 1.0 API, see the Java Community Process Web site:
Portal Guide
CHAPTER 14
This chapter describes strategies for developing portlets, with an emphasis on using the exteNd Director portlet tools and API for implementing value-added features. The following topics are covered:
For detailed information about the Java Portlet 1.0 API, see the Java Community Process Web site:
http://jcp.org/aboutJava/communityprocess/final/jsr168/index.html

When developing a portlet to run with the exteNd Director portal, the following steps are recommended:
Create the portlet class using exteNd Director development tools, as described in Portlet development tools.
Create at least one instance of the portlet class—called a portlet definition, as described in the section on creating a portlet definition.
Register at least one of your portlet definitions to create a portlet registration, as described in the section on registering a portlet definition.
Test the portlet by running the portlet registration directly in a browser, as described in the section on testing a portlet.
Add the portlet registration to the appropriate portal pages, as described in the section on adding portlets to portal pages.
For more information about portlet classes and portlet definitions, see the section on the portlet object model.
exteNd Director provides several tools for developing portlets:
Pageflow design tools allow you to create a specialized type of portlet called a pageflow without the need for Java coding. See Pageflow design tools.
Portlet Wizard simplifies the process of creating custom portlet classes using traditional Java coding techniques

exteNd Director provides design tools for developing pageflows. As the name suggests, pageflows are portlets that implement a flow of control between activities within a portlet session. These activities can model a sequence of user interactions or background processing tasks. The design tools in exteNd Director facilitate the process of defining and linking activities in a pageflow without requiring you to write Java code.
There are several pageflow design tools to choose from:
For an in-depth discussion about pageflows and how to use these design tools, see the Pageflow and Form Guide.
Consider using pageflow design tools for developing your custom logic when:
You can model your application requirements as a flow of control between activities within a single portlet session
Your application does not need to meet cross-platform requirements
Although you can implement most of your portlet application logic using pageflows, there are situations in which you may want to write custom portlet classes. The Portlet Wizard in exteNd Director simplifies the process by
Providing an interface for specifying portlet settings at design time
Automatically generating a barebones portlet class that includes the imports, method signatures, and required logic to get started
To learn how to create custom portlet classes using the Portlet Wizard, see the section on using the Portlet Wizard.
Consider using the Portlet Wizard for developing your custom logic when:
You cannot model your application requirements as a flow of control between activities within a single portlet session
Your portlets need to be lightweight, as in real-time applications
This section discusses the logic requirements for a portlet class and describes what the Portlet Wizard generates automatically.
At a minimum, a portlet class must include the following logic:
The Portlet Wizard automatically generates code for importing packages that are required for working with the exteNd Director portal:
Here is an example of a portlet class generated by the Portlet Wizard, based on its default settings:
  /**
   * Generated by Novell XSLT Code Generator, version 1.0.
   * This generated source file may be freely modified.
   */


  package com.novell.portlets;

  // Java imports
  import java.io.PrintStream;
  import java.io.PrintWriter;
  import javax.portlet.*;

  // Portal/Framework imports
  import com.sssw.fw.api.*;
  import com.sssw.portal.api.*;

  // Portlet API imports
  import com.novell.afw.portlet.api.EbiPortletConstants;


  /**
   * MyPortlet
   */
  public class MyPortlet extends GenericPortlet {

      // an Instance of a log for error/trace reporting
      private static EbiLog m_log =  com.sssw.fw.log.EboLogFactory.getLog(com.sssw.fw.log.EboLogFactory.PORTLET);

      /**
       * Get the initialization parameters from the portlet.xml file
       */
      public void init() throws PortletException {
      }

      /**
       * Helper method to serve up the mandatory view mode
       * @param request           an portlet request object
       * @param response          an render response object
       */
      public void doView( RenderRequest request, RenderResponse response ) throws PortletException, java.io.IOException {

           try {

              // Uncomment the code below when access to portal subsystems is needed
              /*
              // EbiContext stores information about the user's environment
              EbiContext ebiContext = com.sssw.fw.factory.EboFactory.createEbiContext( request, response, getPortletContext() );

              // Get a reference to the Portal Context object
              EbiPortalContext ebiPortalContext = ( EbiPortalContext ) request.getAttribute( EbiPortletConstants.EBI_PORTAL_CONTEXT );
              */

              PortletURL renderUrl = response.createRenderURL();
              response.setContentType( EbiPortletConstants.MIME_TYPE_HTML );
              renderUrl.setPortletMode( PortletMode.VIEW );

              PrintWriter writer = response.getWriter();

              // Build the screen of HTML, set it as the content
              StringBuffer sb = new StringBuffer();

              // Output code goes here
              sb.append( "View Mode" );
              sb.append( "<br></br>" );

              writer.print( sb.toString() );
          }
          catch ( Throwable e ) {
              // Log any errors generated
              m_log.error(e);
              new PortletException( e );
          }
      }

      /**
       * Process any requests that the portlet may have.
       * @param request           an action request object
       * @param actionResponse    an action response object
       */
      public void processAction (ActionRequest request, ActionResponse response) throws  PortletException, java.io.IOException {

          try {
              PortletContext portletContext = getPortletContext();

              // only log items if the log level indicates we should
              if ( m_log.isTrace() ) {
                  m_log.trace( "MyPortlet in processAction method" );
              }
              // Do "save" processing here if necessary, and then
              // set the portlet mode to be "View" after completion.
              response.setPortletMode( PortletMode.VIEW );
          }
          catch ( Throwable e ) {
              // Log any errors generated
              m_log.error( e );
              new PortletException( e );
          }
      }
  }
All portlets implement the Portlet interface, as defined by Java Portlet 1.0. The Portlet interface provides methods that the portlet container uses to manage the life cycle of each portlet:
Portlets can implement the Portlet interface directly or extend the GenericPortlet class, which implements the Portlet interface and also provides helper methods, as described in The GenericPortlet class.
When you develop portlets, you can extend the GenericPortlet class, rather than implement the Portlet interface directly.
The GenericPortlet class provides a default implementation for the Portlet interface. The advantage of extending GenericPortlet is that you gain access to its helper methods which simplify coding for the following tasks:
The following methods defined in the GenericPortlet interface implement the standard portlet modes, as described in Portlet modes. When you write portlets, you can override these methods with custom processing logic as needed for each mode you implement:
These methods perform the render operation in each mode.
NOTE: exteNd Director provides a default implementation for Edit mode, as described in Default implementation for Edit mode.
The following methods defined in the GenericPortlet interface implement portlet life cycle phases, as described in Portlet life cycle:
The following get methods defined in the GenericPortlet interface provide access to portlet configuration parameter:
|
Method |
Gets |
|---|---|
|
getInitParameter() |
Value of a named portlet initialization parameter |
|
getInitParameterNames() |
Names of all portlet initialization parameters |
|
getPortletConfig() |
Configuration object for the portlet |
|
getPortletContext() |
Portlet application context, as described in Portlet context |
|
getPortletName() |
Name of the portlet |
|
getResourceBundle() |
Resource bundle for a given locale |
In addition to supporting the standard context objects defined in Java Portlet 1.0, exteNd Director provides proprietary context objects that allow portlets to interact with the exteNd Director portal and communicate with other exteNd Director subsystems:
EbiContext, defined in the exteNd Director Framework system, is the interface through which all exteNd Director subsystems communicate. EbiContext stores information about the user environment, including the user's ID, session, and the response and request objects appropriate to the current user agent or browser.
You can also access information about other exteNd Director subsystems through the EbiContext, as described in Using EbiContext to access information about other subsystems.
The EbiContext object exists for the duration of a request. With each new request, the exteNd Director portal instantiates a new context object. Information that persists between requests is stored in the EbiSession object, available by calling a getEbiSession() method on EbiContext.
By contrast, there is one standard javax.portlet.PortletContext per portlet application. The standard PortletContext object does not provide access to exteNd Director-specific information in the portlet application.
Portlets can reference EbiContext objects by calling createEbiContext() methods on the EboFactory class for the Framework subsystem. To get an EbiContext context object, use:
EbiContext context = com.sssw.fw.factory.EboFactory.createEbiContext(req, res, getPortletContext());
You can get an EbiContext associated with a particular type of portlet request and response, as follows:
To get the action context object, use:
com.sssw.fw.factory.EboFactory.createEbiContext(javax.portlet.ActionRequest request, javax.portlet.ActionResponse response, javax.portlet.PortletContext ctxt)
This method returns an EbiActionContext object when you call it from the processAction() method of your portlet. EbiActionContext is an extension of EbiContext. The difference between an EbiContext object and an EbiActionContext object is that EbiActionContext is guaranteed to have an ActionRequest and an ActionResponse as the underlying wrapped objects.
To get the render context object, use:
com.sssw.fw.factory.EboFactory.createEbiContext(javax.portlet.RenderRequest request, javax.portlet.RenderResponse response, javax.portlet.PortletContext ctxt)
This method returns an EbiRenderContext object when you call it from your portlet's render(), doView(), doEdit(), or doHelp() method. EbiRenderContext is an extension of EbiContext. The difference between an EbiContext object and an EbiRenderContext object is that EbiRenderContext is guaranteed to have a RenderRequest and a RenderResponse as the underlying wrapped objects.
There are several ways for a portlet to access information about other exteNd Director subsystems through EbiContext:
Use EbiContext to access the context objects of other subsystems.
For example, the following code accesses the EbiContext of the Rule subsystem from the EbiContext of the Framework subsystem:
  ...
  //Get the EbiContext
  EbiContext context =   com.sssw.fw.factory.EboFactory.createEbiContext(req, res,   getPortletContext());
  ...
  // get the re context out of fw context
  com.sssw.re.api.EbiContext reContext =   com.sssw.re.factory.EboFactory.createEbiContext(context);
Pass EbiContext to methods implemented by exteNd Director manager objects to access subsystem-specific data.
For example, the following code passes the EbiContext of the Framework subsystem to the content manager to get information from the Content Management subsystem:
  ...
  //Get the EbiContext
  EbiContext context =   com.sssw.fw.factory.EboFactory.createEbiContext(req, res,   getPortletContext());
  ...
  //Find a document from the content management repository,
  String html_path = req.getParameter("html_path");
  ...
  EbiContentMgmtDelegate cmgr =   com.sssw.cm.client.EboFactory.getDefaultContentMgmtDelegate();
  EbiDocument doc = (EbiDocument)cmgr.lookupDirectoryEntry(context, html_path,EbiDocument.EL_DOCUMENT);
Like the standard javax.portlet.PortalContext, the EbiPortalContext object gives portlets access to portal-specific information. The difference is that EbiPortalContext provides methods that return information specific to the exteNd Director portal, such as data relating to personal, shared, and container pages.
An EbiPortalContext object is available to local portlets only, as a request attribute via request.getAttribute(EBI_PORTAL_CONTEXT).
Portlets that have deployed locally within a portal WAR can reference an EbiPortalContext object as a request attribute as follows:
  // Get a reference to the Portal Context object
  EbiPortalContext ebiPortalContext = ( EbiPortalContext )   request.getAttribute( EbiPortletConstants.EBI_PORTAL_CONTEXT );
IMPORTANT: Remote portlets cannot access EbiPortalContext. If a portlet is deployed external to the portal WAR, the context object stored in the request attribute is EbiContext, not EbiPortalContext.
For more information about local versus remote portlets, see the section on how portlet applications work with the exteNd Director portal.
You must set the content type on the render response for each portlet by calling the setContentType() method on the EbiResponse interface in the Framework subsystem. Java Portlet 1.0 requires that you set the content type before you get the Writer object, as shown in the doView() method in Code example.
IMPORTANT: Modes are based on content types. Therefore, It is strongly recommended that you set the content type before you set the mode in the doView(), doEdit(), and doHelp() methods—or in the render() method—of your portlet. This order of operations allows exteNd Director to validate modes against content type.
 To assign data types to preferences:
Open novell-portlet.xml or the portlet fragment deployment descriptor and scroll to the preference of interest.
TIP: Portlets that ship with exteNd Director store their preferences in novell-portlet.xml. Portlets that you create using the Portlet Wizard store their preferences in the portlet fragment deployment descriptor.
Add the <data-type> element as the first element in the preference definition.
Set the <data-type> element to one of these values:
For example, here is the descriptor for a preference called height that is set to type Integer:
  <preference name="height">
     <data-type>Integer</data-type>
     <required>false</required>
     <multi-valued>false</multi-valued>
  </preference>
Add elements associated with the data type as needed:
Save novell-portlet.xml or the portlet fragment deployment descriptor.
A complex preference is a preference that has its own set of nested preferences, as described in Complex preferences. Often complex preferences require custom editors to provide special formats or graphical user interface (GUI) controls for entering, updating, and validating preference values.
This section explains how to create complex preferences and custom preference editors.
To create a complex preference for a portlet:
Open novell-portlet.xml or the portlet fragment deployment descriptor and scroll to the portlet of interest.
TIP: Portlets that ship with exteNd Director store their preferences in novell-portlet.xml. Portlets that you create using the Portlet Wizard store their preferences in the portlet fragment deployment descriptor.
Create a new <preference> element in the <portlet-preferences> descriptor of the portlet.
  ...
  <portlet-preferences>
  ...
     <preference name="myPreference">
     </preference>
  ...
  </portlet-preferences>
  ...
Set the data type of the preference to Complex by adding a <data-type> descriptor:
  ...
  <portlet-preferences>
  ...
     <preference name="myPreference">
        <data-type>Complex</data-type>
     </preference>
  ...
  </portlet-preferences>
  ...
If you created a custom editor portlet for the complex preference, add a <config-portlet> element to the preference and set its value to the registration ID or name of the portlet:
  ...
  <portlet-preferences>
  ...
     <preference name="myPreference">
        <data-type>Complex</data-type>
        <config-portlet>MyComplexPrefEditor</config-portlet>
     </preference>
  ...
  </portlet-preferences>
  ...
NOTE: If you do not specify a custom editor for the complex preference, the default editor is used.
TIP: For guidelines on how to create a custom editor portlet, see Creating a custom editor portlet for a complex preference.
Add other descriptor elements to the preference as needed.
For example, if the complex preference is required, you need to add the <required> element to the preference descriptor:
  ...
  <portlet-preferences>
  ...
     <preference name="myPreference">
        <data-type>Complex</data-type>
        <required>true</required>
        <config-portlet>MyComplexPrefEditor</config-portlet>
     </preference>
  ...
  </portlet-preferences>
  ...
Save novell-portlet.xml or the portlet fragment deployment descriptor.
As a convenience, exteNd Director provides a base custom editor class for complex preferences. The base class is a portlet called ComplexPrefEditorPortlet that you can extend when writing your own custom editor. You can find the source code for this portlet in:
Novell exteNd install directory\Director\templates\TemplateResources\accessory-portlets\accessory_portlets_src.jar\ComplexPrefEditorPortlet.java.
By default, ComplexPrefEditorPortlet stores complex preference values as XML, but you can modify this portlet to store preference values any way you like—for example, as name-value pairs.
Custom editors for complex preferences must be written as portlets. For information about developing portlets, see The portlet development cycle.
When you edit the preferences of any portlet, a default preference editor displays a preference sheet. If the portlet has a complex preference that uses a custom editor, the preference sheet displays a link that you can click to launch the custom editor for that preference.
For example, here is the preference sheet for the Shortcut portlet, an accessory portlet that ships with exteNd Director:
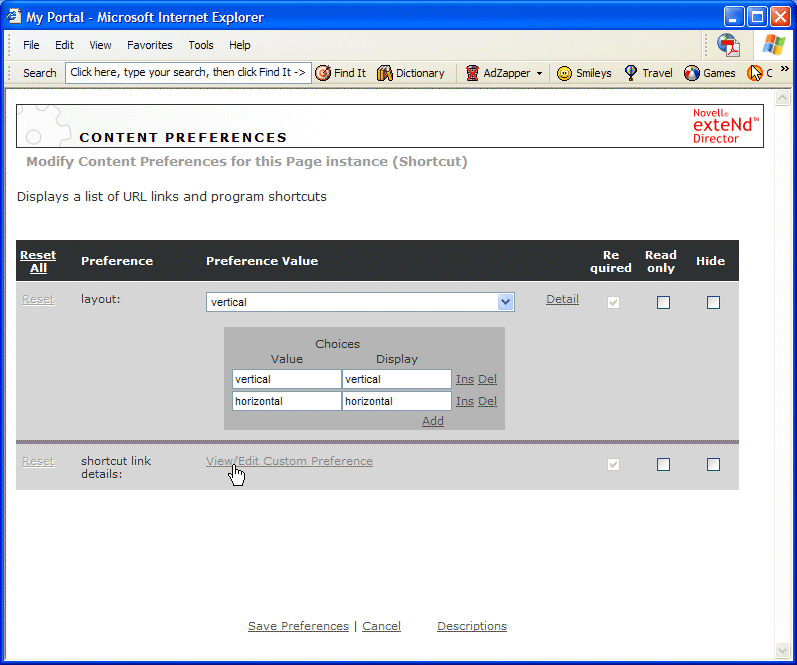
Notice the link next to the complex preference labeled shortcut link details. When you click the link, a custom editor called ShortcutComplexPrefEditor is launched for that preference.
To learn how to create a complex preference and specify a custom editor, see Creating a complex preference for a portlet.
For information about editing portlet preferences at registration time, see Modifying preferences for portlet registrations.
To learn about editing portlet preferences at page assignment time, see:
This section describes how to get information about portlet preferences and settings.
exteNd Director provides a flexible paradigm that allows you to apply portlet preferences at four levels of priority, listed here from lowest to highest priority:
Definition-level preferences are defined on the portlet definition and cannot be modified after deployment
Registration-level preferences are defined on a portlet instance at registration (also known as a portlet registration)
Page Assignment-level preferences are defined on a portlet registration when it is assigned to a page (also known as a portlet page instance).
User-level preferences defined for a portlet page instance by a user at runtime
For more information, see the section on portlet preferences.
To get and set preferences, you typically call methods on the standard javax.portlet.PortletPreferences interface. These methods get and set values for any given preference at the highest level of priority that is available.
For more advanced customization—for example to get and set preferences at specific levels of priority—see the methods provided by the EbiPortletInfoManager.
NOTE: You cannot get and set values for the nested preferences of a complex preference. For more information, see Complex preferences.
exteNd Director defines a group of settings that determine how portlets interact with the portal, as described in the section on portlet settings. You can get and set these values by calling methods on the EbiPortletSettings interface.
In exteNd Director, you can style a portlet that generates XML content by specifying the <style> element in the novell-portlet.xml deployment descriptor or in the associated portlet fragment deployment descriptor.
You can specify one <style> element per portlet, but each style can contain multiple user agents that point to device-specific XSL style sheets.
For more information about how to specify the <style> element, see the section that presents a look inside novell-portlet.xml or look at the novell-portlet.xml schema in:
extend5 install directory\Common\Resources\SchemaCatalog\novell-portlet.xsd
exteNd Director provides a default implementation for Edit mode.
If you enable the Edit option for a portlet, but don't support the Edit mode explicitly, exteNd Director displays a preference sheet of all the preferences that have been defined for the portlet and that can be edited by the end-user.
If you want to use this default implementation, follow these guidelines:
Make sure you define all the preferences of interest in the portlet fragment deployment descriptor of your portlet.
Enable the Edit option in the portlet fragment deployment descriptor, as follows:
<supported-option>edit</supported-option>
Do not enable Edit mode in the <supports> element of the portlet fragment deployment descriptor.
IMPORTANT: If you enable the Edit option and do support the Edit mode by implementing a doEdit() method, be sure to enable the Edit mode and Edit option in the portlet fragment deployment descriptor as follows:
Add a <portlet-mode> entry under the <supports> element:
  <supports>
    <portlet-mode>edit</portlet-mode>
  </supports>
Add a <supported-option> element:
<supported-option>edit</supported-option>
When you create a render or action URL by calling the appropriate method on javax.portlet.RenderResponse, you can set whether or not the URL is a secure URL by calling PortletURL.setSecure(true).
By default, the secure port is 443. If you have configured your server to use a different secure port, you can instruct the exteNd Director portal to use your port when creating portlet URLs. add a property to the PortalService config.xml as follows:
To specify a secure port for portlet URLs:
Add a property to the Portal subsystem configuration file, as follows:
  <property>
  <key>portlet-url-secure-port</key>
  <value>444</value>
  </property>
The exteNd Director API allows you to get and set cookies on a portlet by using methods in the EboCookieUtil class of the Framework subsystem.
To get cookies, you can call methods that propagate headers from the HTTP request down to the portlet request properties:
|
Method |
Description |
|---|---|
|
getCookieValue() |
Gets the value of a specified cookie |
|
getCookie() |
Gets a specified cookie from the HTTP request |
|
getCookies() |
Returns an array of cookies from the HTTP request |
To set cookies, you can call the addCookieToResponse() method, which propagates the set-cookie header from the PortletResponse properties to the HTTP response back to the client.
You can also get and set cookies by using the Request and Response scoped paths, as described in the chapter on working with scoped paths and XPaths.
Copyright © 2004 Novell, Inc. All rights reserved. Copyright © 1997, 1998, 1999, 2000, 2001, 2002, 2003 SilverStream Software, LLC. All rights reserved. more ...