Utility Tools
CHAPTER 17
The Deployment Plan Editor provides a quick and easy way to construct and populate deployment plans needed for deploying J2EE modules and applications to an exteNd application server. This chapter describes how to use the Deployment Plan Editor and includes these topics:
A deployment plan is an XML document that describes how a J2EE module (such as a WAR or an EJB JAR) or application (EAR) should run in the Novell exteNd Application Server or the SilverStream eXtend Application Server environment.
A deployment plan allows you to map declarative data from the deployment descriptor to the appropriate resource in the target server environment. For example, you can map resource references to data sources or map roles to users and groups. Settings in a deployment plan override those in the deployment descriptor, enabling you to customize a particular deployment as needed.
 For more information on the contents and structure of the deployment plans for each J2EE archive, see exteNd Application Server Deployment Plan DTDs.
NOTE: Other J2EE servers require different types of information (possibly in different formats) for deployment. To deploy J2EE archives on another J2EE server, see the server vendor's documentation.
This section describes how to use the Deployment Plan Editor to perform these tasks:
Make sure you have built the archive and added appropriate items to the deployment descriptor.
Open the project for which you want to create the deployment plan.
Select exteNd Server Deployment Plan and click OK.
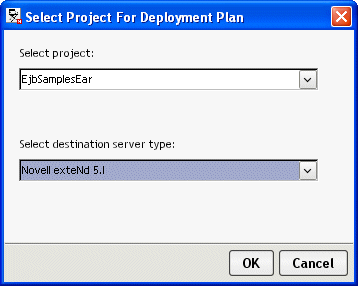
Choose a project from the Select project dropdown.
NOTE: When the project is an EAR, you see multiple files in the dropdown.
Choose the destination server type from the server type dropdown and click OK.
NOTE: The server type listed when the dialog opens is the one specified as the default in Deployment preferences (Tools>Preferences). For more information, see Deployment preferences.
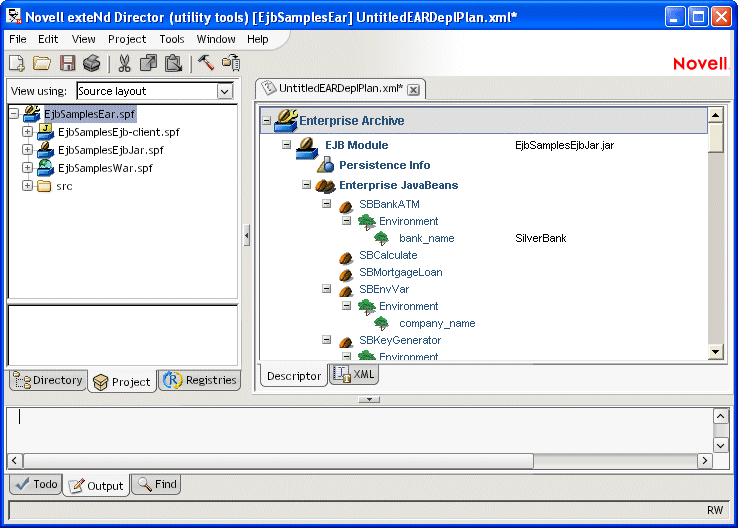
The Deployment Plan Editor constructs a deployment plan based on the project type. The editor uses the project's compiled code and the deployment descriptor to determine the deployment plan elements to create. (If you later change the deployment descriptor, exteNd Director updates the deployment plan accordingly the next time you edit it.)
The deployment plan elements are displayed in a tree structure. Here's a sample deployment plan for an EAR:
TIP: You can view or edit the deployment plan in raw XML by choosing the XML tab. The Deployment Plan Editor opens in the mode (raw XML or tree view) that was in use when you last saved.
Select File>Save (or click the Save icon).
If there are other deployment plans associated with this project, you will be asked whether you want to make the new deployment plan the current one.
 To modify an existing deployment plan:
Highlight the project (SPF) file, right-click, and select Open Deployment Plan from the popup menu.
If your project has more than one deployment plan, choose the one you want from the dropdown and click OK.
Highlight a deployment plan element, then right-click and select Properties from the popup menu.
Use the Property Inspector to modify values for different elements. In some cases, you can double-click an element to open a dialog that lets you enter data more quickly than through the Property Inspector.
To associate a deployment plan with a project:
NOTE: If you created a deployment plan outside of the exteNd Director development environment, you can still use it with a project by following these steps.
Open the project you want to associate the deployment plan with.
Double-click the deployment plan you want.
You are prompted to associate the plan with the current project or a different project (which you can choose)—or to edit the deployment plan in XML mode.
Choose the option to associate the plan with the current project, then click OK.
This opens the deployment plan in the Deployment Plan Editor.
Click Yes when prompted to mark the deployment plan as current.
Validating a deployment plan The Deployment Plan Editor automatically checks your work as follows:
But you can force validation anytime.
To force validation of a deployment plan:
Copyright © 2004 Novell, Inc. All rights reserved. Copyright © 1997, 1998, 1999, 2000, 2001, 2002, 2003 SilverStream Software, LLC. All rights reserved. more ...