|  |
 |
 |
 |
 |
 |
 |
 |
 |
Utility Tools
CHAPTER 10
This chapter describes the Web Service Wizard of the Novell exteNd Director development environment, which you can use to generate files for implementing and invoking Web Services. Topics include:
 For an introduction to Web Service concepts, standards, and technologies, see Web Service Basics.

The Web Service Wizard can perform either of these tasks for you:
Generate a standard (SOAP-based) Web Service that's implemented as a Java remote object. The wizard creates a servlet to handle access to your Web Service and its methods from HTTP SOAP requests.
Generate the code needed for a Java-based consumer program to access any standard (SOAP-based) Web Service. The generated code handles all HTTP SOAP processing under the covers, enabling your consumer program to call the Web Service as a Java remote object and invoke its methods.
In both cases, the wizard produces Java source files based on JAX-RPC (Java API for XML-based RPC) and the Novell exteNd Web Services SDK (the JAX-RPC implementation included with Novell exteNd). JAX-RPC is the J2EE specification that provides Web Service support.
You can use the generated files as is or modify them when necessary. The advantage of this Java-oriented approach is that you can deal with Web Services using the familiar technologies of RMI and J2EE instead of coding lower-level SOAP APIs.
How it works Behind the scenes, the Web Service Wizard uses several different compilers to generate the output you request:
The wizard determines which compilers to run and in what order depending on the type of input you provide and options you select when filling in its panels.
Alternatives to the wizard You can also run the individual wsdl2java, xsd2java, rmi2soap, and rmi2wsdl compilers manually from a command line. For more information, see the Web Services SDK help.
Here's where you'll learn about preparing to use the Web Service Wizard, running it, and working with its output:
|
For instructions on |
See |
|---|---|
|
Using the wizard to create a new Web Service based on one of these: |
|
|
Using the wizard to create code for accessing an existing Web Service based on its WSDL file |
This section lists the panels you need to complete in the Web Service Wizard, depending on your scenario:
|
If you start with |
You step through these panels |
|---|---|
|
A JavaBean or other Java class |
|
|
The home interface of an EJB session bean |
|
|
The remote interface of an EJB session bean or the SessionBean class itself |
|
|
A Java remote interface |
|
|
A WSDL file |
This section describes the options on each panel of the Web Service Wizard. The panels are:

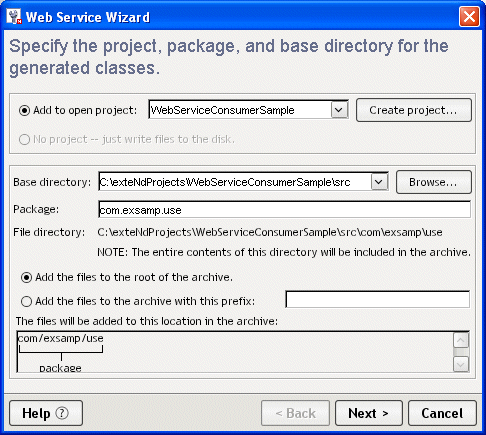
This panel is used to specify details about the project location (project, directory, package) where the wizard is to store Web Service files it generates. There are two variations of this panel:
If you start with anything else (JavaBean, Java class, EJB session bean, or Java remote interface), you'll see:
In this variation, you don't specify a package (because the wizard will get this information from your class or interface, which you supply on an upcoming panel).
|
Option |
What to do |
|---|---|
|
Add to open project |
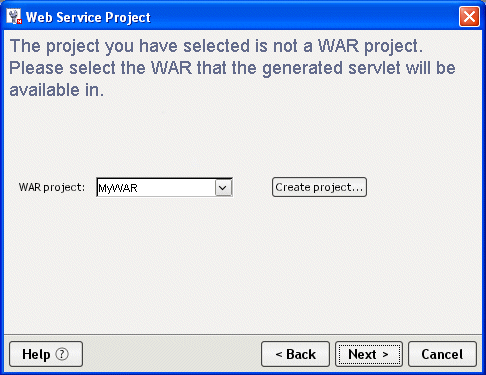
Select a project where the wizard is to store generated files. This option lets you choose from a list of the projects currently open. If you're generating a Web Service, you'll typically select a WAR project. When appropriate, you can select a JAR project instead, but then the wizard will prompt for a WAR project to map the Web Service's servlet. See WAR project selection. (When you generate a Web Service from a WSDL file, the wizard does not currently support selecting a JAR project. It requires you to select a WAR project.) If you're generating a Web Service consumer, you can select any type of project. |
|
Create project |
Click this button if you want to create a new project to use. It displays the New Project dialog. |
|
No project -- just write files to the disk |
(This option is disabled. In the Web Service Wizard, generated files must be added to an open project.) |
Specify the directory and package:
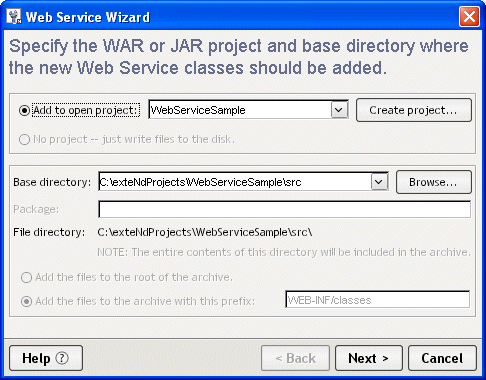
This panel is used to specify the required WAR project for a Web Service stored in a JAR project. The wizard will update this WAR's deployment descriptor (web.xml) with the servlet mapping for the Web Service.
This panel is used to select a compiled class from which the wizard is to generate Web Service files. Supported choices include:
NOTE: This panel won't let you select an EJB or remote interface that defines overloaded method names. Overloaded method names are not allowed in Web Service interfaces (as of WSDL 1.2). You must remove them from your class before starting the wizard.
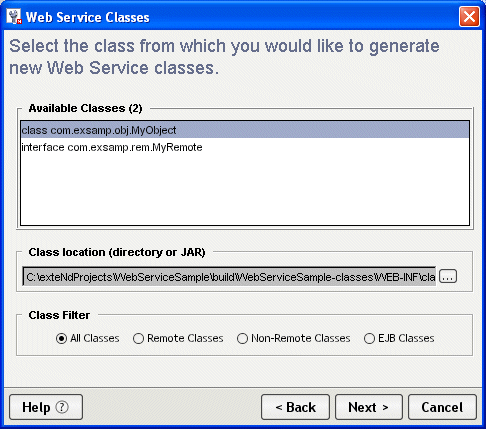
By default, this panel finds the compiled classes in the selected project's build directory and lists them in the Available Classes box. For a WAR project, this list comes specifically from WEB-INF/classes in the build directory.
 To select from the current list:
Click one of the Class Filter radio buttons to narrow the Available Classes list to classes of a particular kind.
To list classes from another location:
Click the browse (...) button for Class location (directory or JAR) to select a different directory or JAR file.
This refreshes the Available Classes list to show just the compiled classes from that new location.
This panel is used to select a WSDL file from which the wizard is to generate Web Service files. You can select it from your project, from your file system, or from the Web (by specifying an URL).
NOTE: This panel won't let you select a WSDL file that defines overloaded method names. Overloaded method names are not allowed in Web Service interfaces (as of WSDL 1.2). You must remove them from your WSDL file before starting the wizard.
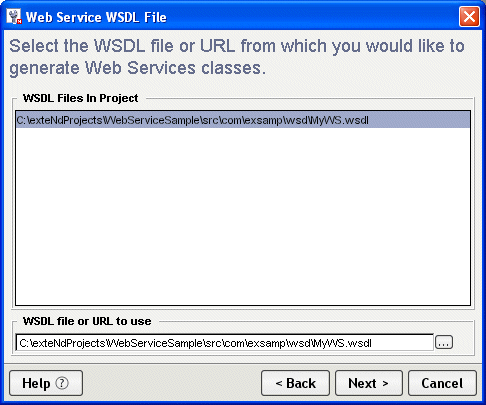
By default, this panel finds the .wsdl files in the selected project and lists them in the WSDL Files In Project box.
To select from the current list:
To select from the file system:
Click the browse (...) button for WSDL file or URL to use to select a WSDL file from your file system.
Type the URL for the target WSDL file in WSDL file or URL to use. For example:
http://upload.eraserver.net/circle24/autoloan.asmx?wsdl
This panel is used when you're generating from a WSDL file that uses multiple namespaces for the complex types in its XML Schema. It lets you map each namespace to a separate Java package.
NOTE: The mappings on this panel are used only if the option Create new Java types for complex XML types is selected on the Web Service type mappings panel.
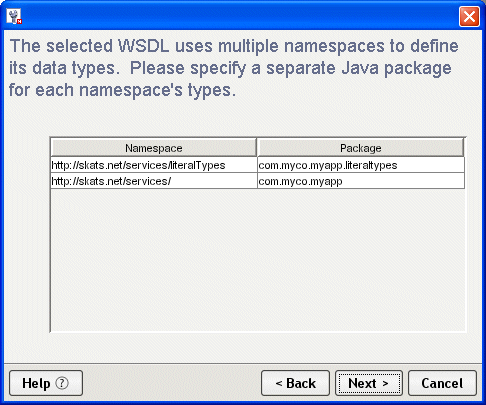
This panel lists the appropriate namespaces and fills in a default package name for each one. You can edit any or all of these package names. Just make sure you specify a unique package name for each namespace.
To edit the namespace-to-package mappings:
This panel is used to specify how data types are to be mapped when you're generating from a WSDL file. It provides choices for handling the complex types and simple types defined in the WSDL (via XML Schema).
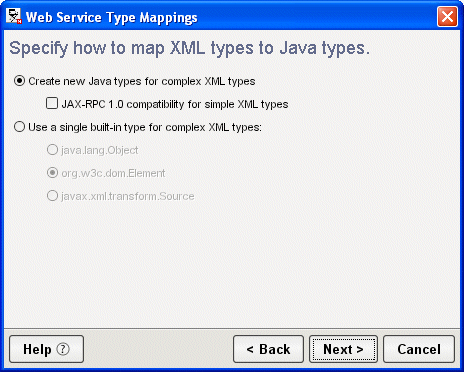
To specify how data types are to be mapped:
|
If you want to |
Do this |
|---|---|
|
Map the complex types defined in the selected WSDL file to specific Java types |
|
|
Map all complex types to one selected built-in type that lets you access the Web Service data as XML (instead of Java classes) |
This panel is used to select the home interface that corresponds to an EJB session bean class or remote interface you've specified on the class selection panel.
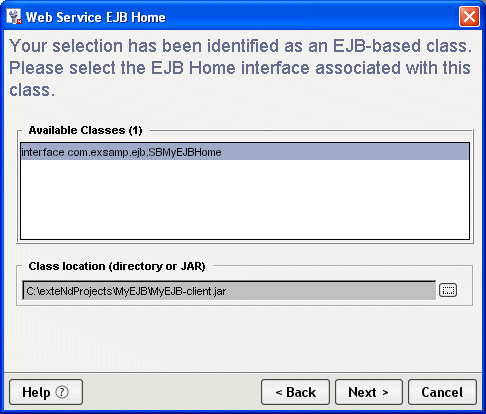
By default, this panel looks in the location of the EJB session bean class or remote interface to find home interfaces (compiled classes that extend javax.ejb.EJBHome). If there are any, it lists them in the Available Classes box.
To select from the current list:
To list classes from another location:
Click the browse (...) button for Class location (directory or JAR) to select a different directory or JAR file.
This refreshes the Available Classes list to show just the compiled classes from that new location.
This panel is used to specify information that the Web Service will need to do a JNDI lookup for a selected EJB session bean. (JNDI is the Java Naming and Directory Interface.)
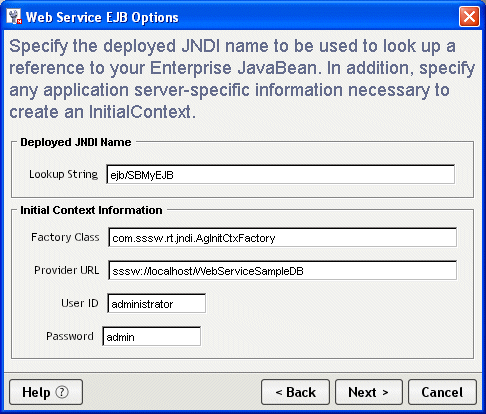
This panel displays default initial context values appropriate for looking up a session bean deployed to the Novell exteNd Application Server. For information on what other J2EE servers require, consult their documentation.
Specify the Deployed JNDI Name:
The wizard includes this information in the ejb-ref declaration it generates within the deployment descriptor web.xml. To learn how it is used at runtime to do a JNDI lookup, see the getSessionBean() method of xxxDelegate.java (the delegate class generated for the tie servlet).
Specify Initial Context Information:
The wizard includes this information in the servlet declaration it generates within the deployment descriptor web.xml. To learn how these values are used at runtime, see the getInitialContext() method of xxxDelegate.java.
This panel is used to select the methods you want to expose when generating a Web Service from a JavaBean or other Java class.
NOTE: Overloaded method names are not allowed in Web Service interfaces (as of WSDL 1.2). As a result, this panel lets you select no more than one method with a given name.
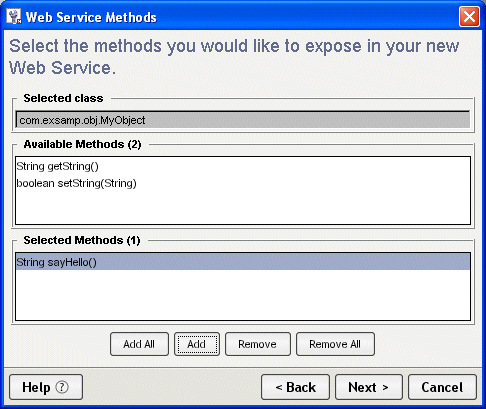
This panel examines the selected class and lists its eligible methods in the Available Methods box.
Use the Add and Add All buttons to move one or more items from Available Methods to Selected Methods.
If necessary, you can use Remove and Remove All to move one or more items back.
This panel is used to specify the binding style when generating a Web Service from a JavaBean, Java class, EJB session bean, or Java remote interface.
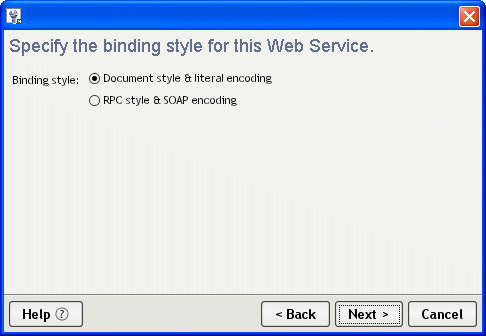
Document style & literal encoding In this format, the SOAP message body contains just the XML document being exchanged and message parts map to elements literally defined in the WSDL file's XML Schema
RPC style & SOAP encoding In this format, the SOAP message body contains argument and return values, individually wrapped in ad hoc elements that the recipient must interpret by applying specified encoding rules to each message part's type
When making this choice, consider the requirements of any other Web Service environments your Web Service must interoperate with. In most cases either style should work, but some environments may favor a particular style.
These panels are used to specify XML Schema information to include in the WSDL file you generate for a Web Service. The Web Service Wizard prompts for this information if:
You're generating from a class (JavaBean, Java class, EJB session bean, or Java remote interface) that defines method parameters (arguments or return values) of type org.w3c.dom.Element
You specified the Document style & literal encoding option on the Binding style panel
There are two related Schema information panels:
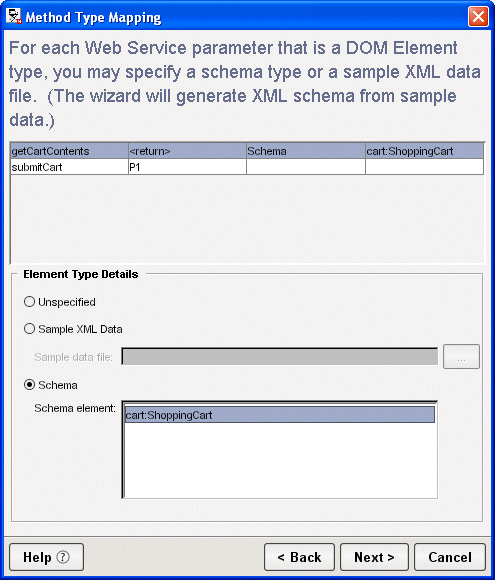
On the Schema includes panel, you specify the path or URL of zero or more Schema (XSD) files to include in the generated WSDL.
On the Method type mapping panel, you specify how each Element method parameter maps to a qualified name in one of those Schemas.
As an alternative, you can map a parameter to a sample XML instance data file. In that case, the wizard generates the Schema information for you based on the instance data.
NOTE: The information on these panels is used only if the option Generate WSDL file is checked on the Class-generation and SOAP options panel.
Use the Add button to specify the path or URL of each Schema (XSD) file to include in the list.
If necessary, you can use the Delete button to remove one or more selected files from the list.
To specify method type mapping:
For each method parameter listed on the panel, do one of the following:
|
If you want to |
Do this |
|---|---|
|
Map a method parameter to a qualified name in a listed Schema |
|
|
Map a method parameter to an instance data file |
|
|
Skip mapping a method parameter |
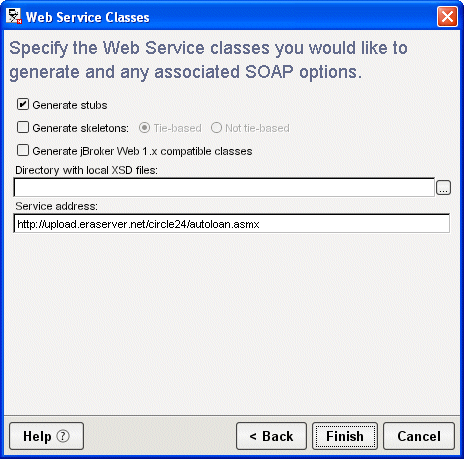
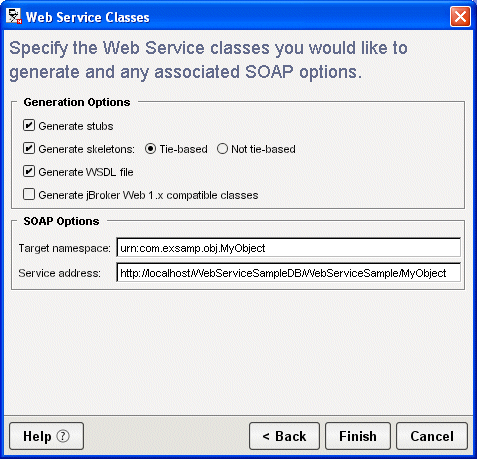
This panel is used to select the Web Service files to generate (including skeleton, tie, and stub classes) and to specify SOAP implementation details to encode in those files. There are two variations of this panel:
If you start with anything else (JavaBean, Java class, EJB session bean, or Java remote interface), you'll see:
Only this variation provides the ability to generate a WSDL file.
NOTE: When you create a new Web Service from WSDL, the Web Service Wizard does not generate a new or updated copy of that WSDL file for you. That means you must edit the WSDL yourself if you want it to reflect changes you've specified via the wizard (such as an override of the default Service address URL).
|
Option |
What to do |
|---|---|
|
Generate stubs |
Check this option to generate classes for consuming the Web Service, including service classes, a stub class, and a simple client application. You'll get the following source files: |
|
Generate skeletons |
Check this option to generate classes for implementing the Web Service. Then choose one of these implementation models:
|
|
Generate WSDL file |
(If displayed) Check this option to generate the following file: It describes your Web Service in standard WSDL format, which is useful when publishing to a registry. The wizard stores this file in the base directory of your source tree (commonly named src). |
|
Generate jBroker Web 1.x compatible classes |
Check this option to generate the specified files according to the original jBroker Web (Version 1.x) conventions for: Except for these conventions, the generated files will conform to the latest version of the Web Services SDK. This option is appropriate only if you're maintaining an application that originated in jBroker Web 1.x and aren't yet ready to switch to the current conventions (which are based on JAX-RPC and may require some changes to existing code).
|
|
Directory with local XSD files |
(If displayed) When the selected WSDL file relies on imported XSD files for its type definitions, you can optionally specify a local directory that contains copies of them. If the wizard can't access a particular XSD file based on the location specified in the WSDL file, it will look for that XSD file in your local directory.
|
Copyright © 2004 Novell, Inc. All rights reserved. Copyright © 1997, 1998, 1999, 2000, 2001, 2002, 2003 SilverStream Software, LLC. All rights reserved. more ...