exteNd 5.2.1 Documentation Addenda
This document describes the new Content Administration portlets and how to use them in exteNd Director portal applications. Topics include:
exteNd Director 5.2.1 provides a set of Content Administration portlets—called CAP portlets—that allows you to access basic content management functions directly from a shared or personal portal page.
In earlier releases of exteNd Director 5 you could interact with the content management system only though the Content Management section of the Director Administration Console (DAC). This tool runs only in Windows, requires Internet Explorer version 5.5 or higher, and is available only to administrators.
By contrast, administrators can use Content Administration portlets to expose selected content management functions to authorized end-users in any browser and operating system supported by exteNd Director 5.2.1.
 See the Novell exteNd Release Notes for the latest information on supported platforms and browsers.
Portlet-based content management consists of the following components:

exteNd Director 5.2.1 provides a set of CAP portlets that can run standalone on portal pages, provide embedded functionality to other CAP portlets, or both. Administrators can select standalone portlets as content for portal pages they build using the Portal Administration tool and Portal Personalizer, as described in Using the standalone CAP portlets.
Here is a brief description of the CAP portlets, with links to more information:
exteNd Director 5.2.1 provides several JavaScript/DHTML client-side widgets that are used by the CAP portlets. The widgets are designed to be used as plug-in tools that developers can incorporate into other portlets with minimal coding effort. The JavaScript files are stored in the portal-general folder of an exteNd Director project resource set.
Here is a brief description of these widgets, with links to more information:
The Content Administration portlets allow you to perform most of the same functions as the Content Management section of the DAC, but not all. The following table illustrates the options available in each tool:\
Administrators and end-users can use standalone CAP portlets out of the box by adding them to portal pages in Web applications and modifying their preferences.
To add standalone CAP portlets to a portal page:
Log in to the portal application and select Personalize or Portal Administration.
For more information about using the Personalizer or Portal Administration tool to create or edit pages, see the exteNd Director Portal Guide. The chapter "Personalizing Your Portal" describes how to create personal pages; the chapter "Administering the Portal" describes how administrators can create shared or container pages.
In the Filter field, select Content Administration Portlets.
The Available Content dropdown refreshes to display the standalone CAP portlets.
Modify portlet preferences as needed by following these steps:
The Content Administration portlet is the main portlet for managing content. In a typical scenario, administrators can add the Content Administration portlet to a shared portal page to expose all content management functions to authorized end-users.
To further restrict access to the content repository, opt instead for the CAP Editor portlet or CAP Reader portlet.
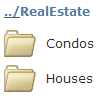
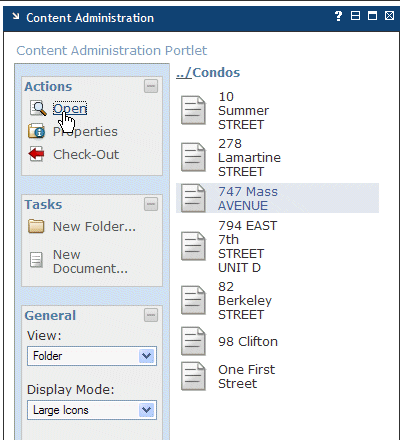
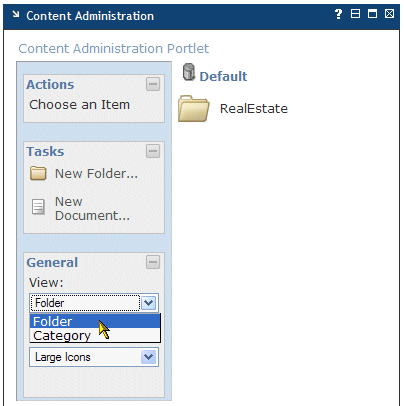
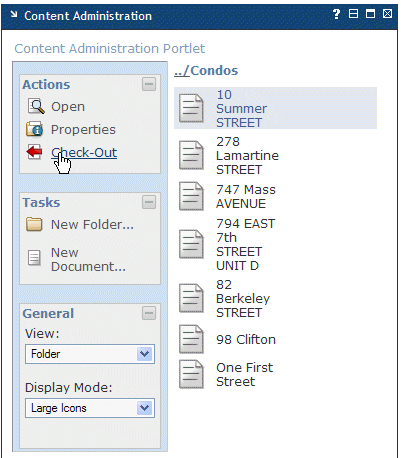
The following diagram shows the default appearance of the Content Administration portlet and explains how each of its panels interact. In this example, the Content Panel displays the root folder of sample real estate data.
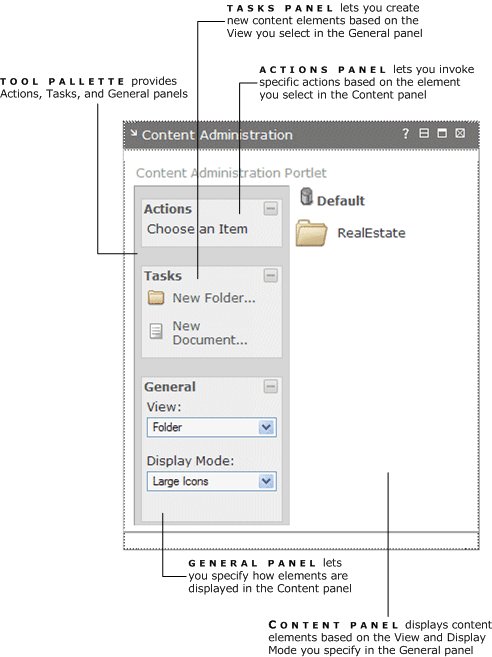
This section describes the panels of the Content Administration portlet Tool Pallette.
The following table describes the actions available for each type of content element:
|
Element selected in Content panel |
Available actions |
|---|---|
|
Folder or Category |
|
|
Document |
|
|
Checked out document |
The following table describes the tasks available for each type of content element:
|
Element selected in Content panel |
Available tasks |
|---|---|
|
Folder or Document |
|
|
Category |
The following table describes General panel options affect the Content panel display:
You can perform the following tasks using the Content Administration portlet:
You can specify how the Content Administration portlet displays documents, folders, and categories, as described in General panel options. Follow these steps:
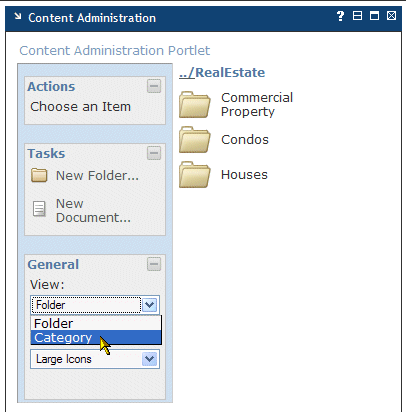
In the General panel, select a view from the dropdown list:
|
View |
Description |
|---|---|
|
Folder |
Displays folders and documents in the Content panel |
|
Category |
Displays categories in the Content panel |
In the General panel, select a display mode from the dropdown list:
|
Display Mode |
Description |
|---|---|
|
Large icons |
Displays content elements as large icons |
|
Details |
Displays content elements as small icons with metadata |
You can browse the content repository by folder or category. You must have LIST and READ permission for the folders you wish to browse.
Follow these steps:
Specify a view and display mode for content, as described in Configuring the content display.
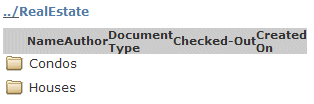
The Content panel of the Content Administration portlet refreshes to reflect your choices. For example, if you select the folder view, you will see folders and documents in the Content panel.
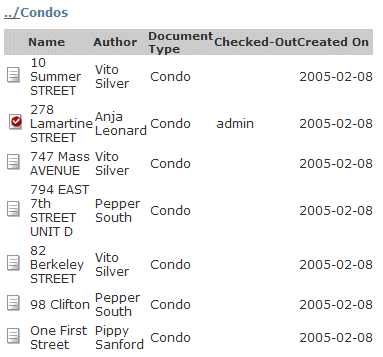
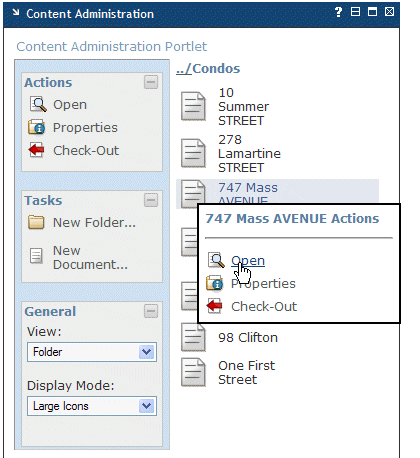
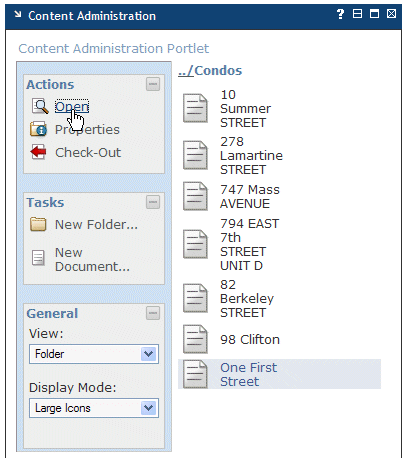
Browse the content repository by selecting elements in the Content panel, then selecting Open in the Actions panel, as in this example:
TIP: A short cut is available for Mozilla or Firefox browsers. The Content Administration portlet has a preference that lets you override the browser's right-click menu with actions relevant to the content element you have selected. This preference is called Override Context Menu, described in Content Administration preferences. When this preference is enabled, you can open content elements by right-clicking a folder or document, as in this example:
TIP: You can double-click content elements to navigate the repository, depending on the browser you use. Follow these guidelines:
|
Browser |
Guideline |
|---|---|
|
Internet Explorer |
Double-click a folder to open it, or double-click a document to display its published content in the CAP Reader portlet. |
|
Mozilla/Firefox |
Select the content element, then double-click. |
You can create folders inside folders for which you have WRITE permission.
Follow these steps:
Select Folder from the View dropdown menu in the General panel:
Select New Folder in the Tasks panel.
A popup dialog appears, asking you to enter a name for the folder.
Enter a folder name and click OK.
A folder is created inside the currently open folder.
TIP: If you want more control over how and where to create folders, see CAP Editor portlet.
You can create documents in folders for which you have WRITE permission. When you create documents using the Content Administration portlet, the Default document type is used as its template.
Follow these steps:
Select Folder from the View dropdown menu in the General panel:
Fill in all required fields and any optional fields you wish.
NOTE: The CAP Editor portlet includes an HTML editor that you can use to enter content for the new document. For more information about the CAP Editor portlet, see CAP Editor portlet.
If you want more control over where and how to create documents, see CAP Editor portlet.
You can set up relationships between documents in the content repository as long as all documents reside in the same folder and are checked out to you. The Content Administration portlet lets you establish several types of relationships:
Adding attachments to a document in a parent-child relationship The Content Administration portlet allows you to attach two documents, where one document becomes the parent of the other. Each child document can have only one parent, but parent documents can have more than one child. This section describes how to add and remove attachments.
To add an attachment, follow these steps:
Select Folder from the View dropdown menu in the General panel:
Open the folder that contains the two documents you want to attach.
Check out the documents, as described in Checking documents in and out.
The Actions panel refreshes to display Link and Attach options.
TIP: Hold down the Control key to select more than one document.
To remove attachments, follow these steps:
Check out the child document you want to remove, as described in Checking documents in and out.
Select the parent document and click Properties in the Actions panel.
Select the Advanced tab and scroll down to the list of attachments.
Select the child you want to remove and click Unattach Child.
Linking documents This section describes how to link and unlink documents.
To link documents, follow these steps:
Select Folder from the View dropdown menu in the General panel:
Open the folder that contains the two documents you want to link.
Check out the documents, as described in Checking documents in and out.
Select the pair of documents, noting that the second document selected will be linked to the first document selected.
The Actions panel refreshes to display Link and Attach options.
TIP: Hold down the Control key to select more than one document.
To unlink documents, follow these steps:
Check out the linked document, as described in Checking documents in and out.
Select the document it is linked to and click Properties in the Actions panel.
Select the Advanced tab and scroll down to the list of linked documents.
Select the document you want to remove and click Unlink Document.
The Content Administration portlet allows you to create categories, both at the root level and as subcategories of other categories. To create subcategories, you need WRITE, LIST, and READ access to the parent category.
NOTE: To set security on categories and taxonomies, use the Content Management section of the DAC.
Although you cannot assign categories to documents or create taxonomies for grouping categories in the Content Administration portlet, you can open taxonomies and view assignments that were created using the Content Management section of the DAC.
To create categories, follow these steps:
Select Category from the View dropdown menu in the General panel:
Select New Category in the Tasks panel.
A popup dialog appears, asking you to enter a name for the category.
You can only open content that has been published, although you can preview unpublished content, as described in Previewing unpublished content. To publish content, you must have the following permissions for accessing the document:
Follow these steps:
Select Folder from the View dropdown menu in the General panel:
Navigate to the desired document, as described in Browsing the content repository.
Check out the document, as described in Checking documents in and out.
Select the document and click Properties in the Actions panel.
Select the Advanced tab, then choose the content version you wish to publish by clicking its radio button:
Click Publish, then click OK in the popup that asks you to confirm the action.
Check the document back in, as described in Checking documents in and out.
To unpublish content, follow the same steps as for publishing, but select Unpublish in the Advanced tab of the CAP Inspector portlet.
Besides publishing and unpublishing the content of one document at a time, you can also publish and unpublish the content of multiple documents at once—either in a single folder, or recursively in one folder and all of its subfolders. In the latter case, documents will be published or unpublished recursively, even if they have not been checked out.
To publish all content in a folder, you must have PUBLISH and WRITE permission on the desired documents, and LIST permission on the folder.
Follow these steps:
Select Folder from the View dropdown menu in the General panel:
Navigate to the desired folder. and click Properties in the Actions panel.
Select the Advanced tab and take any of the following actions:
You can roll back to a previous version of content, but be aware that all later versions will be deleted. The previous version does not need to be a published version.
To roll back to a previous version of content, you need the following permissions:
Follow these steps:
Select Folder from the View dropdown menu in the General panel:
Navigate to the desired document, as described in Browsing the content repository.
Check out the document, as described in Checking documents in and out.
Select the document and click Properties in the Actions panel.
Select the desired content version, then click Rollback.
You receive a warning that later versions of content will be deleted. Click OK if you wish to proceed. Otherwise, click Cancel.
To view the published content of a document you need the following permissions:
Follow these steps:
Select Folder from the View dropdown menu in the General panel:
Navigate to the desired document, as described in Browsing the content repository.
Select the document and click Open in the Actions panel:
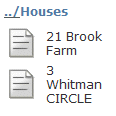
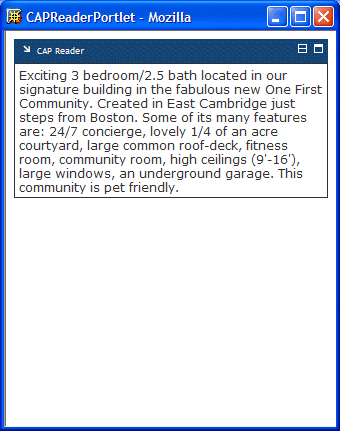
The CAP Reader portlet opens in a new window, displaying the published content of the selected document, as in this example:
NOTE: You can view content only if it has been published. See Publishing and unpublishing content for more information. To look at unpublished versions of content, see Previewing unpublished content.
To preview an unpublished version of content, you need READ permission on the document and LIST permission on the folder containing the document.
Follow these steps:
Select Folder from the View dropdown menu in the General panel:
Navigate to the desired document, as described in Browsing the content repository.
Select the document and click Properties in the Actions panel.
Choose the version of content you wish to preview by selecting its radio button.
The CAP Reader portlet opens in a new window, displaying the content you selected.
Before you can edit a document, you must check it out for your exclusive use. When you are finished making changes, you must check the document back in so others can edit it.
To check documents in and out you need the following permissions:
To check out a document, follow these steps:
Select Folder from the View dropdown menu in the General panel:
Navigate to the desired document, as described in Browsing the content repository.
Select the document and click Check-Out in the Actions panel:
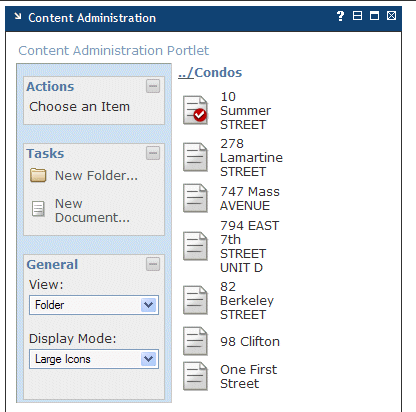
The Content panel refreshes to display the document with a red check mark:
To check in a document, follow these steps:
Select the document in Folder view and click Check-In in the Actions panel.
Click OK in the popup that asks you to confirm the action.
The document is checked in for others to access. The red check mark is removed from the document's icon.
Before you can edit a document, you must check it out for your exclusive use.
To edit a document you need the following permissions:
Follow these steps:
Select Folder from the View dropdown menu in the General panel:
Navigate to the desired document, as described in Browsing the content repository.
Check out the document, as described in Checking documents in and out.
Select the document you just checked out and click Edit in the Actions panel.
Publish the content you just edited, as described in Publishing and unpublishing content.
Check in the document, as described in Checking documents in and out.
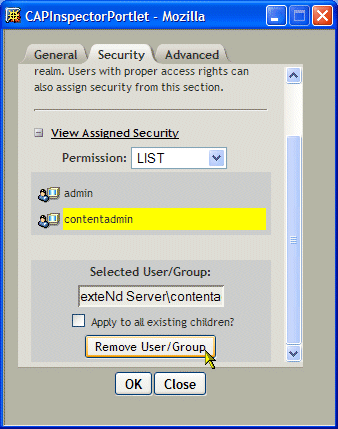
Administrators can assign users and groups varying levels of permissions to work with folders, and also remove these permissions. If you do not have administrative privileges, you can view security settings, but not change them.
Typically, administrators assign PROTECT permission to designated users on folders that need to be secured. However, any user can assign and remove security on folders for which PROTECT permission has not been set.
To assign permissions on folders, follow these steps:
Select Folder from the View dropdown menu in the General panel:
Navigate to the desired folder. and click Properties in the Actions panel.
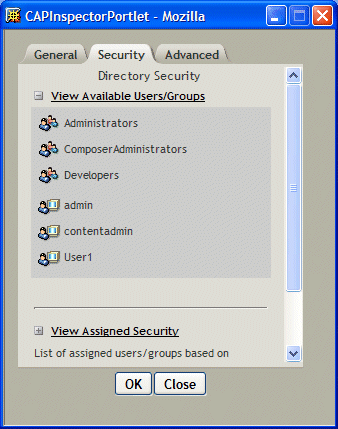
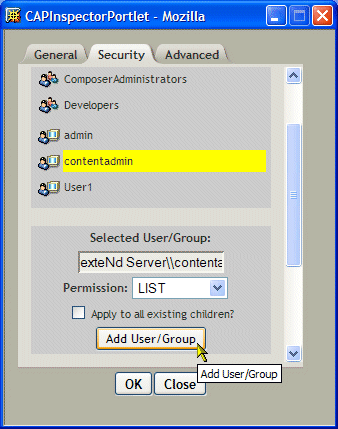
Select the Security tab and click View Available Users/Groups.
A list of available users and groups appears in the Security panel:
If you want to set this permission on all subfolders and documents stored in the selected folder, check Apply to all existing children?
To remove permissions on folders, follow these steps:
Select Folder from the View dropdown menu in the General panel:
Navigate to the desired folder. and click Properties in the Actions panel.
Select the permission you wish to remove from the dropdown menu.
The users who have been assigned this permission are displayed in the panel.
If you wish to also remove access to all subfolders and documents stored in the selected folder, check Apply to all existing children?
Administrators can assign users and groups varying levels of permissions to work with documents, and also remove these permissions. If you do not have administrative privileges, you can view security settings, but not change them.
Typically, administrators assign PROTECT permission to designated users on documents that need to be secured. However, any user can assign and remove security on documents for which PROTECT permission has not been set.
To assign permissions on documents, follow these steps:
Select Folder from the View dropdown menu in the General panel:
Navigate to the desired document and check it out, as described in Checking documents in and out.
Select the checked-out document and click Properties in the Actions panel.
Select the Security tab and click View Available Users/Groups.
A list of available users and groups appears in the Security panel:
To remove permissions on documents, follow these steps:
Select Folder from the View dropdown menu in the General panel:
Navigate to the desired document and check it out, as described in Checking documents in and out.
.Select the checked-out document and click Properties in the Actions panel.
Select the permission you wish to remove from the dropdown menu.
The users who have been assigned this permission are displayed in the panel.
Authorized users can view and edit the properties of content elements.
You need the following permissions:
READ permission on the folders and documents whose properties you wish to view
WRITE permission on the folders and documents whose properties you wish to edit
LIST on the folders that contain the target subfolders and documents
To view properties of content elements, follow these steps:
Select Folder from the View dropdown menu in the General panel:
Navigate to the desired document or folder, select it, and click Properties.
Browse the General, Security, and Advanced tabs to view the properties of the element.
To edit properties of folders, follow these steps:
Select Folder from the View dropdown menu in the General panel:
Navigate to the desired folder, select it, and click Properties.
Select the General tab to edit the title of the folder, then click OK.
Select the Security tab to set security on the folder, as described in Assigning and removing permissions on folders.
Select the Advanced tab to publish documents in the folder, as described in Publishing and unpublishing all documents in a folder.
To edit properties of documents, follow these steps:
Select Folder from the View dropdown menu in the General panel:
Navigate to the desired document and check it out, as described in Checking documents in and out.
Select the checked-out document and click Properties in the Actions panel.
Select the General tab to edit the following properties:
NOTE: To edit the publish of expiration dates, either type a date and time in the text field or click the ellipsis to launch the Calendar widget, which provides a graphical user interface for selecting dates and times.
Select the Security tab to set security on the document, as described in Assigning and removing permissions on documents.
Select the Advanced tab to perform the following functions:
Publish or unpublish content, as described inPublishing and unpublishing content.
Roll back content, as described in Rolling back to a previous version of content.
Preview content, as described in Previewing unpublished content.
To delete content elements you need the following permissions:
To delete folders, follow these steps:
To delete categories, follow these steps:
In the General panel, select Category from the View dropdown.
Select the category you want to delete and select Delete in the Actions panel.
To delete documents, follow these steps:
Select the document you want to delete and check it out, as described in Checking documents in and out.
Select the checked-out document and click Delete in the Actions panel.
When you add the Content Administration portlet to a portlet page, you can modify its preferences, as described in Using the standalone CAP portlets.
The preference sheet for the Content Administration portlet looks like this:
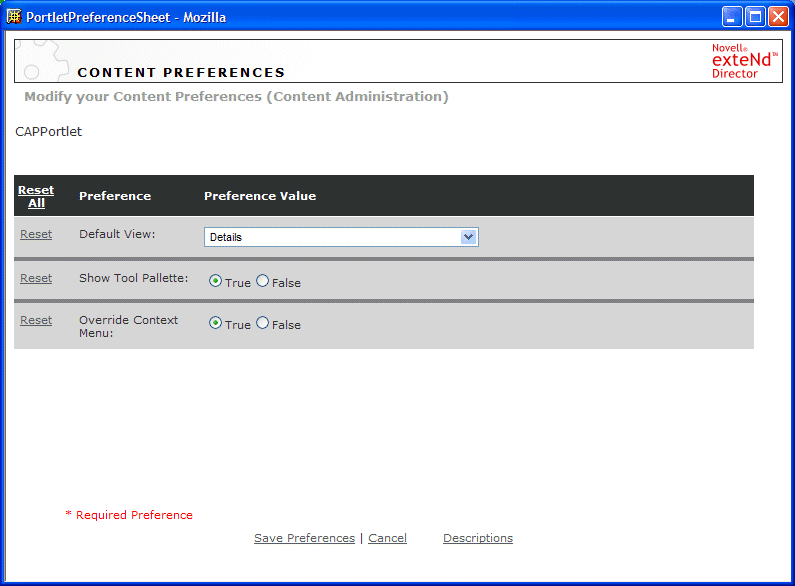
The following table describes each preference:
|
Preference |
What to specify |
|---|---|
|
Default View |
|
|
Show Tool Pallette |
|
|
Override Context Menu |
When you have finished editing preferences, click Save Preferences at the bottom of the property sheet to record all changes.
TIP: You can also get information about all preferences by clicking Descriptions on the preference sheet.
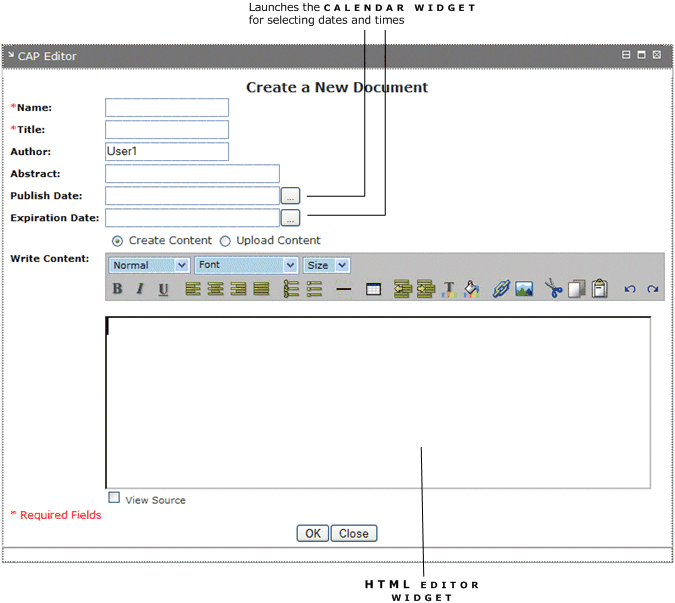
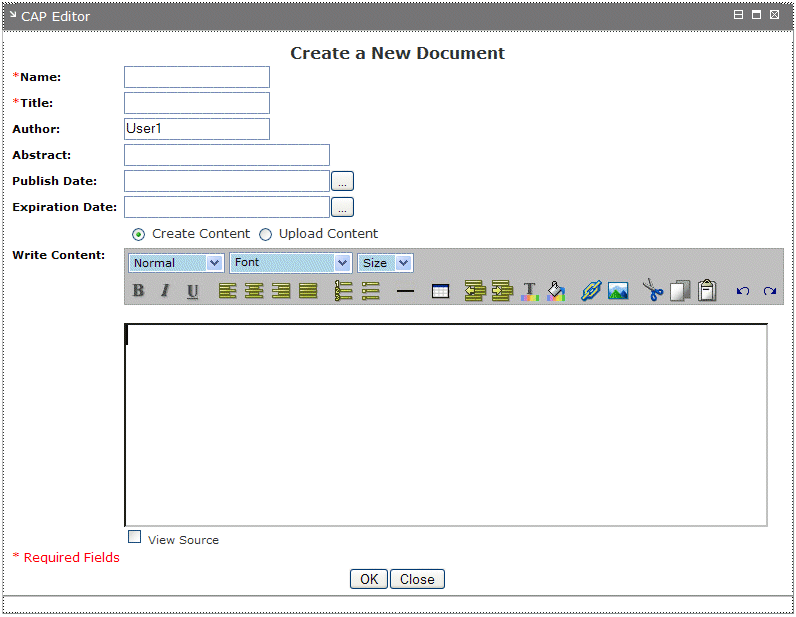
When added to a portal page, the CAP Editor portlet allows you to create a document using a specific document type and to store the new document in a particular folder automatically. This is in contrast to how the CAP Editor portlet works when running inside the Content Administration portlet. In that context, the document you create is automatically stored in the currently open folder.
The following diagram shows the default appearance of the CAP Editor portlet:
You can add the CAP Editor portlet to a portal page and configure its preferences as described in Using the standalone CAP portlets.
To create a document with the CAP Editor portlet, follow these steps:
Set CAP Editor preferences to use a specific document type and folder, as described in CAP Editor preferences.
Enter values for the required fields and for optional fields as necessary:
Enter content using the HTML Editor.
For information on how to use the HTML Editor, see the chapter "Creating Content" in the exteNd Director Content Management Guide.
When you add the CAP Editor portlet to a portlet page, you can modify its preferences, as described in Using the standalone CAP portlets.
The preference sheet for the CAP Editor portlet looks like this:
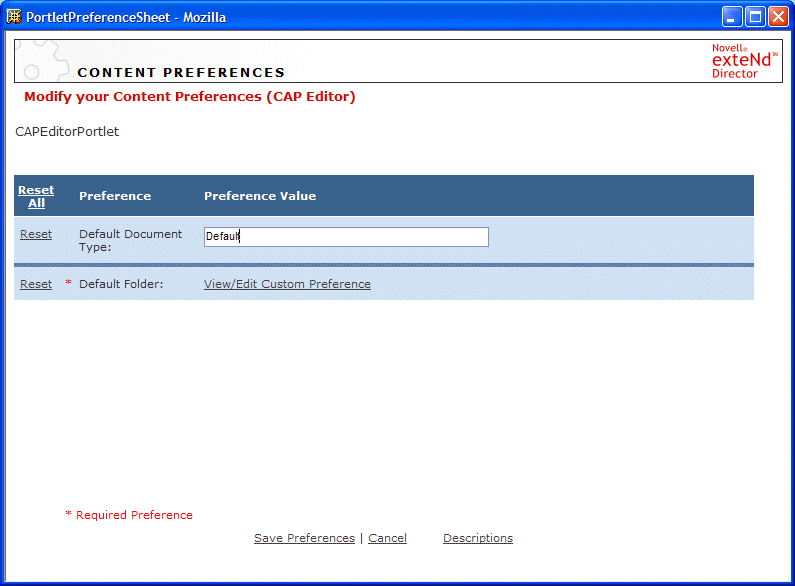
The following table describes each preference:
When you finish editing preferences, click Save Preferences at the bottom of the property sheet to record all changes.
TIP: You can also get information about all preferences by clicking Descriptions on the preference sheet
When added to a portal page, the CAP Reader portlet allows you to view folders and documents in the content repository.
Viewing documents with the CAP Reader portlet To view documents, follow these steps:
Set CAP Reader preferences to view a document, as described in CAP Reader preferences.
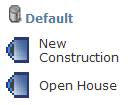
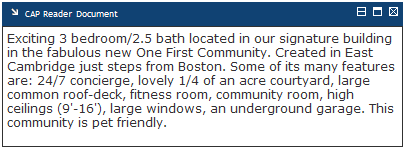
Here is an example of how the CAP Reader portlet displays the content of a document, based on specific preference settings:
Viewing folders with the CAP Reader portlet To view folders, follow these steps:
Set CAP Reader preferences to view a folder and its contents, as described in CAP Reader preferences.
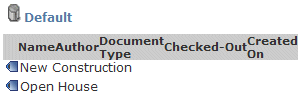
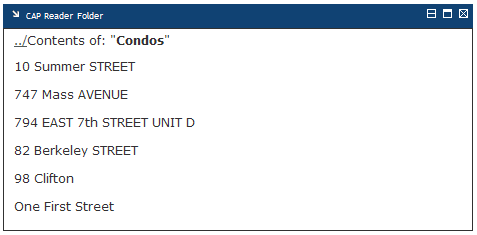
Here is an example of how the CAP Reader portlet displays the content of a folder, based on specific preference settings:
When you add the CAP Reader portlet to a portlet page, you must modify its preferences to specify what and how content is displayed, as described in Using the standalone CAP portlets.
The preference sheet for the CAP Reader portlet looks like this:
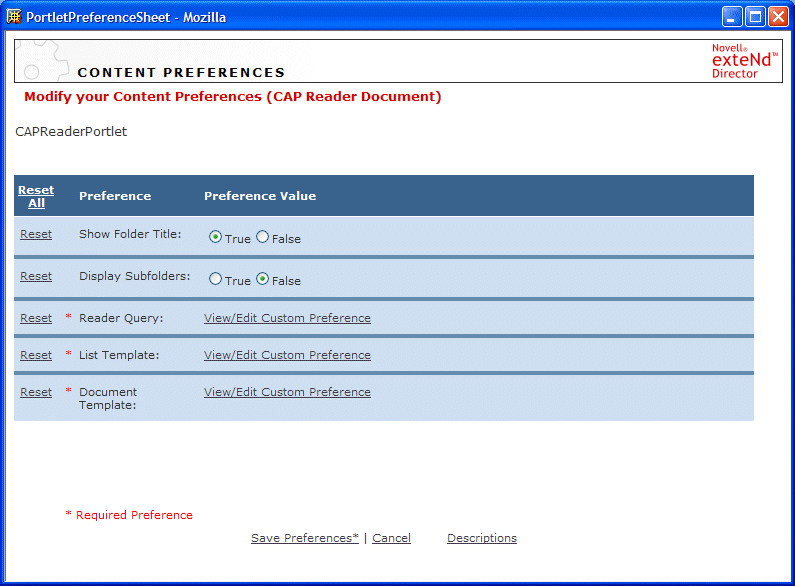
The following table describes each preference:
|
Preference |
What to specify |
|---|---|
|
Show Folder Title |
|
|
Display Subfolders |
|
|
Reader Query |
Follow these steps:
|
|
List Template and Document Template |
Follow these steps:
|
When you finish editing preferences, click Save Preferences at the bottom of the property sheet to record all changes.
TIP: You can also get information about all preferences by clicking Descriptions on the preference sheet.
The Reader Query preference allows you to select which folder or document to display in the CAP Reader portlet.
If you select a folder, the CAP Reader uses the List Template to configure the display for each item in that folder. If you select a document, the CAP Reader uses the Document Template to configure the display for that document.
For more information about these templates, see About the List Template preference and About the Document Template preference.
The CAP Reader uses the List Template if you select a folder in the Reader Query preference. The List Template specifies how to display each subfolder or document that resides in the selected folder.
The List Template uses the HTML Editor widget as the interface for specifying how the folder and its contents will appear in the CAP Reader portlet.
The CAP Reader uses the Document Template if you select a document in the Reader Query preference. The Document Template specifies how to display the selected document.
The Document Template uses the HTML Editor widget as the interface for specifying how the document will appear in the CAP Reader portlet.
The template settings do not apply to any attached child documents or linked documents.
Both the List Template and Document Template preferences use the HTML Editor widget for specifying how content should appear in the CAP Reader portlet:
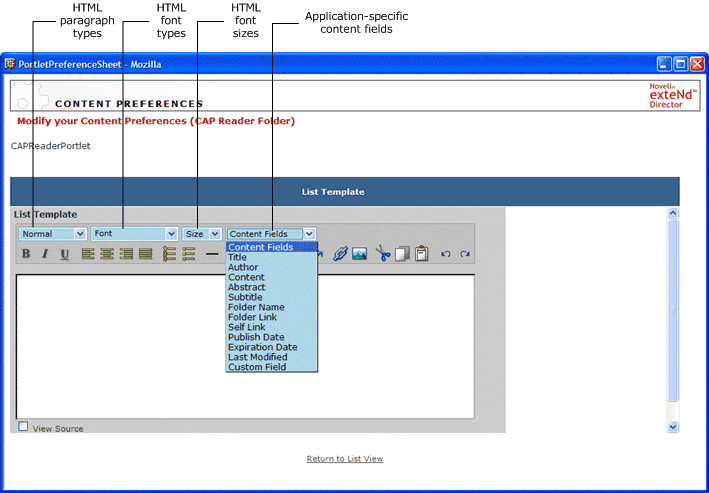
As you can see there are several dropdown menus and tool bar buttons for specifying standard HTML formatting tags. In addition, there is a menu for displaying one or more application-specific content fields, described in Application-specific content fields.
You can think of content fields as substitution strings, or as placeholders for content or metadata. The following table describes each of the application-specific content fields:
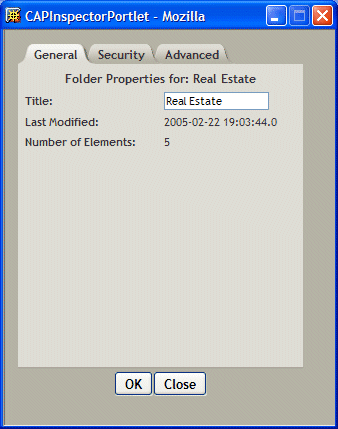
The CAP Inspector portlet provides access to the properties of content elements. The Content Administration portlet invokes the CAP Inspector to allow users to view and modify the properties of folders, documents, and categories. The CAP Inspector is not designed to run standalone.
The CAP Inspector interface is content-sensitive—that is, it provides different functions depending on the type of element you select. In this example, the CAP Inspector has been invoked for a folder:
Here is the CAP Inspector interface for a document:
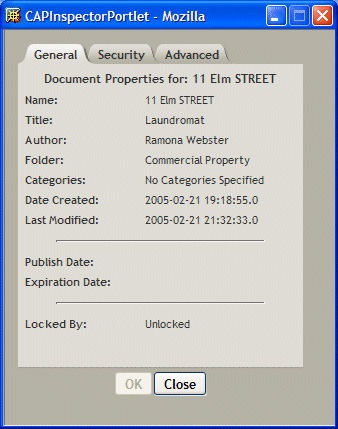
As you can see, the CAP Inspector portlet provides three tabs, each exposing a different type of property:
|
Tab |
Property type |
Related tasks |
|---|---|---|
|
General |
Metadata fields |
|
|
Security |
Access control lists |
|
|
Advanced |
Publish and rollback |
The HTML Editor widget incorporates an HTML editor into a portlet. It is used by the Content Administration, CAP Reader, and CAP Editor portlets.
For example, here is how the HTML Editor widget is implemented in the CAP Reader portlet:
To implement the HTML Editor widget in a portlet, follow these steps:
Import the JavaScript file into the portlet:
<script language="JavaScript" type="text/javascript" src="RESOURCE_URL/portal-general/html_editor.js">
  //Usage: initEditor(imagesDir, palletteDir, CSSDir)
  initEditor("RESOURCE_URL/images", "RESOURCE_URL/portal-general", "");
(Optional) Add a custom dropdown control (as implemented by the CAP Reader portlet).
  var customControls = new Object();
  customControls["Title"] = "$[[title]]";
  customControls["Author"] = "$[[author]]";
  customControls["Content"] = "$[[content]]";
  customControls["Abstract"] = "$[[abstract]]";
  customControls["Subtitle"] = "$[[subtitle]]";
  customControls["Folder Name"] = "$[[folder_name]]";
  customControls["Folder Link"] = "$[[folder_link]]";
  customControls["Self Link"] = "$[[self_link]]";
  customControls["Publish Date"] = "$[[publish_date]]";
  customControls["Expiration Date"] = "$[[expiration_date]]";
  customControls["Last Modified"] = "$[[last_modified]]";
  customControls["Custom Field"] = "$[[field_FIELDNAME]]";

  //Usage: addCustomControl(initialText, selections)
  addCustomControl("Custom Dropdown Text", customControls);
  // Usage: writeEditor(fieldname, html, width, height, buttons)
  writeEditor('documentTemplate', document.getElementById("tempHolder").innerHTML, 640, 200, true);

  </script>
The Calendar widget implements a graphical date selector into a portlet. It is used by the Content Administration and CAP Editor portlets for entering document publication dates and expiration dates.
Here is what the Calendar widget looks like:
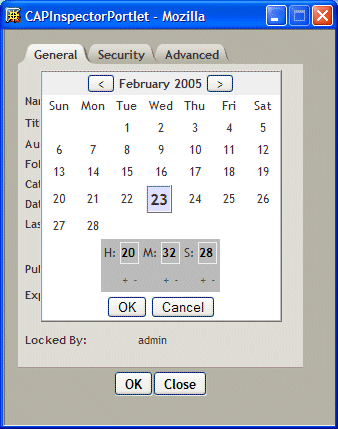
To implement the Calendar widget in a portlet, follow these steps:
Import the JavaScript file into the portlet:
<script language="JavaScript" type="text/javascript" src="RESOURCE_URL/portal-general/calendar_widget.js">
  <script>
  //Usage: createCalendar(calendarID, dateFieldID, dateFunctionID, top, left)
  NCW_createCalendar("calHolder","dateHolder","setActualDate","40px","35px");
  </script>
Incorporate your calendar into the portlet.
For example, suppose you want to use the calendar in the same way as the Content Administration portlet for selecting dates in two fields that each use ellipsis buttons. Here is JavaScript code that handles this user interface:
  <script>
  //Usage: showCalendar(fieldID, currentDate)
  function setPub() {
  NCW_showCalendar('publishDate',Date.parse(document.getElementById("publishDate").value));
  }

  function setExp() {
  NCW_showCalendar('expirationDate',Date.parse(document.getElementById("expirationDate").value));
  }

  //Usage: setActualDate(dateFunctionID)
  function setActualDate(whichField) {
  document.getElementById(whichField).value = document.getElementById("dateHolder").value;
  }
  </script>
fieldID: ID of the field the portlet displays to show the date
currentDate: Existing date to show in the calendar in milliseconds
NOTE: The function setActualData() is the function specified in the dateFunctionID argument of createCalendar(). This function is called when the user presses the OK button in the widget to select a date. In this example, setActualData() passes back the ID of the field that should be set to the selected date.
The Context Menu widget overrides the browser's right-click context menu with a menu based on the portlet's runtime context. It determines when to show or hide the portlet-based menu and automatically positions the menu at the cursor location.
The Content Administration portlet uses the Context Menu widget to give you access to its Tool Pallette functions when you right-click on a folder, document, or category in its Content panel.
To implement the Calendar widget in a portlet, follow these steps:
Import the JavaScript file into the portlet:
<script language="JavaScript" type="text/javascript" src="RESOURCE_URL/portal-general/context_menu_widget.js">
Create the user interface for the menu inside a <div> tag.
For example, here is an interface that displays a menu with three choices: Item 1, Item 2, and Item 3:
  <div id="menu_holder">
  <ul>
  <li>Item 1</li>
  <li>Item 2</li>
  <li>Item 3</li>
  </ul>
  </div>
  <script>
  //Usage: NCMW_activateContextMenu(menuID, callbackFunction)
  NCMW_activateContextMenu("menu_holder","selectRow");
  </script>
NCMW_activateContextMenu() arguments:
menuID: ID of the <div> tag that specifies the user interface for the menu
callbackFunction: Optional function that is called when you click an item in the menu. This function must be provided in your portlet. If you do not provide the callback function, no actions are executed when a user selects an option in the portlet-based context menu.
Copyright © 2004-2005 Novell, Inc. All rights reserved. Copyright © 1997, 1998, 1999, 2000, 2001, 2002, 2003 SilverStream Software, LLC. All rights reserved. more ...