Novell exteNd 5 Guided Tour
LESSON 4

exteNd Director is an interaction portal server that enables IT organizations to rapidly deliver and easily maintain rich, personalized Web applications. exteNd Director provides a comprehensive development environment to help you create state-of-the-art interactive applications that users access through a portal:
Powerful J2EE capabilities for the rapid implementation of sophisticated, services-oriented business Web sites
Build interactive form-based applications that consume Web Services
Model business processes using workflow, rules, and content management
Multiplatform, multivendor combinations of application servers, databases, and operating systems
In this lesson you will build a simple application that will present an initial form to the user requesting a user ID and then will invoke the Web Service (Composer ViewUserInfo) you deployed. The application will then display the results returned using one of two forms depending on whether user data or a message was returned. This application will run as a portlet in a personal page of a portal application. As you complete the application you will also have the opportunity to test your application.
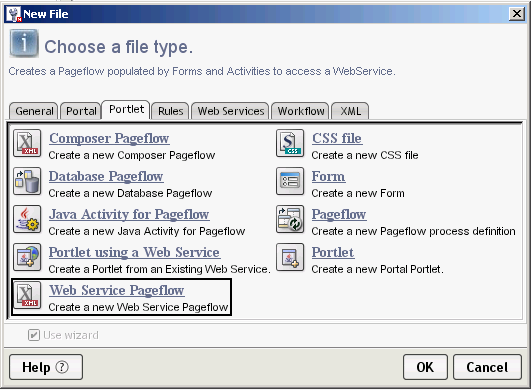
In this exercise you will use an exteNd Director wizard to create a pageflow—an exteNd Director artifact that links together XForms (presentation and data binding) to the invocation of a Web Service. The wizard builds XForms based on the schema in the Web Service and ties it all together to invoke the Web Service—and includes default exception handling. All this without you writing any code.
You must select the WSDL document for which you are building a user interface. There are two ways you can do this:
The Browse button allows you to select a WSDL that is not currently part of your project.
The Resource Set button lets you select a WSDL that is stored in your project, for example, the WSDL for the exteNd Composer service you will be using.
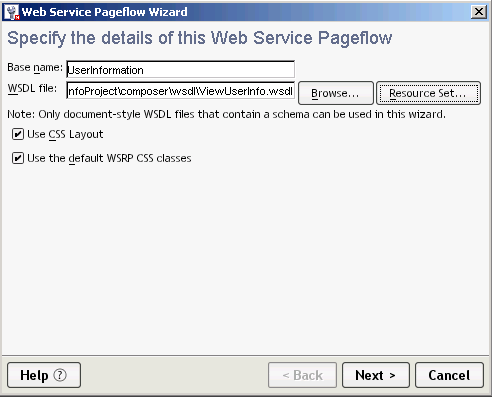
Use the Resource Set button to navigate to the location of the WSDL in the exteNd Composer project. In the Choose file dialog expand the folders until you see the ViewUserInfo.wsdl file. Select the ViewUserInfo.wsdl file. Click OK.
Accept the default checks on Use CSS Layout and Use the default WSRP CSS classes:
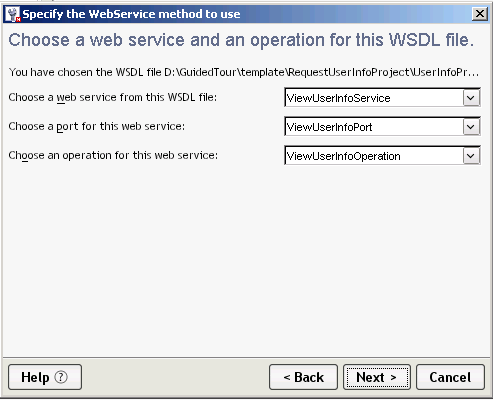
The WSDL has only one operation, so take the defaults for the Select the Web Service Method dialog by clicking Next:
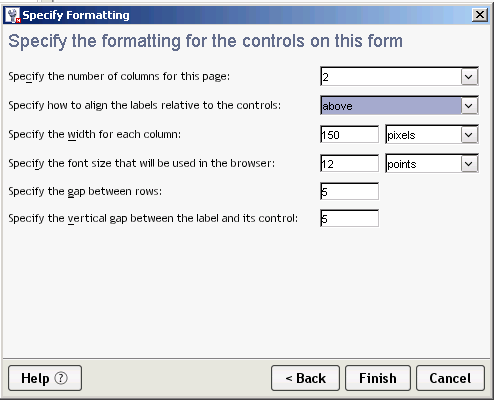
On the Formatting Controls tab, select 2 for number of columns.
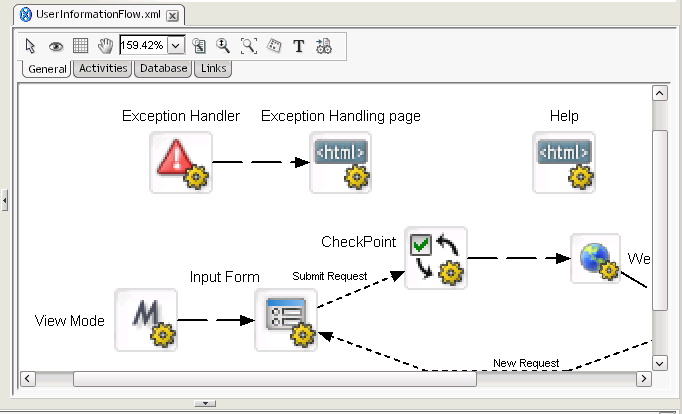
Use the percentage dropdown list  to adjust the size of the pageflow diagram in the editor. 100% is a good compromise between size and readability.
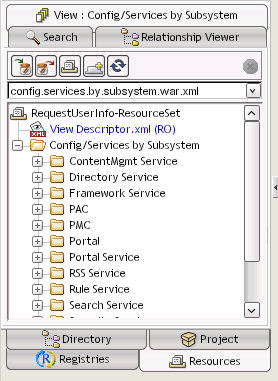
An exteNd Director resource set organizes descriptors and other files used by exteNd Director subsystems and provides for dynamic loading during development, avoiding frequent redeployments and speeding up your testing. Each custom Web application can include a resource set.
A resource set holds application-defined resources and classes. Some of these resources are templates or definitions for using a subsystem's features—such as a rule, XForms, pageflows, or a portlet descriptor. Others specify how subsystems work together—such as bindings between rules and users. Resources are usually XML files; some are accompanied by Java classes.
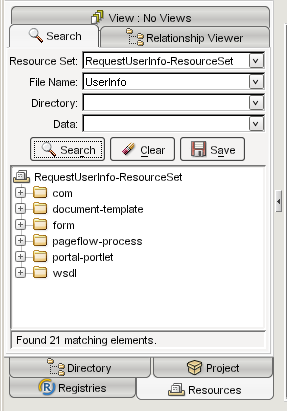
A resource set organizes your application's resources in a known directory structure and within exteNd Director you may use the Resources tab in the Navigation Pane to find the various artifacts in your project. For example, if you wanted to find all the files created in the previous exercise you would do the following:
You can save this search as a view to reuse the search criteria at a later time. Click the Save button.
Name the file UserInfoStuff.xml and click Save.
The view is an XML file that describes the search criteria and display structure, and you may edit it to server your specific needs.
Close the open editor by clicking on the editor title tab to close the UserInfoStuff.xml file.
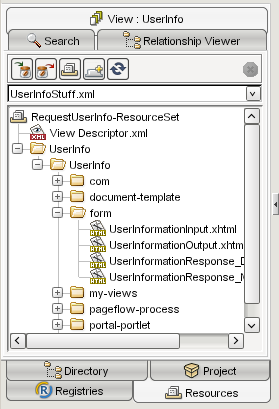
In the dropdown list find UserInfoStuff, then select it:
You may expand the folders to see the various artifacts you created—and by double-clicking a particular entry the appropriate editor for working with that artifact will be opened.
 For details, see the chapter on using the resource set in an exteNd Director application in Developing exteNd Director Applications.
Because pageflows and XForms created by the Web Service Pageflow Wizard are stored in the resource set and you already deployed the application, you may immediately test the default portlet that was created. This is because by default during development, your exteNd Director project was configured to dynamically load the resource set artifacts.
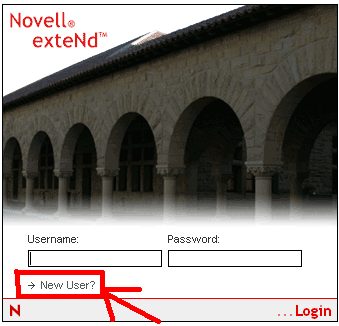
Type the URL http://localhost/RequestUserInfo/portal/portlet/LoginPortlet in the address bar.
Log in using the account you just created. Click Login or press Enter.
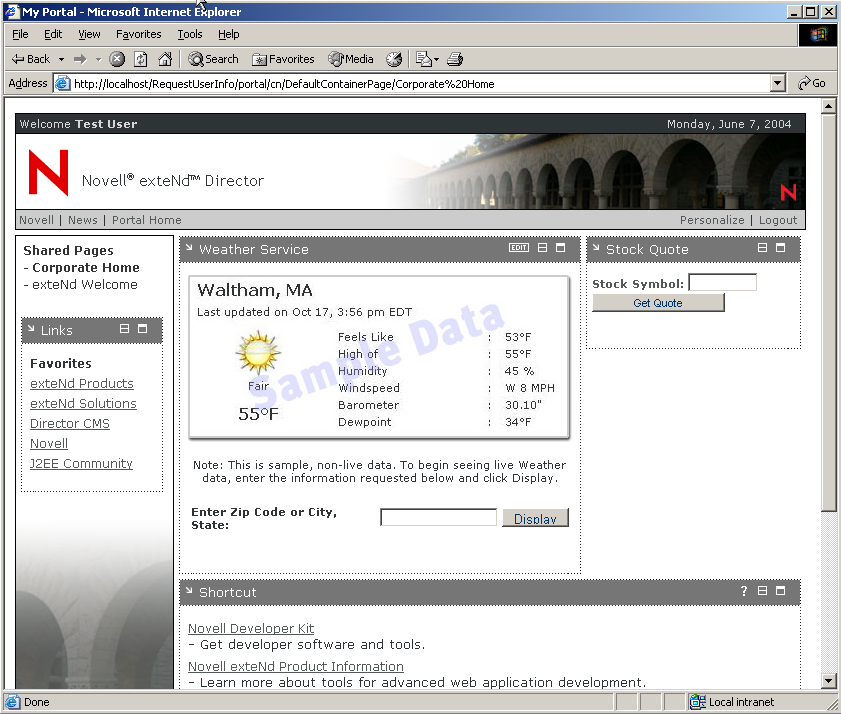
You will see the default portal shared page with some sample portlets. You will create a personal page where the portlet for the pageflow you created will be placed. You will use this page later in this lesson to test and review your changes.
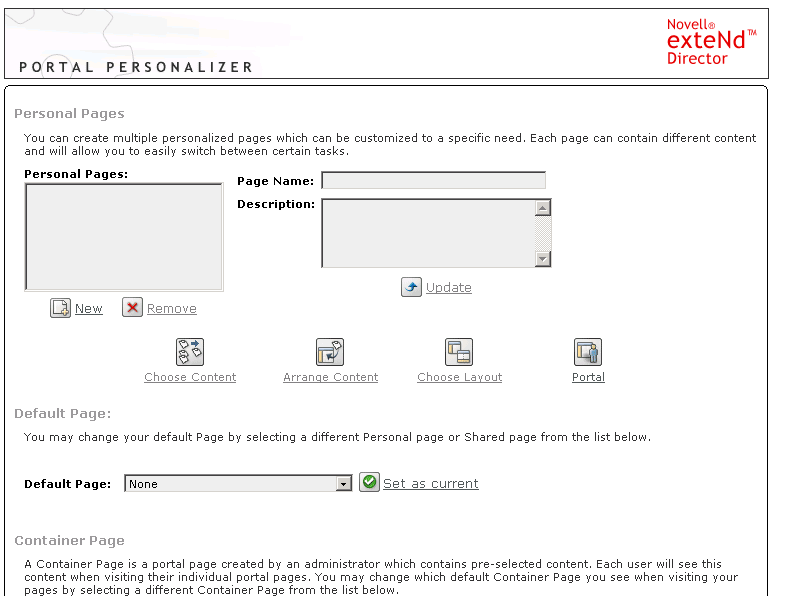
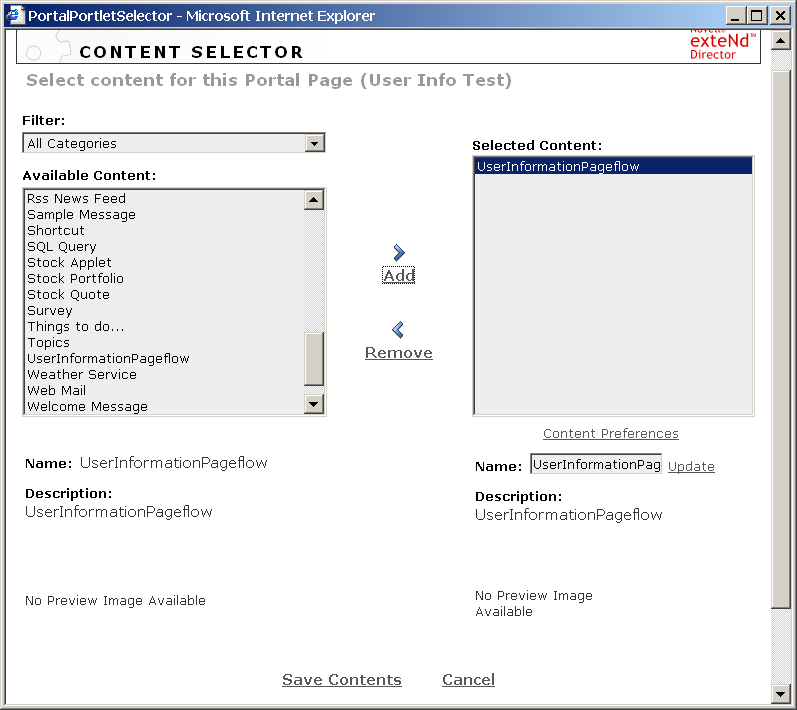
Click New under the Personal Pages list to create a new personal page.
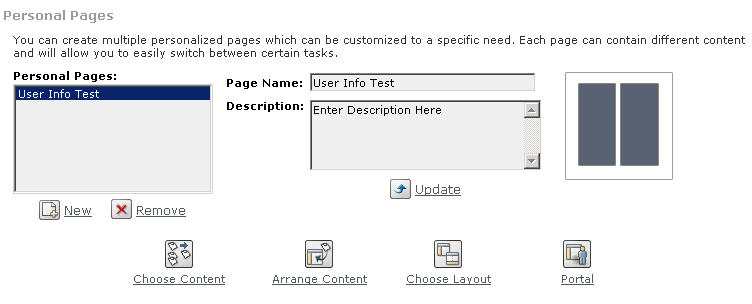
Change the name of the page to User Info Test, then click Update:
In the Default Page text box, select the page you just created.
Click the Set as current link. This allows you to quickly get to this page in the portal page.
Scroll the Available Portlets list until you find UserInformationPageflow, then select it and click Add.
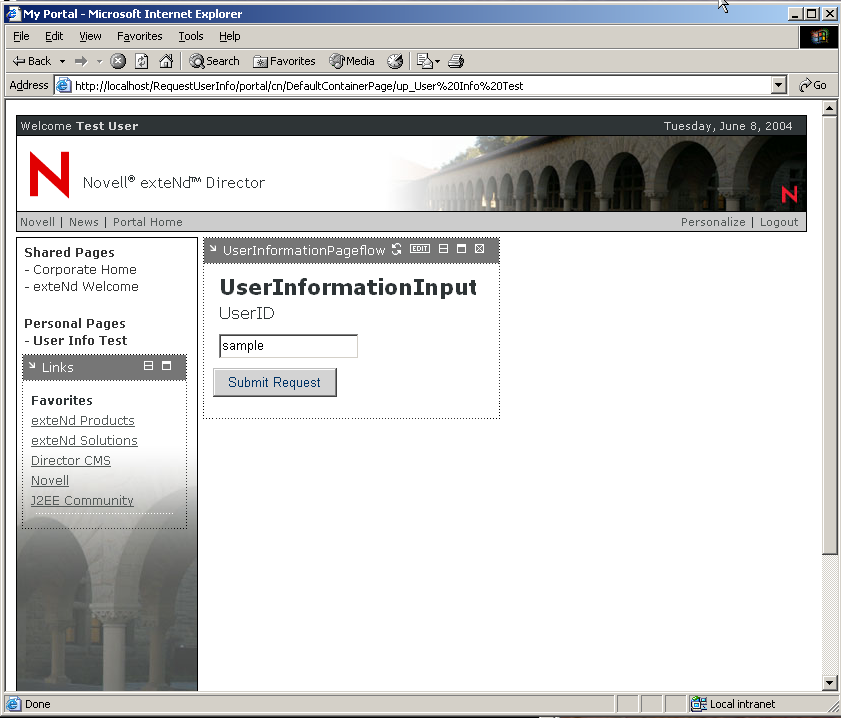
At the top of the page, click Portal Home—or under Personal Pages click User Info Test (the page you just created)—to view your pageflow portlet.
If you see the message Portlet did not respond in time, click the  link or reload the page (by clicking on Portal Home or under Personal Pages clicking User Info Test).
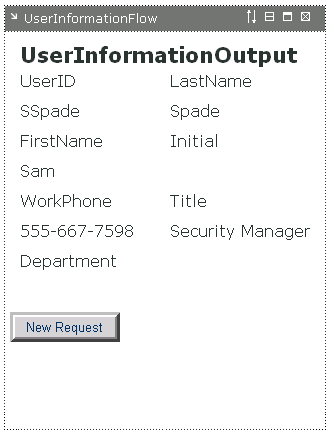
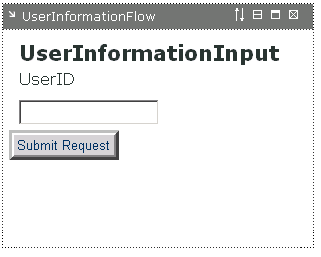
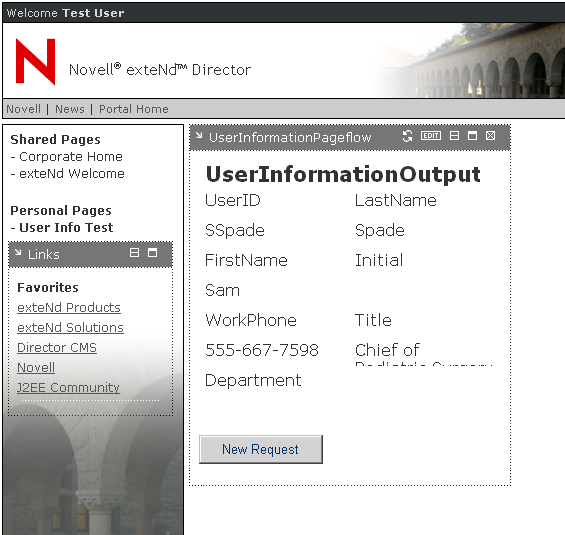
Type SSpade in the UserID text box of the UserInformationInput Portlet page, then click the Submit Request button.
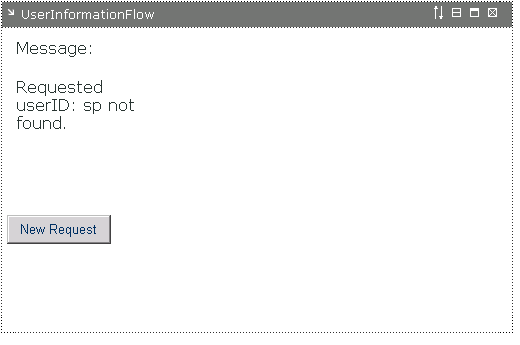
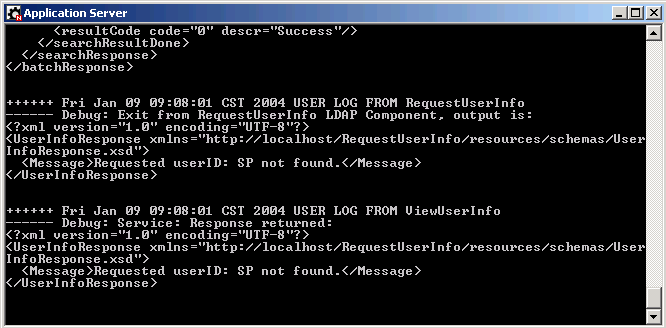
Type SP in the UserID text box, then click the Submit Request button.
Click the New Request button to return to the first form.
If you take a peek at the exteNd Application Server console, you will see the Log output from the exteNd Composer service that shows the data returned to the application.
The forms and pageflow created by the wizard did not take this form into consideration, so you need to change the pageflow. You will add a conditional decision to the pageflow that will decide which form is displayed; the decision will be based on the data returned from the invoked Web Service. This is your task for the rest of this lesson.
A form was already created that displays the message returned by the Web Service when an invalid request is made. You will review this form and make some slight modifications. In the next exercise you will insert this form into the pageflow you created earlier with the Web Service Pageflow Wizard.
In exteNd Director, select the Resources tab  of the Navigation Pane.
Select the View tab in the Resources Navigation Pane view, then use the dropdown list to select UserInfoStuff (the view you created earlier).
Expand the listed folders by clicking the  icon until you find the form folder.
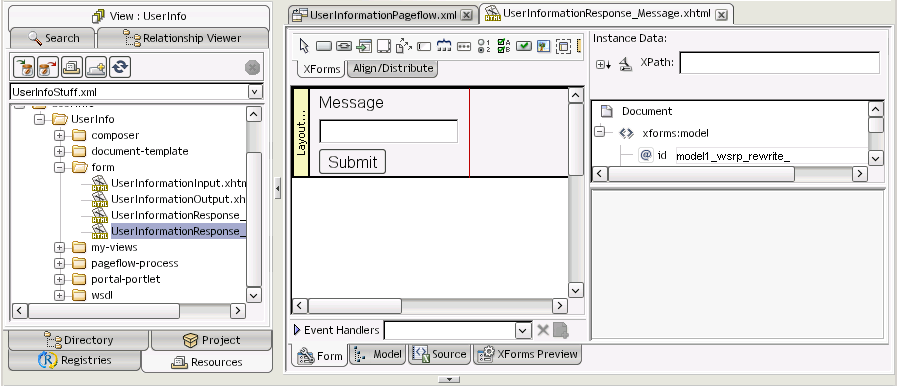
Double-click UserInformationResponse_Message.xhtml, which will open the form in the XForms Editor.
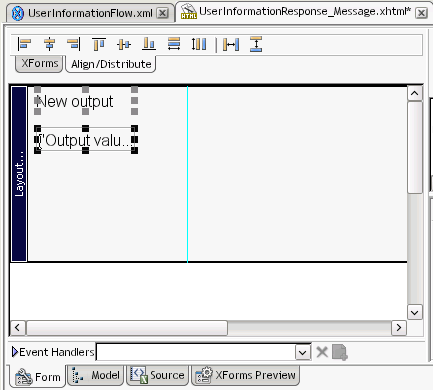
You are going to change the look and feel of this form by replacing the input message text box with an output (display only) text box.
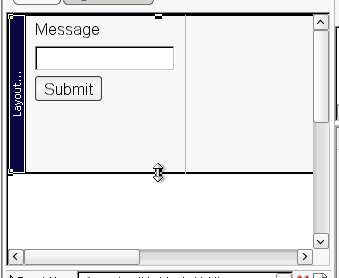
Select the Layout Region and, holding the left mouse button, increase its size by scrolling downward with the mouse.
Click the Submit button on the form and press the Delete key to delete it.
Select the Input message text box, then press the Delete key.
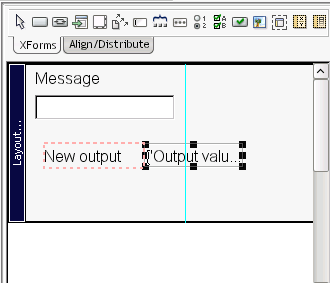
Select the Output text box and drag it below the New output label.
Select the label and text box while holding the Ctrl key, then drag both toward the top of the layout area.
Use the Align/Distribute tab to properly align the controls on the layout.
Enlarge the Output text box by clicking it and then dragging the corner down and to the right.
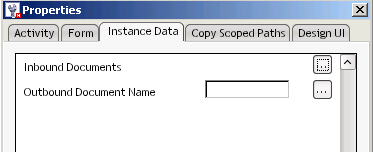
In the Instance Data Pane click the icon until you see the Message element (you may need to scroll).
Click the Message element, the hold the left mouse button and drag the element on the Output text box in the Form Pane.
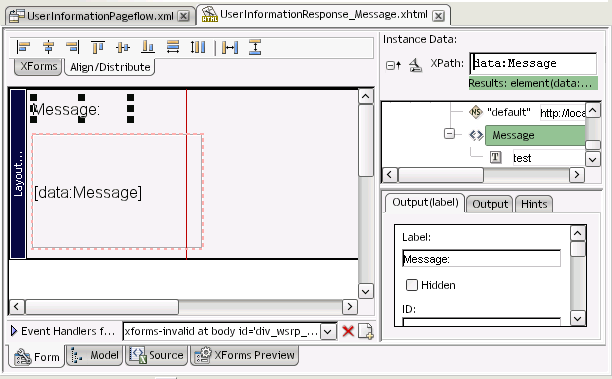
Select the Output (label) tab in the Property Inspector, scroll to the top, and change the Label to read Message:.
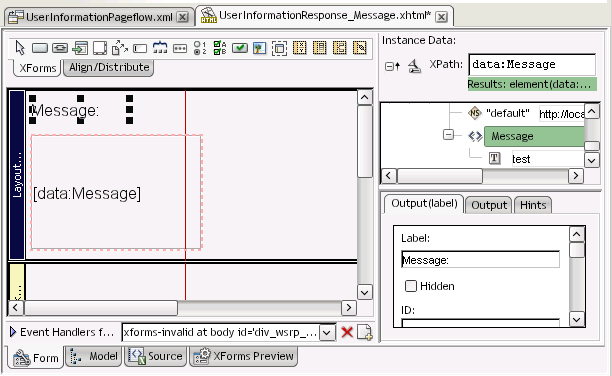
Click the divider between the Form Layout section and the Instance Property section of the XForms Editor to expand the Form Layout, showing you all the items in the tools tab in the Form Layout section.
TIP: If this does not work, maximize the Director Designer, then hold the left mouse button and drag the divider to the right until you see all the XForms tools on the tab.
Click in the Form Layout to add the control to the form:
This region will be used by the Pageflow button link when you add this page to the existing pageflow.
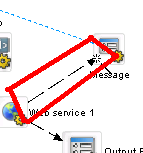
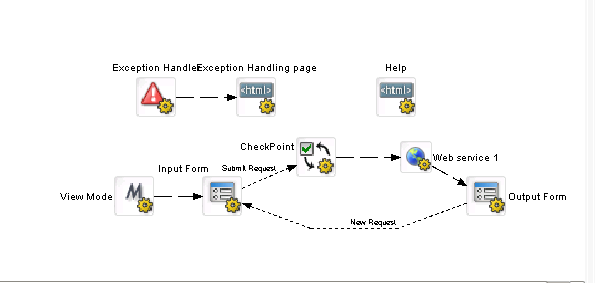
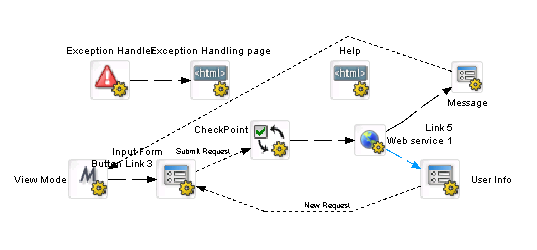
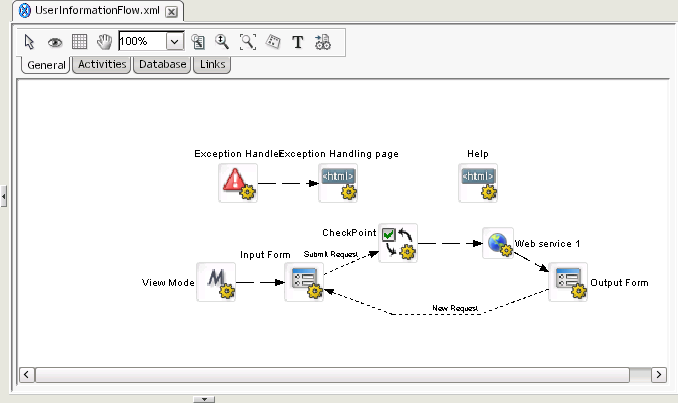
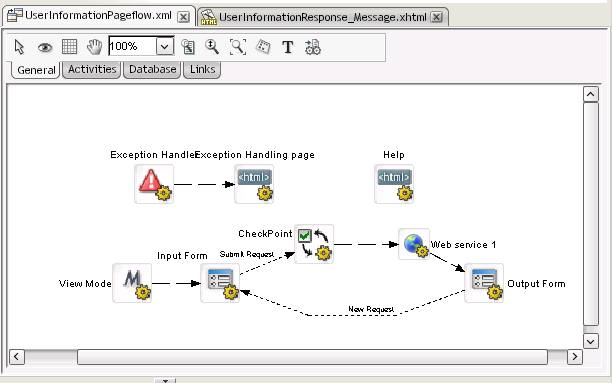
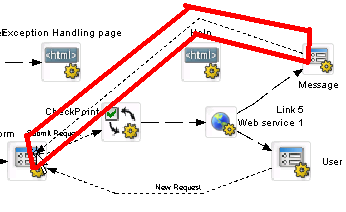
In this exercise you are going to add the Message Display page to the existing pageflow and then change the links on this page to include this page as part of the application flow. One of the links will have a condition that will check what result was received from the Web Service to determine which page should be displayed—the User Information page or the Message page. Your objective is to go from the flow pictured just below to the one pictured under it.
Original pageflow
Target pageflow
Select the UserInformationPageflow.xml file in the exteNd Director Edit Pane. UserInformationPageflow.xml opens in the Pageflow Modeler.
Add the form to the right of the Help HTML activity in the pageflow diagram by moving the mouse pointer to the location and clicking the left mouse button:
Click the label added under the Form activity you just placed on the diagram and edit it to read Message.
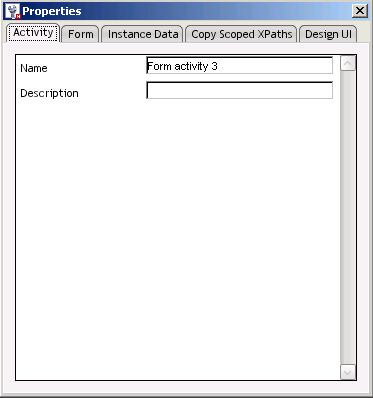
Double-click the Form activity you just placed on the diagram to open the Property Inspector for the activity:
You may drag this window to a more convenient location on you desktop so that it does not cover the diagram or other parts of the editor that you need to view.
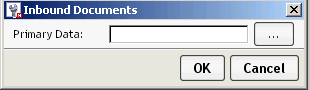
Click the  button next to the XHTML text box on the Form tab.
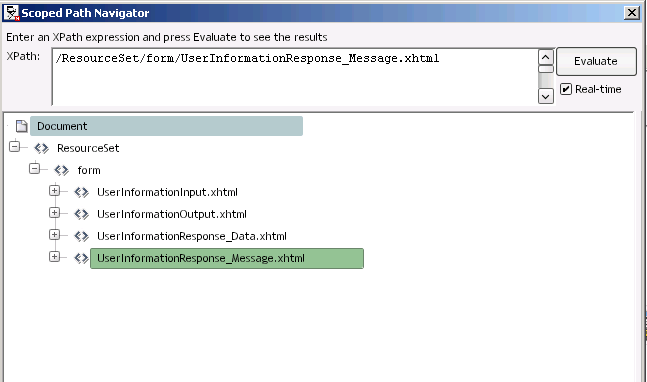
In the Choose The Scoped XPath dialog, select ResourceSet from the dropdown list and then click the Browse button.
In the XPath Navigator, use the button to open the ResourceSet and form lists and then select the UserInformationResponse_Message.xhtml file:
Click the Scoped XPaths dropdown list to select /Flow/document/RESPONSE.
Now you will create links for the new form to include it as part of the normal flow of the application. The Web Service will go to both forms with a condition added to one of the links to determine which one. The new Message form will link to the Input form completing the loop in the application.
Click the Message Form activity, drag to the Input Form activity, then left-click to create a link between the two activities:
In the Property Inspector in the Button Link tab, change the Description to New Request.
This is the value that will appear on the button when the page is rendered in the browser.
Click the Web Service activity, drag to the Message Form activity, then left-click to create a link between the two activities:
Click on the link between the Web Service activity and the Message Form activity.
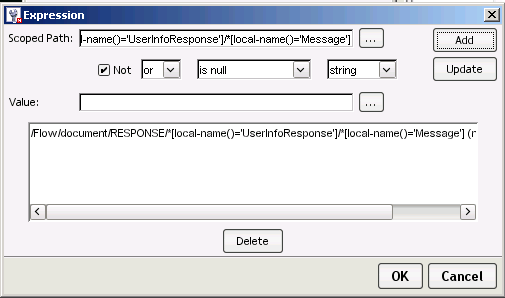
In the Property Inspector, click on the Edit Expression link  in the Link tab.
In the Scoped Path text box of the Expression dialog, type the following expression (be careful with the punctuation and case):
/Flow/document/RESPONSE/*[local-name()='UserInfoResponse']/*[local-name()='Message']
In the operator dropdown list, select is null, check the Not check box, then click the Add button:
In the Link tab of the Property Inspector, make sure that the Precedence text box has a value of 1.
Click on the link between the Web Service activity and the User Info Form activity.
In the Link tab of the Property Inspector, make sure that the Precedence text box has a value of 2.
Now that you have completed the changes to the pageflow to incorporate the new page, the last step is to test your changes in the application server. Because of the dynamic loading feature of exteNd Director, your changed forms and pageflow have been automatically loaded into the application server—and all that is needed to test the changes is to open a browser window and log in to the Portal application.
Type http://localhost/RequestUserInfo/portal/portlet/LoginPortlet in the address bar, then press Enter.
Under the Personal Pages list, click the User Info Test link.
In the UserID text box of the UserInformationInput page, type SSpade and then click Submit Request button.
Type sp in UserID text box, then click the Submit Request button.
Congratulations. You have successfully completed the Guided Tour.
In this Guided Tour through the development features of the exteNd 5 Suite, you have:
Used exteNd Composer to create a service that extracts information from an LDAP directory.
This showed you how you can use exteNd Composer to XML-enable your legacy systems and use the information in them to provide new services.
Deployed the service as a SOAP service.
This made it possible to take a standards-based approach to accessing this information.
Used exteNd Director to build a browser-based interface that can use this service by accepting input from the user and then displaying information to the user.
In short, you have gone from producing a Web Service to consuming a Web Service, all with one integrated set of tools. The entire application was provided by a robust J2EE application server. And all this without writing one line of Java code.
If you were to continue development of your Web Service application, the next step would be to go from a query-only application to a maintenance-and-query application. But that is a challenge for another time.
Learning more To learn more about Novell exteNd, see the Learning Resources page in Welcome to Novell exteNd in this help system.
Copyright © 2004 Novell, Inc. All rights reserved. Copyright © 1997, 1998, 1999, 2000, 2001, 2002, 2003 SilverStream Software, LLC. All rights reserved. more ...
 .
. 

 button.
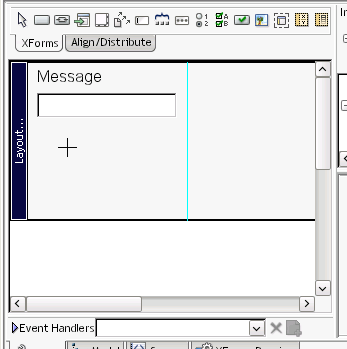

 to save your changes
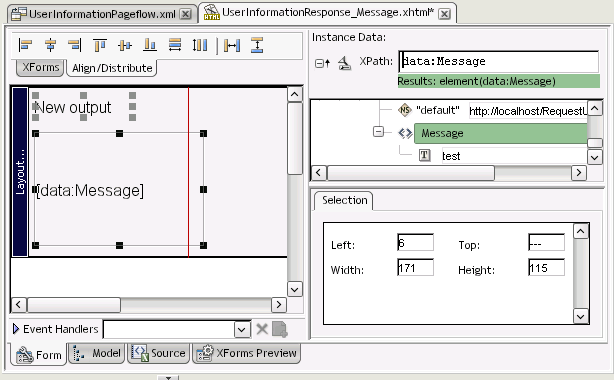

 button.

 toolbar button.
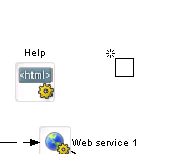
 button next to the
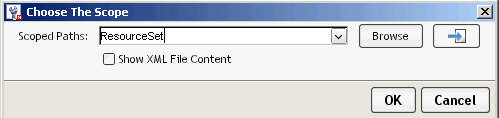

 .
. 
 .
.