8.7 Creating a Group Collaborative Storage Policy
-
Section 8.7.1, Setting Group Collaborative Storage Policy Options
-
Section 8.7.2, Setting Group Collaborative Storage Policy Associations
-
Section 8.7.3, Setting Group Collaborative Storage Policy Provisioning Options
-
Section 8.7.4, Setting Group Collaborative Storage Policy Target Paths
-
Section 8.7.5, Setting Group Collaborative Storage Policy Quota Options
-
Section 8.7.6, Setting the Group Collaborative Storage Policy Move Schedule
-
Section 8.7.7, Setting Group Collaborative Storage Policy Dynamic Template Processing
-
Section 8.7.8, Setting Group Collaborative Storage Policy Cleanup Options
-
Section 8.7.9, Setting Group Collaborative Storage Policy Vault Rules
-
Section 8.7.10, Setting Group Collaborative Storage Policy Groom Rules
-
In the Admin Client, click the tab.
-
Click .
-
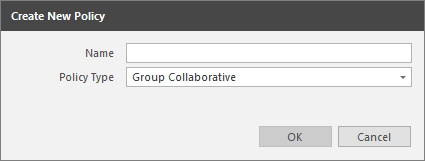
In the menu, select .
The following dialog box appears:
-
Specify a descriptive name in the field.
The Policy Options page appears.
-
Continue with Section 8.7.1, Setting Group Collaborative Storage Policy Options.
8.7.3 Setting Group Collaborative Storage Policy Provisioning Options
The Provisioning Options page is where you indicate collaborative storage permissions, the location of a template for provisioning the collaborative storage folder structure and content in a managed path when it is created, and more.
-
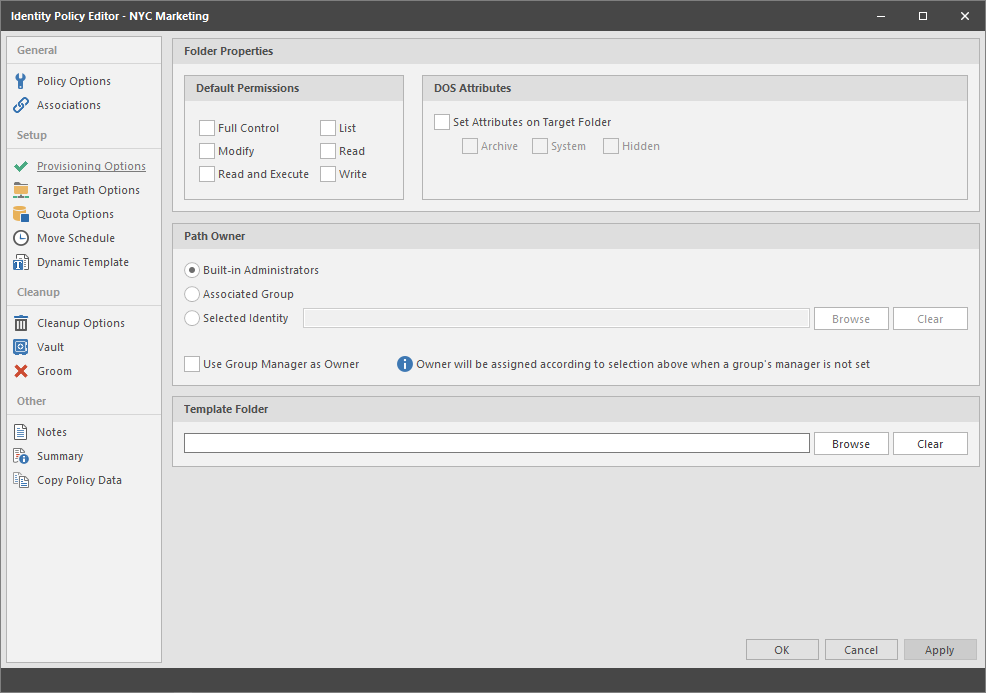
In the left pane, click .
The following page appears:
-
In the region, select the desired permissions to be applied to the target folder.
If you chose to create a Collaborative Storage template, the permissions will be applied from the template that you created earlier under Section 8.5.3, Configuring Permissions for the Group Members’ Personal Folders and Section 8.5.4, Configuring Group Member Permissions to Other Folders.
-
In the region, select one of the following options:
-
Built-in Administrator: If you want the owner of the storage to be the Built-in Administrator, select this option.
-
Associated Group: The associated group is the group whose folder you are creating. If you want the associated group to own their own folder, select this option.
-
Selected Identity: If you want another object to be the owner of the folder, browse and select the object.
-
Use Group Manager as Owner: To use the Active Directory Group Object Manager as the owner, select this check box. If the manager is not found, File Dynamics will use the option selected above.
-
-
In the field below the check box, browse to indicate a path owner (that is, the owner of the group’s managed path).
-
In the region, click the button and locate the folder structure that you created in Section 8.4, Creating a Collaborative Storage Template.
-
Select the topmost folder in the folder structure and click .
For example, if you had a structure similar to the Sample Classroom Collaborative Storage Template in Figure 8-1, you would select “8th Grade U.S. History.”
-
Click to save your settings.
-
Proceed with Section 8.7.4, Setting Group Collaborative Storage Policy Target Paths.
8.7.4 Setting Group Collaborative Storage Policy Target Paths
The Target Paths page is where you set the paths to where the collaborative storage area for this policy will be hosted.
-
In the left pane, click .
-
In the region, do one of the following:
-
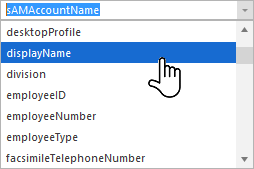
From the drop-down menu, select the single-value Active Directory attribute you want as the means of naming your collaborative storage folders.
-
Click and select a previously saved Action Block for the naming attribute.
For some organizations, having the default sAMAccountName attribute as the means of naming home folders is not desirable. To allow File Dynamics to create a collaborative storage folder with a name you can define, you can select a different attribute from the drop-down list.
Once you have saved the policy, you can use an account provisioning system such as NetIQ Identity Manager to automatically populate the selected attribute with the desired folder name and then File Dynamics will automatically provision the home folder based on this attribute setting.
For existing groups whose collaborative storage folders you would like to change to a new attribute value, you would follow the same procedures, followed by performing an Enforce Policy Path Management Action.
For specifications pertaining to Managed Path Naming Attribute, see Section F.0, Managed Path Naming Attribute Specifications.
-
-
In the region, select a option from the drop-down menu.
If you create more than one target path for a policy, you can indicate any of the following options:
Random: Distributes storage randomly among the number of target paths.
Actual Free Space: Distributes the creation of collaborative storage folders according to shares with the largest amount of absolute free space. For example, if you have two target paths listed, target path 1 has 15 GB of free space, and target path 2 has 10 GB, the collaborative storage folders are created using target path 1.
Percentage Free Space: Distributes the creation of collaborative storage folders to shares with the largest percentage of free space. For example, if you have two target paths listed and target path 1 is to a 10 TB drive that has 30 percent free space, and target path 2 is to a 500 GB drive with 40 percent free space, the collaborative storage folders are created using target path 2, even though target path 1 has more absolute available disk space. You should be cautious when using this option with target paths to shares of different sizes.
-
From the drop-down menu, choose an option.
This setting is used to structure the home folders so that they are categorized by the first or last letter of a username through a subordinate folder. For example, if you choose , and the field is set to 1, a user named BSMITH has a home folder located in a path such as \\SERVER1\HOME\B\BSMITH.
If you choose , and the field is set to 1, the same user has a home folder located in a path such as \\SERVER1\HOME\H\BSMITH
The means the last character of the attribute File Dynamics uses to create storage. Once again, File Dynamics uses the SAM, not the character of the last name.
The field allows you to enter up to 4 characters. This makes it so that you can organize folders by year. For example, if your setting is , and the setting is 4, a user named BMITH2014 has a home folder located in a path such as \\SERVER\HOME\2014\BSMITH2014.
-
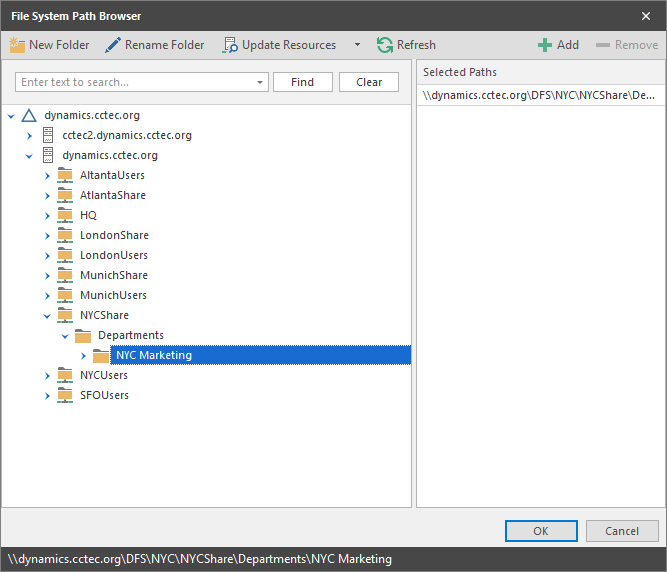
For each target path that you want to establish, click to access the Path Browser.
-
Browse to the location of the target path you want and click to add the target path to the pane.
-
Click to save your settings.
-
Proceed to Section 8.7.5, Setting Group Collaborative Storage Policy Quota Options.
8.7.5 Setting Group Collaborative Storage Policy Quota Options
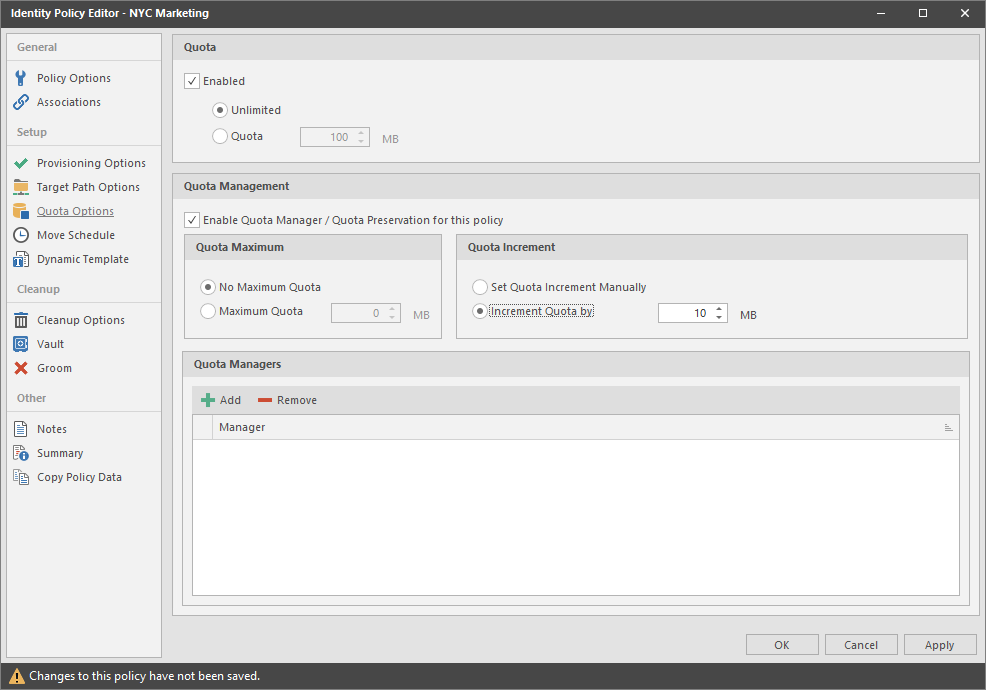
This page lets you establish storage quota settings for the group collaborative storage folder. Until quota management is established, a collaborative storage area has unlimited space. Quota management for collaborative storage applies to:
-
The quota for the entire storage folder
-
Quotas for personal folders in the collaborative storage folder
NOTE:In order for the quota to be managed on a personal folder, you must also manage the quota on the -MANAGER- or -MEMBER- folder. You can set this in the template through the Windows Server Manager in the same way you set the folder options.
Quota management on NAS devices needs to be managed by the NAS vendor software.
This page is also where you establish quota management settings for quota managers. A quota manager is a specified user or group—for example, a help desk administrator or technical support representative—who is granted the ability to increase quotas without having rights to the file system. Quota management actions are performed through Quota Manager, which is a separate Web browser-based management interface. For more information on Quota Manager, see Section 9.0, Using Quota Manager.
-
In the left pane, click .
The following page appears:
-
Select the check box to enable an initial storage quota for collaborative storage paths managed by this policy.
-
In the field, specify the initial storage quota for the collaborative storage folders.
-
Set up quota managers by filling in the following fields:
Enable Quota Manager / Quota Preservation for this Policy: Select this check box to enable the region of the page.
Quota Maximum: Indicate whether the collaborative storage folders associated with this policy will have a maximum quota setting. If so, indicate the maximum quota.
Quota Increment: Indicate whether quota managers will set quotas manually or in set increments. If you select manual increments, the quota manager can increase the quota in any increment until it meets the maximum quota setting. If you select set increments, the quota manager can only increase the quota by the increment setting.
Quota Managers: Click and use the Directory Services Browser to browse to and select a user or group you want to be a quota manager, then drag the User or Group object to the right pane. Repeat this for each user or group you want to be a quota manager.
If you do not specify a user or group as a quota manager, only members of the fdadmins group will be able to use the Quota Manager Web interface.
-
Click to save your settings.
-
Proceed with Section 8.7.6, Setting the Group Collaborative Storage Policy Move Schedule.
8.7.7 Setting Group Collaborative Storage Policy Dynamic Template Processing
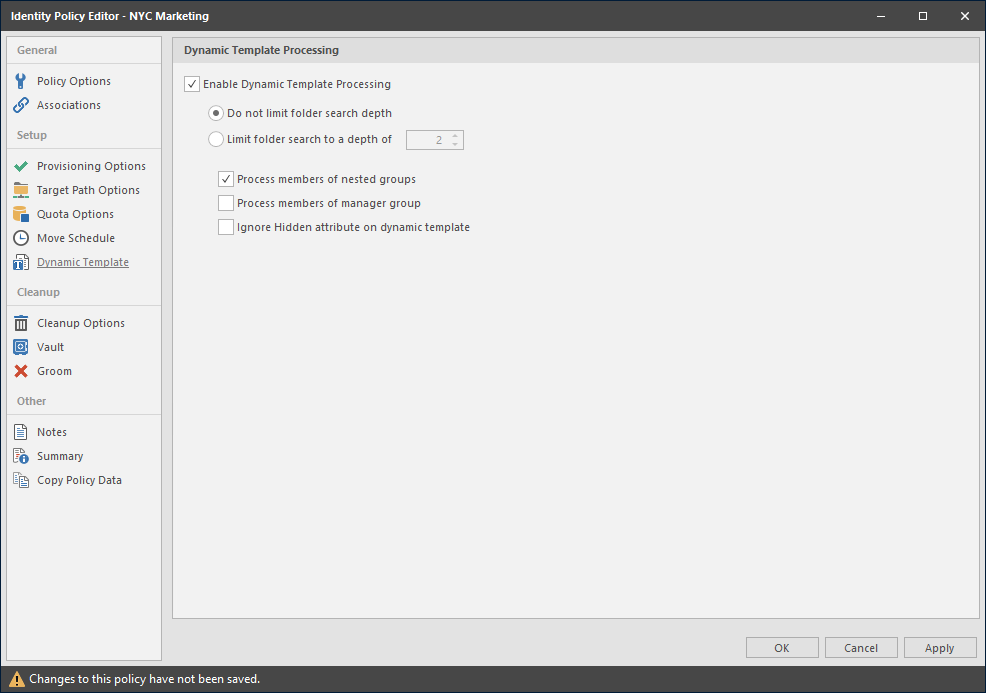
Dynamic Template Processing is the term used in File Dynamics for creating personal folders in a collaborative storage folder. If Dynamic Template Processing is enabled, creating a -MEMBER- or -MANAGER- folder in the collaborative storage file structure automates the management of personal storage within the collaborative storage when a user is added, deleted, or renamed in Active Directory.
-
In the left pane, click .
The following page appears:
-
Do one of the following:
-
If the folder structure in your collaborative storage template includes a -MEMBER- folder, File Dynamics can create personal folders within the collaborative storage folder. Leave the check box selected and proceed with Step 3.
-
If your collaborative storage template does not include a -MEMBER- folder, File Dynamics will not create personal folders within the collaborative storage folder. Deselect the check box and proceed with Section 8.7.8, Setting Group Collaborative Storage Policy Cleanup Options.
-
-
Choose one of the following options:
-
Do not limit folder search depth: The Engine searches through the collaborative storage folder looking for -GROUP-, -MANAGER-, and -MEMBER- folders. Depending on the number of folders in the collaborative storage folder, this can take significant time. It is therefore best to not select this option.
-
Limit folder search to a depth of: If you know the maximum level where the -GROUP-, -MEMBER-, and -MANAGER- folders are located in your collaborative storage template, you can select this option and indicate the level.
For example, in the Sample Classroom Collaborative Storage Template in Figure 8-1, the -MEMBER- folder is located four levels down.
-
-
Select the applicable check boxes:
Process members of nested groups: If you have nested groups in your Active Directory deployment, selecting this check box creates personal storage for group members that are part of a group via group nesting.
Ignore hidden attribute on dynamic template: Selecting this check box ignores the Hidden DOS attribute on the -MEMBER-, -MANAGER-, and -GROUP- folders in the collaborative managed path when provisioning the corresponding folder for the user or group. Thus, the Dynamic Template Processing folder will not have the Hidden DOS attribute set when it is created.
-
Click to save your settings.
-
Proceed with Section 8.7.8, Setting Group Collaborative Storage Policy Cleanup Options.
8.7.9 Setting Group Collaborative Storage Policy Vault Rules
When a Group object is removed from Active Directory, you can have File Dynamics vault the contents of the associated collaborative storage folder from primary storage to less expensive secondary storage. File Dynamics lets you specify what to vault or delete by using vault rules. For example, you might want to remove all .tmp files before vaulting the collaborative storage folder. Or, you might want to vault only a single folder, such as Final Proposal and nothing else in the other folders. You accomplish all of this through settings in the Vault Rule Editor.
-
In the left pane, click .
The field displays the vault path that you established when you set up collaborative storage cleanup rules.
-
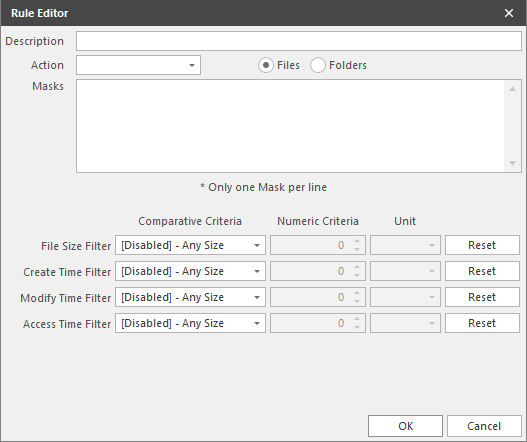
Click to bring up the Vault Rule Editor.
-
In the field, specify a description of the vault rule.
For example, “Files to delete before vaulting,” or “Files to vault.”
-
From the Action menu, select an action.
Select whether the rule will vault files or folders, delete files or folders, or ignore a vault rule.
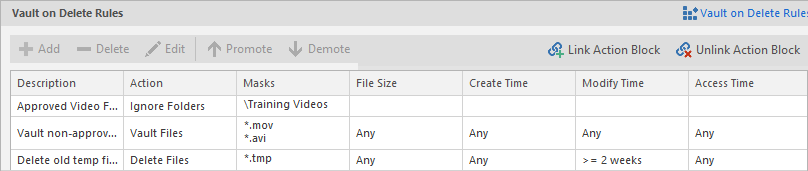
NOTE:There is only one action for each vault rule. For example, if you wanted to delete some files and vault others, you would need to establish two different vault rules.
Vault: Moves all of the files or folders that meet the criteria specified in the vault rule to a location specified in the policy.
Delete: Deletes all of the files or folders that meet the criteria specified in the vault rule.
Ignore: Ignores the conditions that would normally vault or delete a file or folder, based on specifications you provide in the field.
For example, if you wanted to vault all .MOV files, with the exception or approved training videos located in a folder named Training Videos, you could set an individual rule to vault .MOV files, and another rule to ignore vaulting the Training Videos folder.
Selecting disables the filter settings in the lower portion of the Rule Editor.
File or folder names can contain an asterisk.
-
Specify whether the rule will apply to files or folders.
Files: If the vault rule you are creating will vault, delete, or ignore content at the file level, leave the option selected.
Folders: If the vault rule you are creating will vault, delete, or ignore content at the folder level, select the option.
-
Specify the masks for the rule.
Masks: List the files or folders you want to be vaulted or deleted, according to what is indicated in the drop-down menu. For example, if you wanted to delete all temporary files, you could list *.TMP in the field.
Be aware that if you select , only the files or folders that you list in the text box are vaulted and the remainder of the managed path content is deleted. Conversely, if you select , only the files or folders that you list in the text box are deleted, and everything else is vaulted.
-
(Conditional) If the rule you are creating is specific to files, complete the applicable filter settings.
Leaving the setting as vaults or deletes all file types listed in the text box, according to what is indicated in the drop-down menu. Choosing any of the other options from the drop-down menu lets you indicate files to delete or vault according to size, when created, when last modified, and when last accessed.
-
Click to save the vault rule.
-
If necessary, create any needed additional vault rules by repeating the procedures above.
-
(Conditional) If you have set any rules designed to ignore a vault or delete action, in the region of the Vault page, use the arrow to move the rule to the top. This protects files or folders specified in the field from being vaulted or deleted.
-
Proceed with Section 8.7.10, Setting Group Collaborative Storage Policy Groom Rules.