7.1 Installing and Configuring a Windows Server NFR Agent
The Windows Server NFR Agent is installed through an easy-to-use installation program that can be run directly at the server or remotely through a terminal server/remote desktop.
7.1.1 Technical Specifications
Server: Windows Server 2003 SP2 or Windows Server 2008 SP1 or later.
RAM: You need 20 - 50 MB, depending on the number of files and directories being scanned. Because of caching, performance is enhanced in a Windows server environment if you use at least 2 GB RAM.
Disk Space: 150 MB free disk space for each estimated 1,000,000 files or folders.
7.1.2 Procedure
-
Double-click the NFRAgent-1.x.x-win32.msi file located where you stored the files that you downloaded in Step 3 or Step 3.
This launches the installation interface.
-
When you are asked if you want to run this file, click .
-
On the Welcome page, click .
-
Review the License Agreement, accept the terms, and click .
-
Accept the installation path or indicate a new path by using the button.
-
Click .
-
Click .
-
Verify that the check box is selected and click .
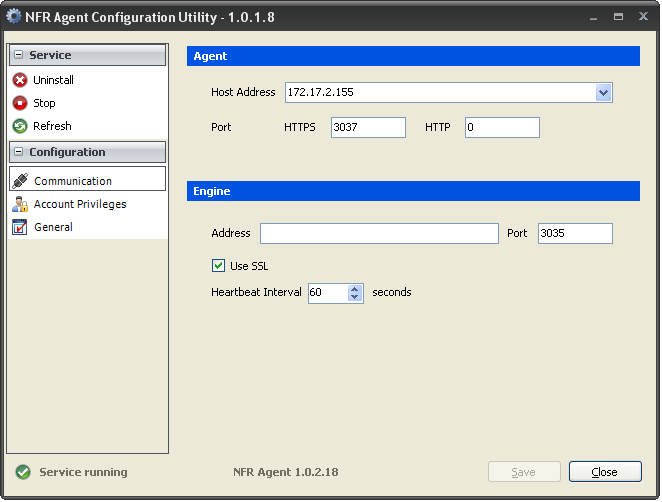
The NFR Agent Configuration Utility is launched.
-
In the s field, use the drop-down menu and select the IP address of the Windows Server where the NFR Agent is being installed.
-
Unless you have a port conflict or your network security standards prohibit it, leave port 3037 set in the field. Be sure to leave the field set to 0.
If you do change the port setting, you need to use the same port setting on all other NFR Agents that you install, as well as the NFR Engine.
-
In the field, enter the IP address of the server hosting the NFR Engine.
-
Unless you have a port conflict, leave the 3035 setting in the field.
If you do change the port setting, you also need to change the field in the NFR Engine Configuration Utility.
-
We recommend using the and default settings.
-
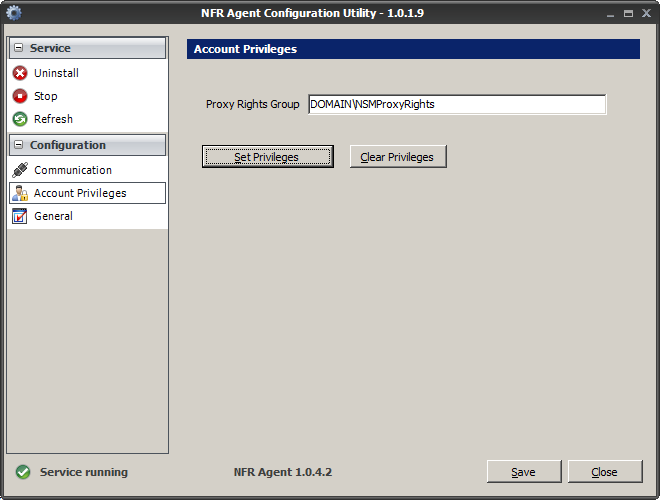
In the left pane, click .
-
In the field, type one of the following:
-
domain_name\NSMProxyRights
-
domain_name\NFRProxyRights
-
-
Click
This stops the NFR Agent service and applies the updated LSA (Local Security Authority) privileges needed by the NFR Agent.
For more information on setting LSAprivileges, see Section 9.4, Adding Local Security to the Active Directory Managed Cluster.
Additional information on LSA privileges in Appendix A, “Security Specifications” in the Novell Storage Manager 3.0.1 Aministration Guide.
-
Click .
-
When you are prompted to restart, click .
NOTE:The settings that appear when you click should be left as the default settings unless you are directed to change them by a Novell Support representative. The data path, however, can be modified if necessary.