6.8 Historic Comparison Reports
Historic Comparison reports specify the differences between two similar scan types of the same target system. For example, if you had a Previous Permissions scan of a Windows share and a Current Permissions scan of the same share, you could generate a Historic NTFS Permissions Comparison report that would specify the differences in permissions between the two points in time that the scans were taken.
Historic Comparison reports can compare the following:
-
Baseline scans to Previous scans
-
Baseline scans to Current scans
-
Historic scans to Current scans
Reports in this classification include Historic File System Comparison, Historic NCP Permissions Comparison, and Historic NTFS Permissions Comparison.
6.8.1 Generating a Historic File System Comparison Report
-
Select > .
-
Click .
-
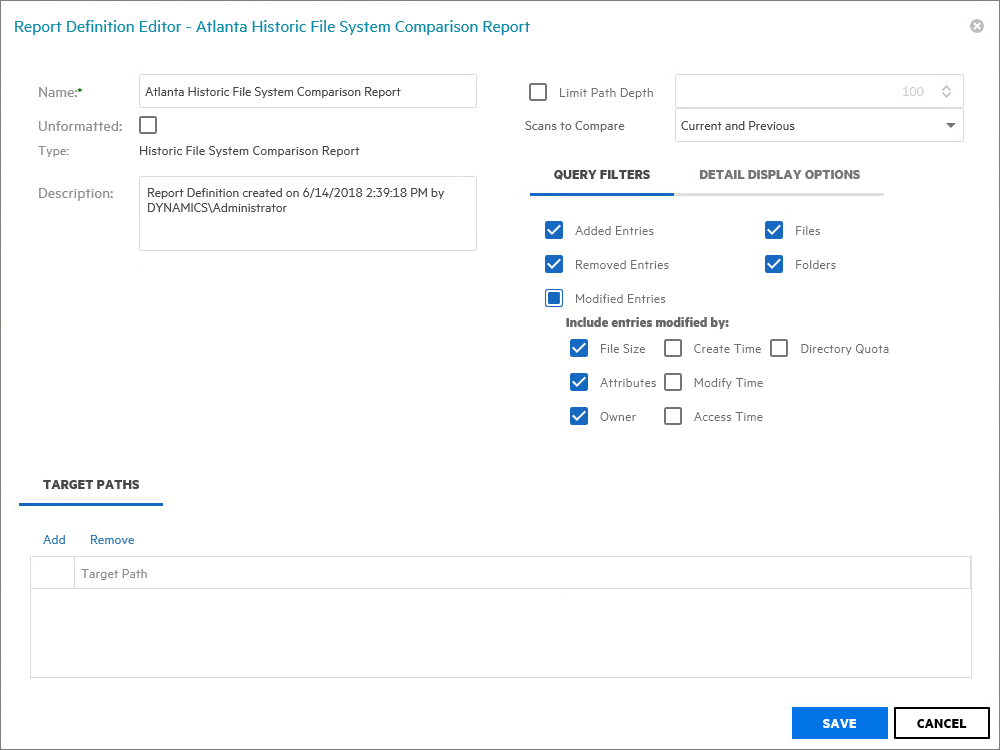
In the field, specify a descriptive name of the report definition.
-
Under , select the option, then click .
-
(Conditional) If you want to limit the scope of the report to a set depth in the file structure, click the check box and specify the depth level.
For example, if you specify 3, the report lists the file contents of all file paths in the specified target paths up to 3 levels in the file structure.
If you do not specify a path depth, File Reporter will report on all levels of the specified target path.
-
From the drop-down menu, select one of the following options:
Current and Previous: Compares the Current scan of the storage resource to the Previous scan of the storage resource.
Current and Baseline: Compares the Current scan of the storage resource to the Baseline scan of the storage resource.
Previous and Baseline: Compares the Previous scan of the storage resource to the Baseline scan of the storage resource.
All options appear whether you have scans or not. If you do not have scans, File Reporter will generate an empty report.
-
In the region, specify whether to include the following metadata categories in the report:
Added Entries: If you want the report to list files or folders that have been added since the older scan, leave this check box selected.
Removed Entries: If you want the report to list files or folders that have been removed since the older scan, leave this check box selected.
Modified Entries: If you want the report to list files or folders that have been modified since the older scan, leave this check box selected.
Files: If you want the report to list files, leave this check box selected.
Folders: If you want the report to list folders, leave this check box selected.
-
In the region of the , specify which of the attributes modified between the older and newer scan you want included in the report.
-
In the region, identify whether to display the metadata categories specified below in the section of the report.
The categories below pertain to the section of the report only, and not the section.
Added Entries: If you want the report to display this category, whether there are added entries to list or not, select this check box.
Removed Entries: If you want the report to display this category, whether there are removed entries to list or not, select this check box.
Modified Entries: If you want the report to display this category, whether there are modified entries to list or not, select this check box.
-
(Conditional) If you selected the check box, in the region, select any of the category options you want displayed in the report whether these metadata categories have been changed between the two scans or not.
By default, the section of the report only shows metadata that has changed. The options in this region of the dialog box are to force the display of one or more particular metadata properties.
Any metadata for an entry that File Reporter has determined has changed is displayed in bold font. Any optional data that has not changed is displayed in regular font.
-
Browse to and specify the file paths you want included in the report, then click .
-
Click to close the Report Definition Editor.
-
Generate the report as either a Preview report or a Stored report.
For procedures on generating a Preview report, see Generating a Preview Report.
For procedures on generating a Stored report, see Generating a Stored Report.
6.8.2 Generating a Historic NCP Permissions Comparison Report
-
Select >
-
Click .
-
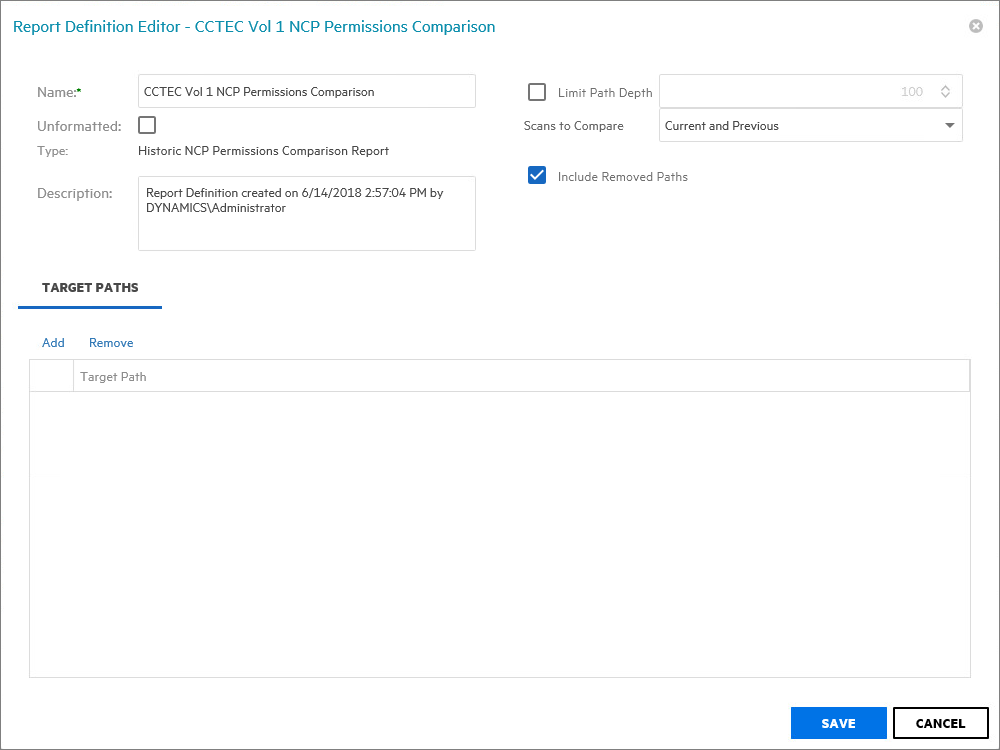
In the field, specify a descriptive name of the report definition.
-
Select the option, then click .
-
(Conditional) If you want to limit the scope of the report to a set depth in the file structure, click the check box and specify the depth level.
For example, if you specify 3, the report lists the permissions of file contents of all file paths in the specified target paths up to 3 levels in the file structure.
If you do not specify a path depth, File Reporter will report on all levels of the specified target path.
-
From the drop-down menu, select one of the following options:
Current and Previous: Compares the Current scan of the storage resource to the Previous scan of the storage resource.
Current and Baseline: Compares the Current scan of the storage resource to the Baseline scan of the storage resource.
Previous and Baseline: Compares the Previous scan of the storage resource to the Baseline scan of the storage resource.
All options appear whether you have scans or not. If you do not have scans, File Reporter will generate an empty report.
-
(Conditional) If you do not want the report to list any paths that have been deleted or removed, deselect the check box.
-
Browse to and specify the file paths you want included in the report, then click .
-
Click to close the Report Definition Editor.
-
Generate the report as either a Preview report or a Stored report.
For procedures on generating a Preview report, see Generating a Preview Report.
For procedures on generating a Stored report, see Generating a Stored Report.
6.8.3 Generating a Historic NTFS Permissions Comparison Report
-
Select >
-
Click .
-
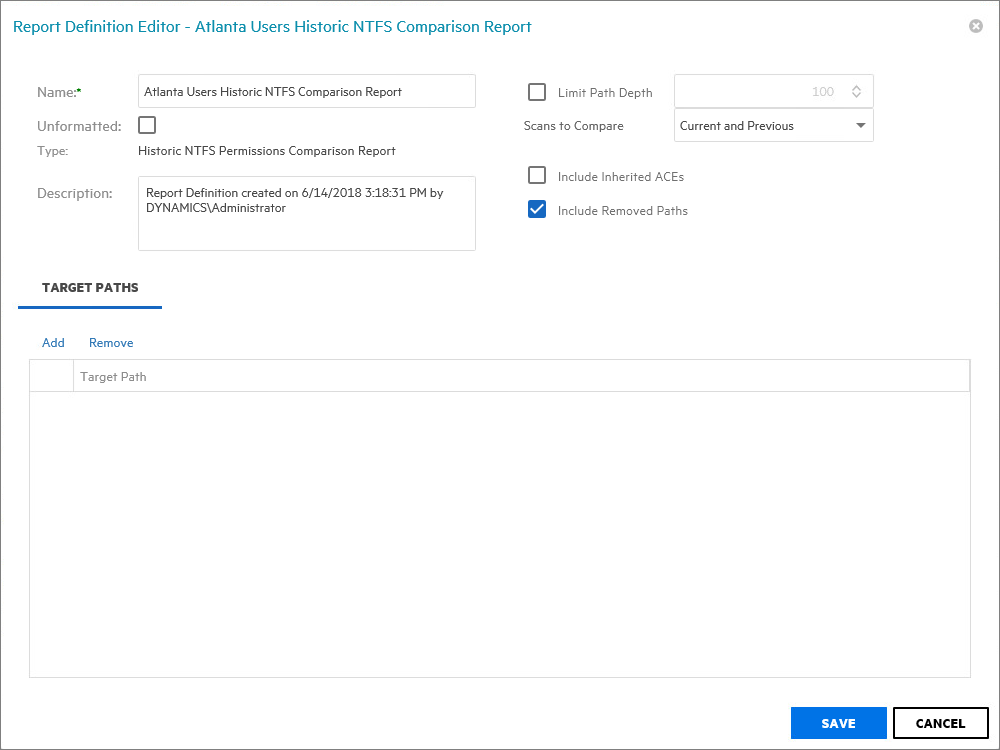
In the field, specify a descriptive name of the report definition.
-
Select the option, then click .
-
(Conditional) If you want to limit the scope of the report to a set depth in the file structure, click the check box and specify the depth level.
For example, if you specify 3, the report lists the permissions of file contents of all file paths in the specified target paths up to 3 levels in the file structure.
If you do not specify a path depth, File Reporter will report on all levels of the specified target path.
-
From the drop-down menu, select one of the following options:
Current and Previous: Compares the Current scan of the storage resource to the Previous scan of the storage resource.
Current and Baseline: Compares the Current scan of the storage resource to the Baseline scan of the storage resource.
Previous and Baseline: Compares the Previous scan of the storage resource to the Baseline scan of the storage resource.
All options appear whether you have scans or not. If you do not have scans, File Reporter will generate an empty report.
-
(Conditional) If you want your report to include not only direct permissions, but inherited permissions, select the check box.
Reporting inherited permissions could make the report significantly larger.
-
(Conditional) If you do not want the report to list any paths that have been deleted or removed, deselect the check box.
-
Browse to and specify the file paths you want included in the report, then click .
-
Click to close the Report Definition Editor.
-
Generate the report as either a Preview report or a Stored report.
For procedures on generating a Preview report, see Generating a Preview Report.
For procedures on generating a Stored report, see Generating a Stored Report.