10.2 Upgrading an All-in-One (Small) Deployment
Before upgrading a Filr deployment, you must ensure certain requirements are met. See Before You Upgrade! and then complete the instructions in the following sections in order:
Before You Upgrade!
NOTE:As an additional resource to the information in this section, TID 7017288 has a “Pre-Flight Checklist” that can help you ensure a successful upgrade.
Failure to comply with the following critical points could result in a non-functional Filr system.
-
Review the Release Notes: Check
Upgrade Notes
andUpgrade
known issues in the Filr 3 Release Notes before you start the upgrade process. -
Ensure that the VM host has enough unformatted disk space:
-
System Disk (/): A 20 GB disk is created automatically.
-
Disk 2 (/vastorage): You make a copy of the appliance’s Disk 2.
-
Each Disk 3 (/var): You create this disk. The recommended size is 4 GB plus 3 times the appliance’s RAM allocation.
-
-
Check the version: Make sure that the existing appliance is running version 2.0 with the latest patches applied (see
Managing Field Test Patches
in the Filr 2.0: Administration Guide) -
Remove VMware Snapshots: Before copying Disk 2, make sure to remove all VMware snapshots so that the /vastorage disk has the correct disk file and latest configuration settings.
-
If the appliance has two network adapters: Do the following:
-
Download the networkprep.zip file from the Filr software downloads page.
-
Enable SSH on the appliance, as described in
Managing System Services
in the Filr 3.4.1: Administrative UI Reference. -
Using an SSH client (such as WinSCP), log in to the appliance as the root user.
-
Copy the networkprep.zip file that you downloaded to the /root/ directory on the appliance.
-
Unzip the networkprep.zip file:
unzip networkprep.zip
The networkprep folder is created.
-
Change to the network prep folder:
cd /root/networkprep
-
Run the script:
sh run-networkprep.sh
-
Close the remote SSH connection to the appliance.
-
After ensuring that you have met the prerequisites and cautions above, complete the instructions in the following sections in order.
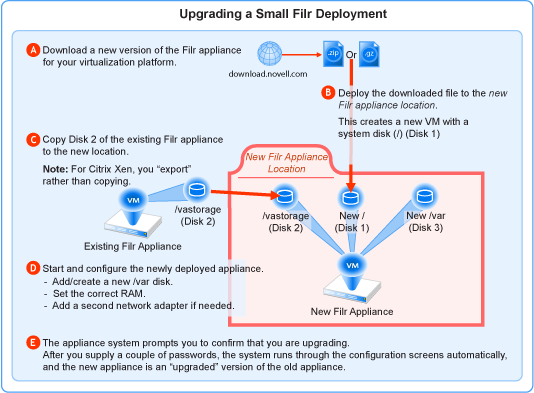
10.2.1 Small Filr Upgrade Process Overview
If you have upgraded a small Filr deployment before, the following reminder might be all you need.
Figure 10-2 Overview of the Small Filr Appliance Upgrade Process
10.2.2 Downloading and Preparing Software
Download and prepare the software for your virtualization platform as described in the following sections:
VMWare
-
Download the Filr appliance software to your management workstation.
IMPORTANT:Registration with Micro Focus is required to receive an email with a software-download link.
-
Extract the .ovf.zip file on your management workstation until a Filr-version folder appears.
-
Launch the vSphere Client and navigate to the datastore where you plan to host the upgraded VM.
-
Create a folder for the new appliance with a name that is easily associated with (but not the same as) the VM name of the appliance being upgraded.
-
Continue with Copying Each Appliance’s /vastorage Disk (Disk 2).
Hyper-V
-
Log in to the Hyper-V host server either locally or from a remote workstation using Remote Desktop.
-
Download the Filr appliance software to the location where you plan to host your upgraded VMs.
IMPORTANT:Registration with Micro Focus is required to receive an email with a software-download link.
-
Extract the .vhd.zip file in the directory where you downloaded it until an Filr-version.vhd archive file appears.
-
Create a directory for the new appliance with a name that is easily associated with, but not the same as the VM name of the appliance being upgraded.
-
Move the Filr-version.vhd archive file to the folder you just created.
-
Continue with Copying Each Appliance’s /vastorage Disk (Disk 2).
Xen
-
Log in to the Xen VM host server either locally or from a remote workstation.
If you are connecting from a remote Linux workstation, use the following command:
ssh -X root@host_ip_address
The -X in the command in required for the GUI installation program upon which the steps in this section are based.
-
Download the Filr appliance software to the Xen VM host server in the location where you plan to host your upgraded VM.
IMPORTANT:Registration with Micro Focus is required to receive an email with a download link.
-
Untar the *.gz file in the directory where you downloaded it.
You can use the following command to untar the file:
tar -Sxvzf Filr.x86_64-version.xen.tar.gz
A Filr-version directory is created.
-
Continue with Copying Each Appliance’s /vastorage Disk (Disk 2).
Citrix Xen
-
On a workstation with Citrix XenCenter installed, download the Filr appliance software.
IMPORTANT:Registration with Micro Focus is required to receive an email with a download link.
-
Using a program such as 7-Zip, extract each .xva.tar.gz file on your management workstation until a Filr-version folder appears.
-
Continue with Copying Each Appliance’s /vastorage Disk (Disk 2).
10.2.3 Copying Each Appliance’s /vastorage Disk (Disk 2)
IMPORTANT:
-
VMware requires shutting down an appliance before copying a disk.
This means that Filr services will be down while disk copying takes place.
-
On Citrix Xen you
export
rather than copying Disk 2.
-
Using the tools provided by your hypervisor, copy the /vastorage (second disk) to its associated folder or directory that you created for your upgraded appliances in Downloading and Preparing Software.
10.2.4 Upgrading the VMs
Shutting Down the Appliance
-
Shut down the Filr appliance using the Port 9443 Appliance Console.
-
Continue with the instructions for your VM platform:
Upgrading a Filr VMware VM
Complete the steps in Table 10-5.
Table 10-5 Upgrading the Filr VMware VM
|
Page, Dialog, or Option |
Do This |
|---|---|
|
1 - Launching the vSphere Client.
|
|
vSphere Client |
2 - Deploying the OVF Template and naming the VM.
|
|
Deploy OVF Template |
|
|
Open |
|
|
Deploy OVF Template |
|
|
3 - Editing the VM settings. |
|
|
vSphere Client |
|
|
Virtual Machine Properties |
|
|
4 - Configuring disk 2 (/vastorage) |
|
Virtual Machine Properties |
|
|
Add Hardware |
|
|
5 - Adding and Configuring disk 3 (/var) |
|
Virtual Machine Properties |
|
|
Add Hardware |
|
|
6 - (Optional) Adding a Network Adapter You can add a network adapter if your Filr deployment accesses a separate network for one or more of the following reasons:
|
|
Virtual Machine Properties |
|
|
Add Hardware |
|
|
vSphere Client |
|
Upgrading a Filr Hyper-V VM
Complete the steps in Table 10-6.
Table 10-6 Upgrading a Filr Hyper-V VM
|
Page, Dialog, or Option |
Do This |
|---|---|
|
1 - Open Hyper-V Manager. |
|
|
Hyper-V Host Server |
|
|
2 - Create a new VM. |
|
Hyper-V Manager |
|
|
Specify Name and Location |
|
|
Specify Generation |
|
|
3 - Specify memory |
|
Assign Memory |
|
|
4 - Assign network adapter |
|
|
Configure Networking |
|
|
6 - Identify the system disk |
|
Connect Virtual Hard Disk |
|
|
Summary |
|
|
7 - Specify processors |
|
Hyper-V Manager |
|
|
Processor |
|
|
8 - Use existing copy of hard disk 2 (/vastorage). |
|
Settings for VM on Host Server |
|
|
9 - Add hard disk 3 (/var). |
|
Hyper-V Manager |
|
|
Summary |
|
|
10 - (Optional) Add a Network Adapter
|
|
|
Hyper-V Manager |
11 - Deploy the upgraded appliance
|
Upgrading and Deploying a Filr Xen VM
Complete the steps in Table 10-7.
Table 10-7 Upgrading and Deploying a Filr Xen VM
|
Page, Dialog, or Option |
Do This |
|---|---|
|
1 - Launch the installer. |
|
|
Terminal prompt on Xen VM Host Server |
|
|
Create a Virtual Machine |
|
|
Install an Operating System? |
|
|
Type of Operating System |
|
|
2 - Name the VM. |
|
Summary |
|
|
Name of Virtual Machine |
|
|
3 - Specify the RAM and Virtual Processors. |
|
Summary |
|
|
Hardware |
|
|
4 - Configure the boot disk |
|
Summary |
|
|
Disks |
|
|
Virtual Disk |
|
|
Locate Disk or Disk Image. |
|
|
Virtual Disk |
|
|
5 - Configure disk 2 (/vastorage) |
|
Disks |
|
|
Virtual Disk |
|
|
Locate Disk or Disk Image. |
|
|
Virtual Disk |
|
|
6 - Configure disk 3 (/var) |
|
Disks |
|
|
Virtual Disk |
|
|
Locate Disk or Disk Image. |
|
|
Virtual Disk |
|
|
Disks |
|
|
7 - (Optional) Add a Network Adapter You can add a network adapter if your Filr deployment accesses a separate network for one or more of the following reasons:
|
|
Summary |
|
|
Network Adapters |
|
|
Virtual Network Adapter |
|
|
Network Adapters |
|
|
Summary |
|
|
Console |
8 - Deploy the Appliance
|
|
Port 9443 Admin Console |
|
Upgrading Citrix Xen VMs
Complete the steps in Table 10-8.
Table 10-8 Upgrading a Citrix Xen VM
|
Page, Dialog, or Option |
Do This |
|---|---|
|
1 - Launch XenCenter. |
|
Management Workstation |
|
|
XenCenter |
|
|
2 - Import the system disk |
|
Locate the File you want to import |
|
|
Select the location where the imported VM will be placed |
|
|
Select target storage |
|
|
3 - Select the network adapter |
|
Select network to connect VM |
|
|
Review the import settings |
|
|
4 - Specify Memory |
|
|
|
5 - Specify Processors |
|
|
|
6 - Link to Disk 2 (/vastorage) |
|
|
|
8 - Add Disk 3 (/var) |
|
Virtual Disks |
|
|
Add Virtual Disk |
|
|
9 - (Optional) Add a Network Adapter You can add a network adapter if your Filr deployment accesses a separate network for one or more of the following reasons:
|
|
|
|
|
XenCenter |
|
10.2.5 Deploying the Upgraded Filr VM
-
Power on the appliance.
-
Access the appliance’s console.
-
When prompted, enter the root and vaadmin passwords for the appliance.
The upgrade process proceeds automatically.
-
When the appliance displays the final screen in the console window, open your management browser and log in to the appliance on port 9443 as the vaadmin user.
-
Check the following:
-
MySQL :
-
Click the phpMyAdmin icon.
-
Verify that the database is populated as expected.
-
-
Filr:
-
Click the Filr configuration icon.
-
Ensure that all of the settings are in place as expected.
-
If the configuration wizard displays, there was a problem with the configuration.
-
Resolve the configuration issues, then click Finish to reconfigure the system.
Common configuration issues include:
-
If your system is not using DNS, the most likely problem is unresolvable DNS names and missing /etc/hosts entries.
-
If the appliance doesn’t have access to the database, ensure that all of the settings are as expected.
-
-
-
-
When the appliance is running, continue with
Performing Post-Upgrade Tasks.
10.2.6 Performing Filr Post-Upgrade Tasks
After upgrading to a new version of Filr, you should perform the following tasks to ensure a fully functional Filr system:
(Optional) Enable Net Folder Sharing
Folder sharing is a new feature in Filr 3.0 with an Advanced-Edition license installed.
If you have Net Folders where you want users to be able to share folders as well as files, you must grant folder sharing rights using the Recipient can share folders in this Net Folder with: option as documented in Grant Rights dialog
in the Filr 3.4.1: Administrative UI Reference.
Install Your New Filr License
Upgraded Filr appliances have a 60-day evaluation license installed.
To prevent a service interruption, you must install your new license by following the instructions in Installing/Updating the Filr License
in the Filr 3.4.1: Administrative UI Reference.