17.3 Formatting Email

The formatting options that are available when you compose a message depend on the Compose View you have selected. The options described in this section apply to the message you are composing.

NOTE:If recipients are using the HTML Read view, they see the email as you formatted it. They cannot change the font of an HTML-formatted item. If recipients are using the Plain Text Read view, HTML formatting is lost. However, they can click View > HTML to display the message the way you formatted it.

17.3.1 Selecting a Text Editor

When you compose a message in GroupWise, you have a choice of using the native GroupWise editor, or any of the following third-party editors:

  • LibreOffice 3.6 or later

  • Microsoft Word 2007 or later

    Microsoft Word 2019 is supported in GroupWise 18.1 and later.

In order to use LibreOffice or Word, the application must be properly installed on your workstation.

When you select LibreOffice or Word as your default editor, the application’s functionality and formatting are available within the GroupWise compose window. Refer to their documentation for formatting assistance.

  1. Click Tools > Options, and then double-click Environment.

  2. Click the Editors/Viewers tab.

  3. Under Compose plain text using, select the editor to use.

  4. Under Compose HTML using, select the editor to use.

  5. Click OK.

17.3.2 Using the GroupWise Text Editor to Format HTML Email

You can use the HTML tools available in GroupWise to add additional formatting to your messages. Standard text features like font, underline, and italics are all available on the toolbar, as well as features like alignment, indentation, adding images and tables, and more.

HTML Toolbar

You might need to resize the item view horizontally to see all the buttons on the HTML toolbar.

Changing the Font in an HTML Message

To change the font in an open HTML message:

Use the HTML toolbar to change the font, font size, and other font attributes as needed.

You can also set a default font for HTML items. For more information, see Setting the Default Read/Compose View and Font.

Adding Emojis to an HTML Message

Use any of the options below to insert an emoji into an HTML message.

NOTE:If you change a message with emojis from HTML to plain text format, the emojis will convert to black-and-white images. GroupWise supports emojis with plain text, but only in black and white.

  • Click Insert Emoji HTML Toolbar on the tool bar, and select from the available emojis.

  • Use the Windows Key + . (period) shortcut to open the Emoji menu.

  • Select Insert Emoji from the right-click menu to open the Emoji menu.

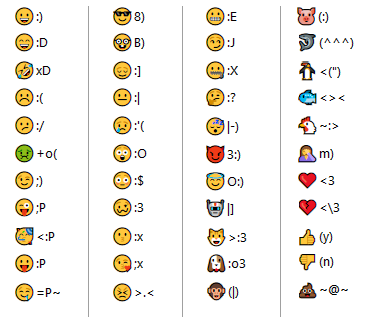
  • Type common emoji character strings to insert an emoji directly into the text line. For example,

    key :) or :-) for a smiley face .

    Press Ctrl+Z to change the emoji to the entered characters or Ctrl+Y to redo an undo action.

    Emoji character mapping in GroupWise:

Adding a Horizontal Line in an HTML Message

To add a horizontal line in an open HTML message:

  1. Select a location in the email where you want the line to appear.

  2. Click the Horizontal Line icon.

Adding a Bulleted or Numbered List in an HTML Message

To add a bulleted or numbered list in an open HTML message:

  1. Use the HTML toolbar to insert a bulleted or numbered list.

  2. Type a list item, and then press Enter to create the next item in the list.

  3. To turn off the list formatting, press Enter, and then press Backspace after the last item.

Adding a Table in an HTML Message

To add a table in an open HTML message:

  1. On the HTML toolbar, click the Table Options icon.

  2. From the drop-down menu, select the size of the table, or select Other and specify your own dimensions.

    The table is displayed in the email and adjusts to fit the text.

Adding Images in an HTML Message

To add an image in an open HTML message:

  1. In the area where you want the image to appear, click the Insert Picture icon.

  2. Specify the name of the graphic you want to add, or browse to and select it, and then click OK.

Adding a Background Image in an HTML Message

To add a background in an open HTML message:

  1. Click the Background Image icon.

  2. Specify the name of the graphic you want to use as a background, or browse to and select it.

  3. Click OK.

Adding a Hyperlink in an HTML Message

Hyperlinks directly connect a specific word, phrase, or image to a specific website.

To add a hyperlink in an open HTML message:

  1. Select the word, phrase, or image you want to use, and then click the Insert Hyperlink icon.

  2. Specify the web address you want to link to.

  3. Click OK.

    The text changes color and is underlined to indicate it is a link. An image does not change color, but still functions as a link.

Undoing or Redoing the Last Text Action in an HTML Message

You can undo the last text action in the Subject or Message field of a message you are composing.

Click Edit > Undo.

or

To redo the action, click Edit > Redo.

You can also use Ctrl+Z for Undo and Ctrl+Y for Redo. For information about other shortcut keys, see Shortcut Keys.

17.3.3 Using the GroupWise Text Editor to Format Plain Text Email

In a plain text message, you can change the font, size, and color. You can use bold, italics, and underline. However, in the Plain Text Compose view, you cannot indent text, or insert hyperlinks or horizontal lines.

Changing the Font in a Plain Text Message

To change the font in an open item you are composing in the Plain Text view:

  1. Click the Message field.

  2. Click Edit > Font > Font.

  3. Select a font and a font style.

  4. Select a size.

  5. Select any other options you want to change, and then click OK.

You can also use the toolbar buttons to bold, italicize, or underline portions of text.

Formatting Lists in a Plain Text Message

To format a list in an open item you are composing in the Plain Text view:

  1. Press Ctrl+Shift+L to insert a bulleted list.

  2. Press Ctrl+Shift+L again to change it to a numbered list.

  3. Continue to press Ctrl+Shift+L to select from the six list formats available.

  4. Type a list item, and then press Enter to create the next item in the list.

  5. To turn off the list formatting, press Enter twice after the last list item.

Undoing the Last Text Action in a Plain Text Message

You can undo the last text action in the Subject or Message field of a message you are composing.

To do this, click Edit > Undo.

You can also use Ctrl+Z for Undo. For information about other shortcut keys, see Shortcut Keys.

17.3.4 Using Custom Views in the GroupWise Text Editor

Custom views make it possible to create an email template, and then save that template to use again. This is helpful when you want to frequently send an email that has certain text or a certain appearance. You can create an email message with your desired look and feel, and then save that email message as a custom view.

NOTE:Some HTML formatting might not be preserved if you save an HTML message as a view. Using a Plain Text message for a custom view is recommended.

Saving a Custom View

To save a custom view:

  1. Click New Mail to create a new email message.

  2. (Optional) Type the subject of the email message in the Subject field.

  3. Type the message of the email in the Message field.

  4. Click File > Save View.

    By default, a custom view is saved in the C:\Novell\Groupwise directory. Custom view files have a .ghv file extension.

  5. Type a name for the view, and then click Save.

Opening a Custom View

To open a custom view:

  1. Click the down-arrow next to the New Mail icon.

  2. Select the custom view file you saved earlier.

    The custom view opens, displaying the information you entered when you saved the custom view file.

  3. Add any additional information as needed, and then click Send.

Defining the Location Where Custom Views Are Saved

To set the custom view location:

  1. Click Tools > Options, and then double-click Environment.

  2. Click the File Location tab.

  3. In the Custom views field, type the location where custom views are stored, or browse to and select the location.

  4. Click OK.