3.3 Setting Up a Basic GroupWise System
Follow the setup instructions for the platform where you are creating your basic GroupWise system:
3.3.1 Linux: Setting Up a Basic GroupWise System
You should have already reviewed Section 3.2, Planning a Basic GroupWise System and filled out the worksheet. The following sections step you through the GroupWise Installation program.
IMPORTANT:If you plan to install GroupWise in a clustered server environment, see the GroupWise 2012 Interoperability Guide before starting to set up your GroupWise system.
If you are new to Linux, you might want to review Linux Commands, Directories, and Files for GroupWise Administration
in the GroupWise 2012 Administration Guide before beginning to set up your GroupWise system on Linux.
Preparing the Linux Server for Your Basic GroupWise System
-
Ensure that the Linux server for your basic GroupWise system meets the system requirements listed in Section 2.1, GroupWise Administration Requirements.
-
Ensure that the Linux operating system media is available, in case the GroupWise Installation program needs to install supporting packages on the Linux server.
-
Ensure that the Linux server has a static IP address.
-
Ensure that the firewall on the Linux server has the ports open that are used by the GroupWise Post Office Agent (POA) and Message Transfer Agent (MTA).
For assistance, see
GroupWise Port Numbers
in the GroupWise 2012 Administration Guide. -
Ensure that the directories exist where you want to create your domain and post office directory structures, as described in Domain Directory Name and Post Office Directory Name.
-
Ensure that ConsoleOne is installed on the Linux server, as described in ConsoleOne.
-
Ensure that eDirectory User objects exist for the GroupWise accounts that you want to create, as described in User Objects in eDirectory.
-
Ensure that the eDirectory container objects exist where you want to create the Domain object and Post Office objects for your Basic GroupWise system, as described in Domain Context.
-
Continue with Starting the Linux GroupWise Installation Program.
Starting the Linux GroupWise Installation Program
-
In a terminal window, become root by entering su - and the root password.
-
Run the GroupWise Installation program at the root of the downloaded GroupWise 2012 software image
./install
-
Select the language in which you want to run the GroupWise Installation program, then click .

-
(Optional) Review the Readme, Quick Start, and Installation Guide to better prepare yourself for setting up your basic GroupWise system.
-
Continue with Installing the GroupWise Software.
Installing the GroupWise Software
-
Click .

The list on the left details the steps the Installation program performs for you.
-
Click , accept the License Agreement, then click .
-
Follow the prompts to provide the following information from your Basic GroupWise System Worksheet.
The Installation program automatically installs the GroupWise Administrator snap-ins to ConsoleOne under /usr/ConsoleOne. Then, the Installation program copies the selected software components into your software distribution directory.
-
When the copying is complete, click .

-
Select , then click .

You use the New System utility in ConsoleOne to create your basic GroupWise system.
-
Click to start ConsoleOne.
-
Continue with Selecting a Linux Mount Directory.
Selecting a Linux Mount Directory
The first time you start ConsoleOne with the GroupWise Administrator snap-ins installed, you are prompted to specify a Linux mount directory under which you create mount points for future domains in your GroupWise system.
-
In the Linux Mount Directory dialog box, browse to and select the Linux mount directory from your Basic GroupWise System Worksheet, then click .

The mount directory information is stored in a user-specific preferences file (.consoleone/SnapinPrefs.ser) in each GroupWise administrator’s home directory. If necessary, you can later select a different mount directory in ConsoleOne, as described in
Changing the Linux Mount Directory
inSystem
in the GroupWise 2012 Administration GuideFor instructions on using the Linux mount directory after creating your basic GroupWise system, see
Mounting a Linux File System for a Domain or a Post Office
inSystem
in the GroupWise 2012 Administration Guide.After you select the Linux mount directory, the New System Utility provides some instructions for creating your basic GroupWise system.

-
Click to proceed into ConsoleOne.
-
Continue with Using ConsoleOne to Create Your Basic GroupWise System.
Using ConsoleOne to Create Your Basic GroupWise System
ConsoleOne automatically attempts to authenticate to an eDirectory tree when it starts.
-
Fill in the fields in the Login window from your Basic GroupWise System Worksheet, then click to start ConsoleOne:

If the Login dialog box does not appear automatically, select the NDS object, then click . Under some circumstances, you might need to specify the IP address of the server instead of the tree name.

Because the GroupWise Administrator snap-ins have been installed to ConsoleOne, a GroupWise System object is displayed. As you add domains and post offices to your GroupWise system, they are listed under the GroupWise System object.
-
Under the NDS object, select the tree where you want to create the GroupWise system, then click .

-
Follow the prompts to provide the GroupWise system and domain information from your Basic GroupWise System Worksheet.
-
Follow the prompts to provide the GroupWise post office information from your Basic GroupWise System Worksheet.
-
Follow the prompts to provide information about how to link the domain and the post office from your Basic GroupWise System Worksheet.
When you have provided the system, domain, post office, and agent information for your GroupWise system, you are ready to create users. However, adding users at this point is optional. After the Installation program has finished, you can add users to the post office at any time by using ConsoleOne. We recommend that you just add yourself and a test user at this time.

-
Add users as needed, then click .
The Installation program summarizes your overall progress.

-
Click to display a summary of the system, domain, post office, and agent information you entered.

After you have verified that the information you entered is correct, you are ready to create your GroupWise system.
-
Click to create your GroupWise system.
The Installation program summarizes your overall progress.

-
Click to install the MTA and POA software.
-
Continue with Installing and Starting the Linux GroupWise Agents.
Installing and Starting the Linux GroupWise Agents
At this point, the Installation program has created eDirectory objects and network server directories associated with your GroupWise system. You now need to install and start the MTA and POA on your Linux server.
Installing the Linux Agents
The GroupWise Installation program starts the Agent Configuration program for you.

-
Review the Introduction, then click .
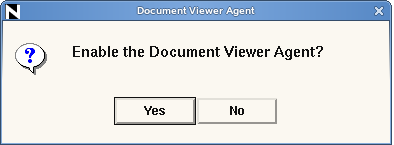
The DVA is configured for high availability separately from the MTA and the POA.
-
(Conditional) If you want to configure the DVA for high availability, click Yes.
or
Click .
-
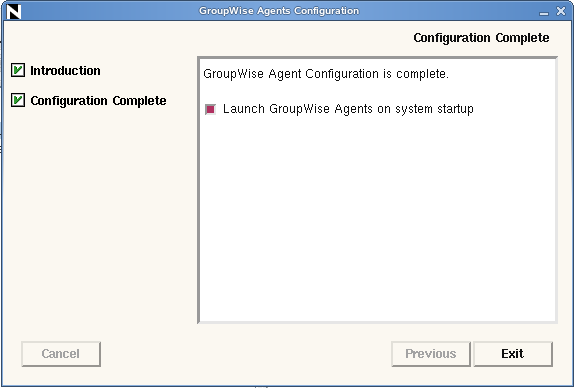
On the Configuration Complete page, is selected by default.
IMPORTANT:If you want to configure the agents for high availability, as described in Enabling the GroupWise High Availability Service for the Linux GroupWise Agents, they must be configured to start automatically on system startup.
-
(Conditional) If you do not want the agents to start automatically when the server restarts, deselect .
-
Click to complete the agent configuration.
-
For convenience, leave ConsoleOne running while you start the agents in a terminal window.
-
Continue with Starting the Linux Agents with a User Interface.
Starting the Linux Agents with a User Interface
-
In a terminal window, become root by entering su - and the root password.
-
Change to the GroupWise agent bin directory.
cd /opt/novell/groupwise/agents/bin
-
Use one of the following commands to start the MTA:
- Syntax:
./gwmta --show --home domain_directory &
./gwmta --show @domain_name.mta &
- Example:
./gwmta --show --home /gwsystem/domlnx &
./gwmta --show @provo.mta &
The --show startup switch starts the MTA with a server console interface similar to that provided for the Windows MTAs when they run as Windows applications. This user interface requires that the X Window System and Open Motif be running on the Linux server.
The --home startup switch specifies the domain directory and is required to start the MTA.
The @domain.mta startup switch specifies the MTA startup files, which contains the --home startup switch.
To remind yourself of these commands when you are at your Linux server, view the gwmta man page.
The ampersand (&) causes the MTA to run in the background, so that the terminal window you started it in is again available for use.

The status messages displayed on the MTA server console are also written to the MTA log file (mmddmta.nnn) in the /var/log/novell/groupwise/domain.mta directory. The log file name includes the month and day when it was created, along with an incrementing extension to accommodate multiple log files on the same day.
-
In ConsoleOne, check to see that the domain as been updated:
-
Browse to and right-click the Domain object, then click .
-
Verify that the field displays 12 (short for 2012), then click .
-
-
In the terminal window, use one of the following commands to start the POA:
- Syntax:
./gwpoa --show --home post_office_directory &
./gwpoa --show @post_office_name.poa &
- Example:
./gwpoa --show --home /gwsystem/polnx &
./gwpoa --show @polnx.poa &
To remind yourself of these commands when you are at your Linux server, view the gwpoa man page.

The status messages displayed on the POA server console are also written to the POA log file (mmddpoa.nnn) in the /var/log/novell/groupwise/post_office.poa directory. The log file name includes the month and day when it was created, along with an incrementing extension to accommodate multiple log files on the same day.
-
In ConsoleOne, check to see that the post office database as been updated:
-
Browse to and right-click the Post Office object, then click .
-
Verify that the field displays 12 (short for 2012), then click .
After the post office database has been updated, users can connect to the post office using the GroupWise Windows client or GroupWise WebAccess.
-
-
If you want to finish setting up your basic GroupWise system so that users can access it, continue with Section 3.4, Testing Your Basic GroupWise System.
or
If you want to learn more about managing the GroupWise agents on Linux, skip to the following sections in Section 8.0, Installing GroupWise Agents:
Installing the GroupWise Administrator Snap-Ins to Additional Linux Machines
As part of creating your basic GroupWise system, the GroupWise Administrator snap-ins to ConsoleOne were installed under /usr/ConsoleOne of the server where you ran the GroupWise Installation program. If ConsoleOne is installed in multiple locations and if you want to be able to administer GroupWise from those locations, you need to install the GroupWise snap-ins to each ConsoleOne installation.
-
Go to the Linux machine where you want to install the GroupWise snap-ins to ConsoleOne.
-
Make sure you are logged in as root and have network access to the software distribution directory or downloaded GroupWise 2012 software image and the domain directory.
-
Start the GroupWise Installation program (install), then click .
-
When the installation is complete, click , then click .
-
Accept the License Agreement, then follow the prompts to provide the necessary information.
-
Repeat Step 1 through Step 5 for each location where you want to install the GroupWise snap-ins.
-
Skip to What’s Next.
3.3.2 Windows: Setting Up a Basic GroupWise System
You should have already reviewed Section 3.2, Planning a Basic GroupWise System and filled out the worksheet. The following sections step you through the GroupWise Installation program for creating a new GroupWise system.
IMPORTANT:If you plan to install GroupWise in a clustered server environment, see the GroupWise 2012 Interoperability Guide before starting to set up your GroupWise system.
Preparing the Windows Server for Your Basic GroupWise System
-
Make sure that the Windows server for your basic GroupWise system meets the system requirements listed in Section 2.1, GroupWise Administration Requirements.
-
Make sure that the Windows server has a static IP address.
-
Make sure that the firewall on the Windows server has the ports open that are used by the GroupWise Post Office Agent (POA) and Message Transfer Agent (MTA).
For assistance, see
GroupWise Port Numbers
in the GroupWise 2012 Administration Guide. -
Make sure that the directories exist where you want to create your domain and post office directory structures, as described in Domain Directory Name and Post Office Directory Name.
-
Make sure that eDirectory User objects exist for the GroupWise accounts that you want to create, as described in User Objects in eDirectory.
-
Make sure that the eDirectory container objects exist where you want to create the Domain object and Post Office objects for your Basic GroupWise system, as described in Domain Context.
-
Configure the Windows server to ensure GroupWise database integrity across the network:
-
At the selected Windows machine, right-click the Novell Client icon (the Red N) on the toolbar at the bottom of your screen, then click .
-
Click .
-
Set to .
-
Set to .
-
Click to save the new Novell Client settings.
-
Reboot the Windows machine to put the new settings into effect.
-
-
(Optional) Enable SNMP.
If you want to monitor the GroupWise Windows agents from an SNMP manager program, SNMP must be enabled on the Windows server where the agents are installed. If it is not already enabled, you must enable it before you run the Installation program.
For example, in Windows Server 2008:
-
In the Server Manager, right-click , then click .
-
Select ., then click .
-
Click .
-
-
Continue with Starting the Windows GroupWise Installation Program.
Starting the Windows GroupWise Installation Program
-
Log in as an Admin equivalent to the eDirectory tree in which you are creating your GroupWise system.
-
Run setup.exe at the root of the downloaded GroupWise 2012 software image.
-
(Conditional) If prompted, select the language in which you want to run the GroupWise Installation program, then click .
On Windows, the GroupWise 2012 software image can be downloaded in a multilanguage version or an English-only version. When you install from the multilanguage version, all languages are always installed, regardless of the specific language that you select for running the Installation program.
The main GroupWise System Installation page appears.

-
Click , then click to accept the License Agreement and display the Installation Type page.

When you create a new GroupWise system, you are performing a Standard installation. Other installation options on this page are described in Setting Up Predefined Installations.
-
Click to accept the default of .

-
Make sure that is selected, then click .
-
Continue with Installing Your Basic GroupWise System.
Installing Your Basic GroupWise System
-
Follow the prompts to provide the following information from your Basic GroupWise System Worksheet.
- Software Platform
- Administration Options
- ConsoleOne Path
- Software Distribution Directory
- Software Selection
After the GroupWise Installation program has gathered this administrative information, it is ready to gather information about the eDirectory tree and the GroupWise objects to create.
-
Follow the prompts to provide the following information from your Basic GroupWise System Worksheet.

After the GroupWise Installation program has gathered eDirectory information, it is ready to gather GroupWise agent information.
-
Follow the prompts to provide the following information from your Basic GroupWise System Worksheet.

-
On the Summary and Modification page:
-
Review the installation information you have provided.
-
(Conditional) If you need to change information, select the information to change, then click .
-
Specify the desired information, then click .
-
-
Click to start the installation.
Status messages keep you informed about the installation and system creation progress.
-
Click when the installation and system creation is completed.
Starting the GroupWise Agents
The GroupWise Installation program does not start the agent for you. For instructions, see Starting the Windows GroupWise Agents.
IMPORTANT:The GroupWise agents must be running in order to access your GroupWise mailbox to send and receive messages.
Setting Up and Testing the GroupWise Windows Client on the GroupWise Server
To test your new GroupWise system, you can install and run the GroupWise Windows client on your local machine. To accomplish this test quickly, follow the instructions in the specific sections of Section 9.0, Installing the GroupWise Client that are listed below, in order to create test GroupWise user accounts and mailboxes.
As an easy test:
-
Create a test GroupWise account for your own eDirectory user.
You can delete it after the test if you want your permanent mailbox elsewhere in the GroupWise system.
-
Make sure that you can log in to the test GroupWise account.
-
As a further test, create a second test account, install the client on a second machine, and exchange messages between the two users.
-
Skip to Section 4.5, What’s Next.
or
Install the GroupWise Administrator snap-ins to additional locations, as described in Installing the GroupWise Administrator Snap-Ins to Additional Windows Machines.
Installing the GroupWise Administrator Snap-Ins to Additional Windows Machines
As part of creating your basic GroupWise system, the GroupWise Administrator snap-ins to ConsoleOne were installed in one location. If ConsoleOne is installed in multiple locations and if you want to be able to administer GroupWise from those locations, you need to install the GroupWise snap-ins to each ConsoleOne installation.
-
Go to the Windows machine where you want to install the GroupWise snap-ins to ConsoleOne.
-
Configure the Windows machine, as described in Step 7 in Starting the Windows GroupWise Installation Program.
-
Make sure you are logged in as an Admin equivalent and have network access to a software distribution directory or the downloaded GroupWise 2012 software image and the domain directory.
-
Start the GroupWise Installation program (setup.exe).
-
Click , click to accept the License Agreement, then click to display the GroupWise Components page.
-
Select .
-
Deselect , then click .

-
Deselect , then click .
-
Follow the prompts to install the GroupWise Administrator snap-ins to ConsoleOne on your current Windows machine.
-
Repeat Step 1 through Step 9 for each location where you want to install the GroupWise snap-ins.
-
Skip to Section 3.5, What’s Next.
Setting Up Predefined Installations
Whenever you run any installation using the Windows GroupWise Installation program, from a full system creation to installation of a single GroupWise component, you can save all the information you provide during the installation into a configuration file. You then have the option of performing that installation again and again using the previous installation information as defaults for the next installation, or performing an express installation with no intervention on your part.
You can create installation configuration files to create a new GroupWise system, update an existing GroupWise system, and install GroupWise administration, agents (the MTA, POA, and DVA as a group), and the GWIA.
NOTE:You cannot currently create installation configuration files to install GroupWise WebAccess, GroupWise Monitor, the GroupWise Calendar Publishing Host, or the GroupWise Windows client. Predefined installations are not available when you run the Linux Installation program.
Deciding Where to Store Installation Configuration Files
You can store installation configuration files in any convenient location, taking into account the following:
-
If you run the GroupWise Installation program only from your own workstation, you can store the configuration files locally. However, if you want them to be available from multiple locations or to multiple users, you should store them on the network.
-
For the least amount of interaction during predefined installations, you can create the configuration files with passwords stored in them. Passwords are stored in clear text. Therefore, if you store the configuration files with passwords, you should store them in a secure location.
Creating an Installation Configuration File
-
Create a directory where you want to store installation configuration files.
-
Run an installation that you want to repeat.
The final Installation program page allows you to create the configuration file.

-
Select .
-
Specify the full path and file name for the installation configuration file.
The configuration file name automatically receives a .cfg extension
-
Select if you store your configuration files in a secure location and you do not want to be prompted for passwords during an express installation.
-
Click to complete the current installation.
Running a Predefined Installation
-
Start the GroupWise Installation program, click , then click to accept the License Agreement.
-
Select .
-
Browse to and select the installation configuration file from a previous installation that you want to repeat.
-
If you want to run the predefined installation without intervention or if you want to stop only for providing passwords, select .
or
If you want to use the settings in the installation configuration file as the default as you run the Installation program yourself, do not select .
This option allows you to quickly click through the Installation program pages, while adjusting only a few settings for the current installation.
-
Click to start the predefined installation.