4.11 Using the Multi-User Calendar
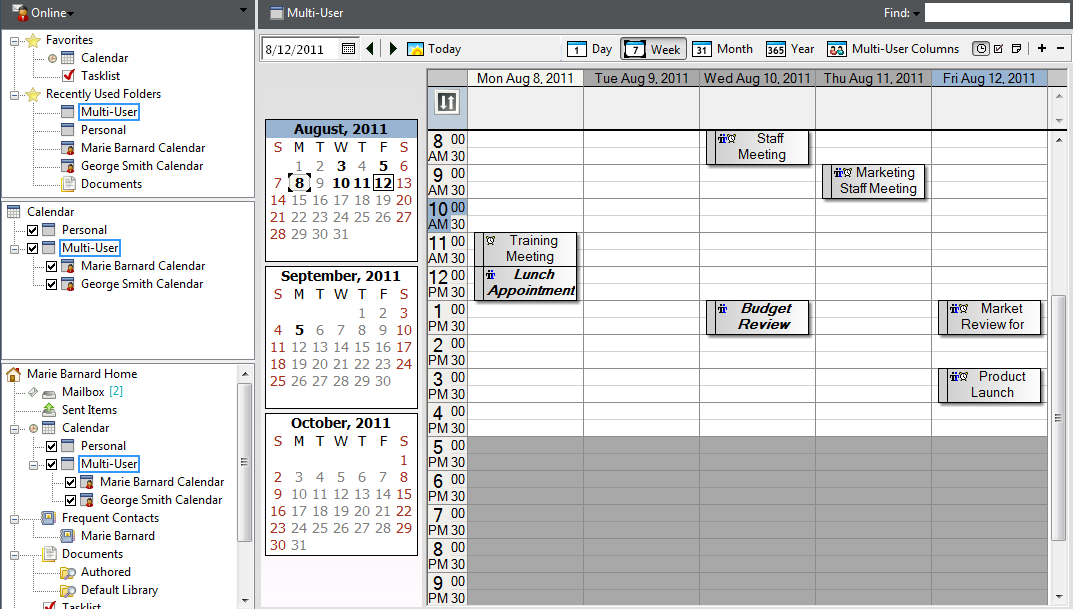
The Multi-User Calendar allows you to see a combined schedule for users and resources in a graphical day, week, month, year, or multi-user column view (the Multi-User Columns view is a day view that displays the schedule for each user in his or her own column). You can easily select and deselect users and resources so that their appointments are displayed or not displayed in the combined view. Use a Multi-User Calendar to find out what users’ schedules are or to find out which of your company’s conference rooms is free at a specific time.
In versions of GroupWise prior to GroupWise 2012, the Multi-User Calendar allows you to see only the Multi-User Columns view (the view that displays the day schedule for each user in his or her own column). Likewise, if you create a Multi-User Calendar in a previous version of GroupWise and then upgrade to GroupWise 2012, you are able to see the Multi-User Calendar only in the Day view. You must create a new Multi-User Calendar in order to see the calendar in multiple views.
IMPORTANT:You must have the appropriate Proxy rights for each user or resource in order to include them in a Multi-User Calendar. (See Section 10.0, Mailbox/Calendar Access for Proxy Users.) For example, if you do not have Read rights for appointments, you cannot see another person’s schedule in the Multi-User Calendar.
-
Section 4.11.1, Setting Up a Calendar to View Multiple Users or Resources
-
Section 4.11.2, Setting Up Additional Calendars to View Multiple Users and Resources
-
Section 4.11.3, Configuring Which Users Are Displayed in the Multi-User Calendar
-
Section 4.11.4, Creating an Appointment for Users in the Multi-User Calendar
4.11.1 Setting Up a Calendar to View Multiple Users or Resources
To set up a Multi-User Calendar where you can simultaneously view the calendars of multiple users and resources:
-
Click in the Nav Bar, then click the view button on the Calendar toolbar.
If this is the first time you have used the Multi-User Columns view on this calendar, the Multi-User List dialog box is displayed.
-
(Optional) If this is not the first time you have used the Multi-User Columns view on this calendar and you want to modify which user calendars are being displayed, click the drop-down arrow next to , then click .
-
In the Multi-User List dialog box, in the section, specify users in the field, then in the section select the check boxes by the names of the users whose calendars you want to view, then click .
-
View users’ schedules in a day, week, month, year, or multi-user column view by clicking the appropriate view in the Calendar toolbar.
For example, you can click the view option in the Calendar toolbar to see users’ schedules in a week view.
If calendar items are not appearing for a particular user, ensure that the check box is selected next to the user’s name in the Folder List.
-
(Conditional) Assign colors to users or resources by clicking on the presence icon next to their name in the Folder List.
Because appointments for users and resources are combined into a single column in the , , or views, assigning colors to each user or resource is essential to differentiating appointments in those views.
You can modify the Multi-User List associated with this Multi-User Calendar, as described in Modifying the Multi-User List. You can also create additional Multi-User Calendars, as described in Section 4.11.2, Setting Up Additional Calendars to View Multiple Users and Resources.
4.11.2 Setting Up Additional Calendars to View Multiple Users and Resources
After you have set up an initial Multi-User Calendar as described in Section 4.11.1, Setting Up a Calendar to View Multiple Users or Resources, you might want to set up additional Multi-User Calendars.
-
In the Folder List, select the calendar that you want to set up as a Multi-User Calendar.
-
Select in the Calendar toolbar.
-
Modify the Multi-User List for this calendar as described in Modifying the Multi-User List.
4.11.3 Configuring Which Users Are Displayed in the Multi-User Calendar
When you created the Multi-User Calendar as described in Section 4.11.1, Setting Up a Calendar to View Multiple Users or Resources you specified which users and resources to include in the calendar.
After the initial creation of the Multi-User Calendar, you can add or remove users and resources from being displayed in the calendar by modifying the Multi-User List, or you can simply hide users and resources from being displayed in the calendar by selecting or deselecting the user or resource in the Folder List.
Modifying the Multi-User List
The Multi-User List determines which users and resources are displayed in the Multi-User Calendar. You must have the appropriate Proxy rights to add users and resources to a Multi-User List and to view their calendars in a Multi-User Calendar. See Section 10.0, Mailbox/Calendar Access for Proxy Users.
-
Click in the Nav Bar, then click
 on the Calendar toolbar.
(If you have created additional Multi-User Columns views, the button might look like
 .)
.)
-
Click the arrow to the right of
, then click .
-
To add a user or resource, click , double-click a name, then click .
-
To delete a user or resource, click the name, then click .
or
To delete all the names in the list, click , then click .
-
To change the order of the names in the list, click a name, then click the up-arrow or down-arrow button. The order of names determines the order in which the calendars display in the Multi-User Columns view.
-
To remove a user or resource calendar from the Multi-User Calendar without deleting the name from the list, deselect the check box by the name.
-
To insert all the names in your Proxy List, click , then click .
-
To reset the list, click , click , click , then click .
-
Click to save and exit the dialog box.
or
Click to save without exiting.
Selecting or Deselecting Users and Resources
GroupWise 2012 enables you to easily select and deselect users and resources so that their appointments are displayed or not displayed in the Multi-User Calendar.
-
In the Folder List, select the check box next to the users and resources whose appointments you want to display in the Multi-User Calendar.
Deselect the check box next to the users and resources whose appointments you want to hide from the Multi-User Calendar.
For information on how to modify which users are associated to the Multi-User Calendar, see Modifying the Multi-User List.
4.11.4 Creating an Appointment for Users in the Multi-User Calendar
You can quickly create an appointment that includes all users whose calendars are currently being displayed in the Multi-User Calendar.
Creating an Appointment in the Day, Week, Month, or Year View
-
Click either the , , , or view in the Calendar toolbar.
-
Right-click in the day or time when you want to schedule the appointment, then click > .
The field is populated with all users whose calendars are currently being displayed in the Multi-User Calendar.
-
Finish creating the appointment, then click .
Creating an Appointment in the Multi-User Columns View
-
Click the view in the Calendar toolbar.
-
Click the time that you want to schedule the appointment, then drag the cursor to highlight the appointment duration. Drag the cursor to also include the users you want to schedule for the appointment.
-
Right-click the selected time, then click > .
-
Finish creating the appointment, then click .
4.11.5 Creating a Multi-User Columns Calendar View
If you delete the Multi-User Columns view, you can create a new one:
-
Click in the Nav Bar.
-
Right-click the Calendar toolbar, then click .
-
Click , then specify a name for the Multi-User Columns view, such as Multi-User Columns.
-
Click in the drop-down list, then click twice.
The Multi-User List dialog box displays.
-
If a user or resource you want in the Multi-User Columns view is not listed, specify the user in the field, then click .
-
Double-click a user or resource, click , then repeat for each user you want to add.
-
Select the check boxes of the users whose calendars you want to display, then click .