12.2 Adding POP3 and IMAP4 Accounts to GroupWise
Before you add a POP3 or IMAP4 account to GroupWise, you need to know the type of mail server being used (POP3 or IMAP4), your account name and password, and the name of the incoming and outgoing mail servers. You can get this information from your Internet service provider (ISP) or LAN administrator. Microsoft Secure Password Authentication is supported for accessing Exchange servers and MSN accounts.
12.2.1 Adding a POP3 or IMAP4 Account
Make sure you know the type of mail server being used (POP3 or IMAP4), your account login name and password, and the name of the incoming and outgoing mail servers. Contact your Internet service provider for this information.
You can add a POP3 or IMAP4 account only if the menu is displayed. The menu is displayed if you are in Caching mode or if your administrator allows POP and IMAP or NNTP on your GroupWise system.
-
Click > .
-
Click .
-
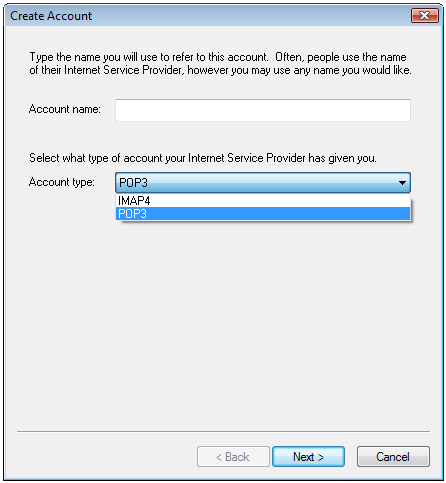
Type an account name and select the desired account type.
-
Select whether to upload the new account to the GroupWise Mailbox, then click .
-
Provide the details for the new account, then click .
The details you need to enter include the incoming and outgoing mail servers, your login name, your email address, and the name that appears in the field when you send an email.
-
Select whether to connect to the account through a LAN or a modem and phone line, then click .
-
Select the folder to use for the account, or create a new folder.
-
Click .
12.2.2 Importing POP3 and IMAP4 Email
The GroupWise E-Mail Importer utility lets you import information from supported POP3 and IMAP4 clients into GroupWise. The menu > > option lets you create new accounts if you are in Caching mode or if your administrator allows POP and IMAP or NNTP on your GroupWise system.
Use the GroupWise E-Mail Importer utility to import existing POP3 and IMAP4 accounts into GroupWise. In addition to importing messages from your existing POP3 and IMAP4 accounts, you save time by not retyping address book entries into the GroupWise address book.
-
Click > > .
The Installed E-Mail Clients list box displays the email accounts installed on your machine.
-
Select the email account you want to import into GroupWise, then click .
-
Select the appropriate check boxes to import the account information into GroupWise.
You can choose email messages, address books, account settings, or any combination of the three.
-
Click .
-
Click the folders that you want to import from your existing email account into GroupWise.
When you import a folder, all messages and subdirectories in that folder are also imported.
-
Click .
-
Type a name for the new GroupWise folder to contain the imported messages and folders, use the , , , and buttons to position the folder in the GroupWise Cabinet, then click .
-
Type a name for the new GroupWise address book to contain the imported addresses.
The name you type displays on a new tab in the GroupWise Address Book.
-
Click .
-
Click the accounts that you want to import into GroupWise, then click .
-
Accept the default name for the new account, then click .
or
Select the account folder in the list box, click , type a new name, click , then click .
-
Review the summary information to ensure that it is correct, then click .
or
Click to change your import options.
-
Ensure that the email account was successfully imported, then click .