6.3 Addressing Items
There are multiple ways to address an item in GroupWise:
6.3.1 Using Name Completion
Configuring Name Completion
By default, Name Completion uses names in your Frequent Contacts and the GroupWise Address Book. You can configure GroupWise to use additional books when performing Name Completion.
-
In the Main Window, click
 on the toolbar.
-
Click > .
-
In the box, click or Ctrl+click the books you want Name Completion to search, then click .
-
To change the search order of an address book, select the address book in the list, then click or .
-
To disable Name Completion, select the check box.
-
Click .
Addressing an Item with Name Completion
When you begin typing a name in the , , or fields of an item you are creating, Name Completion tries to complete the name for you. It searches the address books in the order you specify in the Name Completion Search Order dialog box for entries that match what you’re typing. Names are sorted by relevance, so users who you contact more frequently appear first in the name completion.
If Name Completion finds the name you are looking for, you can stop typing. If Name Completion doesn’t find it, continue typing. Name Completion searches again after each new character you type. If Name Completion finds a name that is close to but doesn’t exactly match the one you are looking for, you can use the Up-arrow or Down-arrow keys to scroll to adjacent names in the address book. You can also press Ctrl+Enter at any point to display matches up to that point.
If Quick Info is enabled, as described in Section 6.5.12, Displaying Quick Info, contact information displays as you type to help you identify the contact you want. If the contact you want has multiple email addresses, you can use the Up-arrow or Down-arrow keys to select the email address you want to use. You can also right-click the completed name, then select the email address from the drop-down list.
Name Completion with Duplicate Names
When you use name completion, you might have two contacts with the same name. When name completion finds two people with the same name but different email addresses, it displays a prompt so you can select the correct name to use. Additional information is provided to help you select the correct name to use. After you make your selection, the name is added to your Frequent Contacts and is your default selection the next time you send an email to that name.
6.3.2 Using the Address Selector
When you are composing a new item and you click  on the item view toolbar, the Address Selector displays. The Address Selector presents a simplified address book view, providing you with the options you need to select a name or create a group.
Understanding the Address Selector
The Address Selector displays in other places throughout GroupWise, such as when you are selecting members of a group or entries for a Find. It might be slightly modified to show only context-appropriate options.
Figure 6-2 The Address Selector
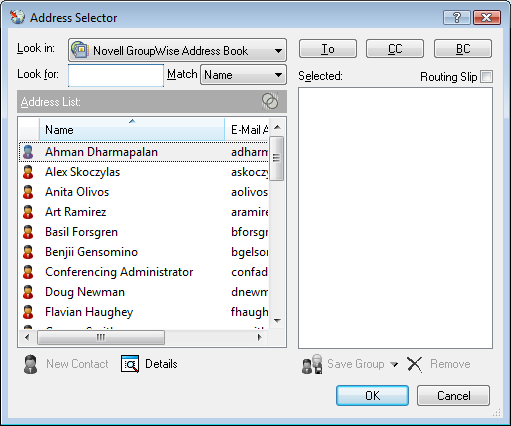
In the Address Selector, you view one address book at a time. To choose a different address book to look at, click an address book in the drop-down list.
Double-click the entries you want placed in , , or fields of the item you are addressing. You can use the  drop-down list to restrict the list of entries to contacts, groups, or resources. You can search the list by name, first name, or last name by using the drop-down list. If an entry is marked with a +, it has multiple email addresses.
You can add and remove columns and change the column order in the list of address entries. You can change the sort order of the list based on the entries in any column. You can resize the Address Selector by dragging a corner of the window. You can open a contact entry to view details by clicking the contact, then clicking .
You can add contacts to the right pane and then create a group by clicking . If you click the down-arrow on the button, you can select which address book the group is saved to. Otherwise it is saved to the address book displayed in the Address Selector.
You can create new contacts by using the button. This button is not active if you are currently displaying the GroupWise Address Book or any other address book that you don’t have rights to edit (for example, a shared address book or an LDAP Address Book). To create a new contact, click , enter the contact information in the different tabs, then click . For more information, see Section 6.4.2, Managing Contacts.
To create a routing slip in the item you are creating, click . For more information, see Creating a Routed Message.
Addressing an Item with the Address Selector
Use the Address Selector to address items you are composing. For more information about the Address Selector, see Section 6.3.2, Using the Address Selector.
-
In an item you are composing, click
on the toolbar.
-
Select an address book from the drop-down list.
-
Double-click the names you want as primary (To) recipients of your message.
-
To address carbon copy recipients, click , then double-click the names you want.
-
To address blind copy recipients, click , then double-click the names you want.
-
Click the
drop-down list to show only contacts, groups, or resources in your list.
-
Click the drop-down list to select how you want to locate a recipient (by name, last name, or first name), then type the recipient’s name.
-
Click .
If you know the person’s name, begin typing it in the field of the item view. In the Address Selector, Name Completion searches the currently selected address book. When Name Completion finds the person you want to send a message to, you can stop typing. If Name Completion finds a name that is close to but doesn’t exactly match the one you are looking for, use the Up-arrow or Down-arrow keys to scroll to adjacent names in the address Book. If Name Completion does not find the person, select a different address book in the Address Selector.
6.3.3 Using the Frequent Contacts Address Book
Use the Frequent Contacts address book to access your most frequently used or most recently used entries. When you use an address in a message, the entry is copied to the Frequent Contacts address book if the book’s options are set to do so. You can view the date and time you last used an entry and the number of times you have used it.
After an entry is placed in Frequent Contacts, it remains there until you delete it. The entry also remains in its original address book.
You can use Frequent Contacts Properties to decide which addresses to capture (if any) from either received or sent items, and how long you want addresses to remain in the address book before deleting them.
-
Click
in an item you are composing.
-
Select from the drop-down list.
-
Double-click the names you want, then click .
The Frequent Contacts address book can be closed, but it cannot be deleted.
6.3.4 Sending Mail from a Contacts Folder
-
Click a Contacts folder.
-
If you are viewing the Contacts folder as address cards, click the email address you want to send a message to.
or
If the email address is not immediately displayed in the Contacts folder:
-
Double-click a contact.
-
On the Summary page, click the email address you want to send a message to.

You can also double-click an email address on the Contact page or click on any page.
-
-
Type a subject and message in the mail message that opens.
-
Click on the toolbar.
6.3.5 Sending Mail from the Address Book
Use Mail Message to send items from an address book. If you have opened the address book from the Main Window, the address book is not connected to an item view. Mail Message lets you open an item view from the address book.
-
In the Main Window, click
on the toolbar.

-
Click an address book.
-
Ctrl-click the users you want to send mail to.
-
Click > .
6.3.6 Sending Mail to an Entire Address Book
-
In the Main Window, click
on the toolbar.
-
Click an address book.
-
Shift-click the first and last users in the address book.
-
Right-click the group of selected users.
-
Click .