3.4 Managing Received Email
3.4.1 Personalizing Sent or Received Email
When you send or receive an email message, you can click the tab to add personal information to the email. You can change the subject, add a note, select a category, and add associated contacts to the message.
Changing the Subject of an Email You Send or Receive
If you personalize a subject, the new subject displays in your Mailbox and Calendar and in the Mailbox and Calendar of anyone who proxies for you. If you change the subject of an item in a shared folder, other users of the shared folder still see the original subject.
-
Open an item from your Mailbox, Sent Items, or Calendar.
-
Click the tab.
-
Type a new subject in the field.

To see the original subject, open the item and look in the field in the item header.
When you perform a Find with a specific word in the field, the Find results shows items whose original subject or personalized subject contains this word. When you create an advanced find, use the field to search for the original subject, and use the field to search for the personalized subject.
When you create a rule that looks for a specific word in the field, the rule only looks at the original subject.
Adding a Note to an Email You Send or Receive
When you add a note to an email you send or receive, the note is visible to you and anyone who proxies for you. You can only view the note only by using the tab for the email.
-
Open an item from your Mailbox, Sent Items, or Calendar.
-
Click the tab.
-
In the field, type your note. The note is automatically saved when you leave the tab.
Attaching a File to an Item You Send or Receive
You can add a personal attachment to items that you have sent or received. The attachment is only visible to you and is not sent when replying to or forwarding an item.
To attach a personal file to an item:
-
Right-click in the attachment window, then click .
-
Browse to and select the file or files you want to attach.
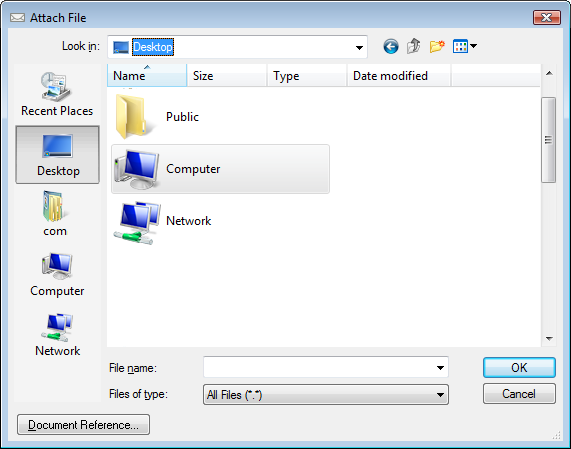
To remove an attached file, right-click the attachment, then click .
-
Click .
You can also drag and drop an attachment to the attachment window.
Moving or deleting a file on a disk or network drive does not affect a file you have attached to an item.
If you delete an attached file, it is not erased from disk or network drive; it is simply removed from the attachment list.
Assigning a Category to an Email You Send or Receive
Categories provide you with a way to organize your items. You can assign a category to any item, including contacts that you send or receive. You create and add categories and can give each category an identifying color. The colors display in the Item List and in the Calendar.
For additional Information on how to assign a category to an item, see Assigning Categories to Items.
Adding a Contact to an Email You Send or Receive
When you add a contact to an email you send or receive, the email is then associated with the contact you added. This is helpful when viewing the history for a particular contact, because the email displays in the contact history for the contact even though that contact did not send the email. For additional information on contact history, see Viewing All Correspondence with a Contact.
You can add users as contacts to an email while you are composing an email, as described in Adding a Contact to an Email.
To add a contact to an email that has already been sent or received:
-
Open an item from your Mailbox, Sent Items, or Calendar.
-
Click the tab.
-
In the field, type a user name, then press Enter. Repeat for additional users.
or
To select user names from a list, click > icon next to the field. Double-click each user, then click .
3.4.2 Changing Email to Another Item Type
You can convert an item in your Mailbox to another type of item. For example, you can change a mail message in your Mailbox to an appointment in your Calendar. The new appointment contains all the information from the mail message (such as , , and lists, subject, and message text) that is applicable in the appointment.
When you change a mail or phone message to another type of item (such as an appointment or task), the original item is removed from your Mailbox and the new item is added in the appropriate location, such as the Calendar.
When you change an item, GroupWise displays the default item view selected in Environment Options.
-
In your Mailbox, click the item you want to change.
-
Click > , then click an item type.
or
Click > > , then click an item type. You can choose posted or group items.
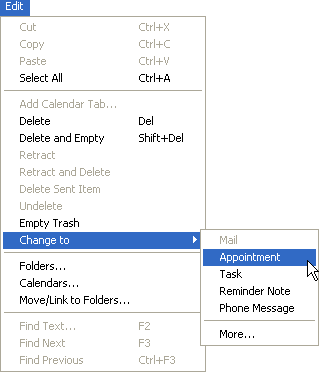
Posted items are sent directly to your Calendar. Group items are sent to the Mailboxes of individuals and groups the message is sent to.
-
Type any necessary information.
-
Click or on the toolbar.
When you change a mail or phone message to another type of item (such as an appointment or task), the original item is removed from your Mailbox and the new item is added in the appropriate location, such as the Calendar.
3.4.3 Saving Received Email to Disk or a GroupWise Library
Saved items remain in your Mailbox and Calendar as well as being copied to the location you specify. Items saved to disk can be saved as a text file, rich text file, or Internet mail. Attachments are saved in their original format.
-
In your Mailbox or Calendar, click the item you want to save, then click > .

-
Ctrl+click the item and attachments you want to save.
-
Select to save the item to disk or to a GroupWise Library.
-
In the field, type a file name for the item.
or
In the field, type a subject name.
-
To save the item in a different location than is currently shown, browse to the desired location.
or
To save the item in a different GroupWise Library, click the drop-down list, then select a library name.
-
If you are saving to a GroupWise Library, make sure is selected, unless you want to specify document properties at this time.
-
Click , then click .
Dragging and Dropping Emails
You can drag and drop an item from within GroupWise to the location where you want to save the file. For example, you could drag and drop a message into a project folder on your Windows desktop or another email client.
Files that you drag and drop are saved in one of two formats: a shortcut to the original message in .gwi format or a copy of the original message in .eml format.
To change the format:
-
Click
-
Double-click , then click the tab.
-
Under select or .
3.4.4 Deleting Email
Use Delete to remove selected items from your Mailbox.
You can also use Delete to retract items you have sent. You can retract mail and phone messages if the recipients have not read them or if they have not been sent to the Internet. You can retract appointments, reminder notes, and tasks at any time. For information on how to retract items you have sent, see Section 3.2.3, Retracting Sent Email.
If you receive junk mail that requires frequent manual deletion, you might want to set up Junk Mail Handling. See Handling Unwanted Email (Spam) for more information.
To delete items from your mailbox:
-
In the Main Window, select one or more items, then press the Delete key.
-
If you delete a sent item, the Delete Item dialog box displays. Select the appropriate option, then click .
You can choose from the following options:
-
My Mailbox
-
Recipient’s Mailbox
-
All Mailboxes
-
If you delete a document reference from your Mailbox, only the reference is deleted. The document remains in the library.
Deleted items are moved to your Trash and remain there until the Trash is emptied.
3.4.5 Viewing the Discussion Thread of an Email
Discussion threads shows the email discussion of an original item and all its replies grouped in hierarchical order.When you view the discussion thread of an email you receive, a list of all messages sent and received is displayed above the email message.
-
Double-click an item that you want to view.
-
Click the tab.
3.4.6 Displaying Only Unread Messages
To quickly view all your unread messages, you can create a folder that displays only unread messages. For more information, see Creating a Folder That Displays Unread Items.
3.4.7 Viewing the Source of External Messages
When you receive or send messages to and from external systems, you can view the source for a message. The source includes all the data that is contained in a message.
-
Double-click an item that you received from an external source.
-
Click the tab.
3.4.8 Archiving and Backing Up Email
Email can accumulate rapidly. See Section 16.0, Maintaining GroupWise for long-term management strategies.