4.3 Email Accelerator Settings
Email Accelerator controls are included in the Intellisync Mobile Suite control if you have Email Accelerator installed on your server.
Figure 4-10 Intellisync Mobile Suite Control: Email Accelerator Settings
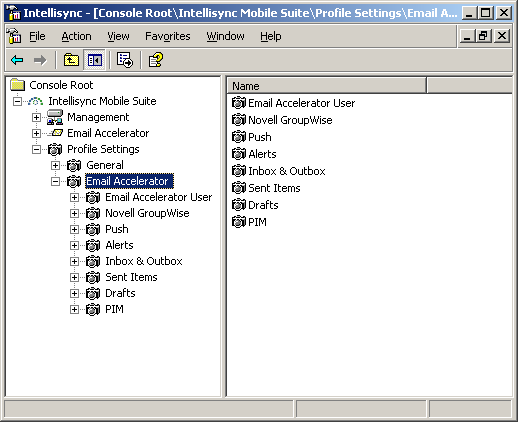
You can set profile settings for the following categories.
4.3.1 Email Accelerator User Settings
With Email Accelerator User Settings, you can set user options and permissions, and define how long you want to keep items in the Inbox, Sent Items, and Calendar folders. Email Accelerator User Settings are separated into three tabbed pages:
Email Accelerator User Settings: Settings Tab
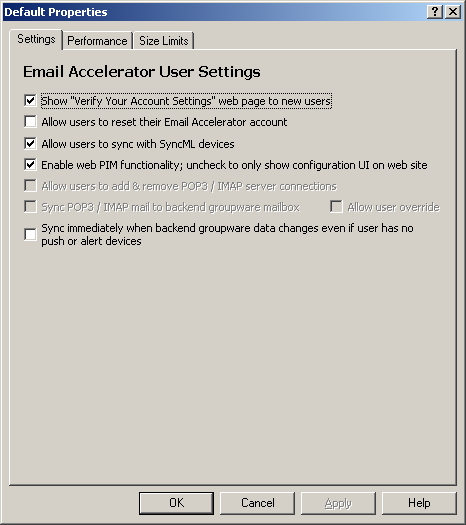
Use the Email Accelerator User Settings page to set user options and permissions for your users.
Figure 4-11 Email Accelerator User Settings: Settings
Available options and capabilities include the following.
-
Show “Verify Your Account Settings” web page to new users: This page appears after the user logs in, and includes fields for the user’s Exchange mailbox, the user’s address, and identifying information. If you enable user discovery, these fields automatically populate. The user can edit the information. Select this option to allow the user to view the page.
-
Allow users to reset their Wireless Email account: Select this option to enable users to resynchronize their e-mail accounts and devices.
-
Allow users to sync with SyncML devices: Select this option to allow users to synchronize data to a SyncML device.
-
Enable web PIM functionality; uncheck to only show configuration UI on web site: Controls whether end users can see and use full Web client functionality. If you deselect this option, users can only use the Web site to set up devices.
-
Allow users to add and remove POP3/IMAP server connection: Grants users permission to add connections for POP3/IMAP map without an administrator’s assistance. This setting is disabled by default, and not part of GroupWise Mobile Server.
-
Sync POP3/IMAP mail to backend groupware mailbox: Allows users to synchronize mail from other sources with their corporate GroupWise account. This setting is disabled by default, and not part of GroupWise Mobile Server.
-
Sync immediately when backend groupware data changes even if user has no push or alert devices: Allows for almost immediate synchronization between the mail server and the Intellisync Mobile Suite server for users who do not have push or alert devices. Setting this option allows for immediate import of e-mailed itineraries. For optimum system performance Novell recommends that you do not use this option.
Email Accelerator User Settings: Performance Tab
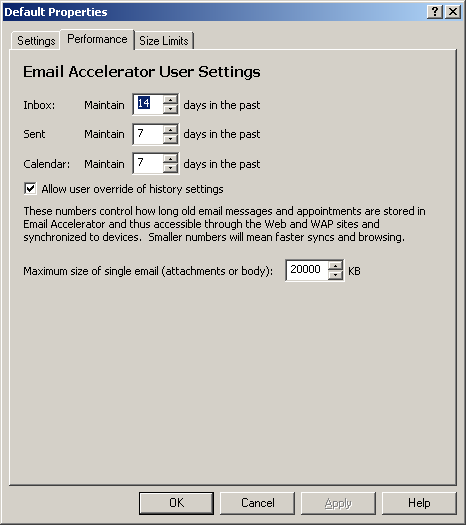
With Email Accelerator User Settings, you can control how long items should remain in a user’s Inbox, Sent Items, and Calendar folders. In addition, you can control whether users can override these settings.
Figure 4-12 Email Accelerator User Settings: Performance
You can set the length of time that appointment information and e-mail messages remain on the device. The list of history settings includes the following:
-
Inbox: Maintain x days in the past: Specify the number of days items should remain in the user’s Inbox.
-
Sent Items: Maintain x days in the past: Specify the number of days items should remain in the user’s Sent Items folder.
-
Calendar: Maintain x days in the past: Specify the number of days a user’s appointments and other calendar items should remain on the device.
-
Allow user override of history settings: Select this option to allow the user to change any history settings you define.
-
Maximum size of single email: Specify the maximum size on a single email message including attachments can be, represented in kilo bytes.
Email Accelerator User Settings: Size Limits Tab
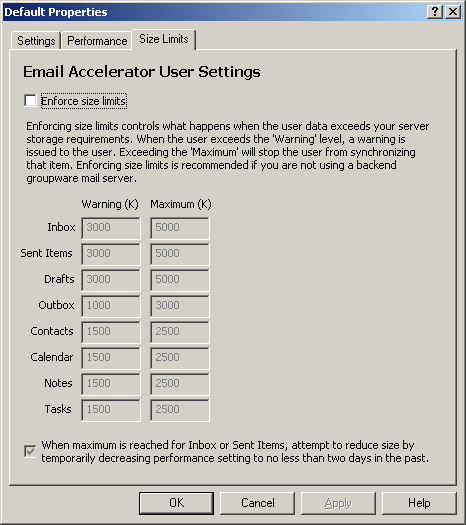
Use the Size Limits tab to control what happens when a user’s data exceeds the server storage limits.
Figure 4-13 Wireless Email User Settings: Size Limits
Available settings include:
-
Enforce size limits: Select this option to enable the size limits feature. If you deselect this option, other settings on this page become unavailable.
-
Warning: Set a warning limit for each category. When the user’s data exceeds this value, the user receives a warning message.
-
Maximum: Set a maximum limit for each category. When the user’s data exceeds this value, the user cannot synchronize the current item.
-
When maximum size is reached for Inbox or Sent Items: Select this option to temporarily decrease performance settings (that is, the number of days in the past for which items are stored) when the user reaches the Maximum value for Inbox or Sent folder items.
4.3.2 Novell GroupWise Settings
Novell GroupWise profile settings allow you to set values for the server, access methods, user options, and system address book sync sessions. The options are located on the Access tab and the User Settings tab.
For more information on selecting access methods, see Section 6.0, Authenticating Users .
Novell GroupWise Settings: Access Tab
The settings on the Access tab allow you to enter a GroupWise server and select an access method for the user. The available settings are similar to those shown in the following figure:
Figure 4-14 Novell GroupWise Settings: Access
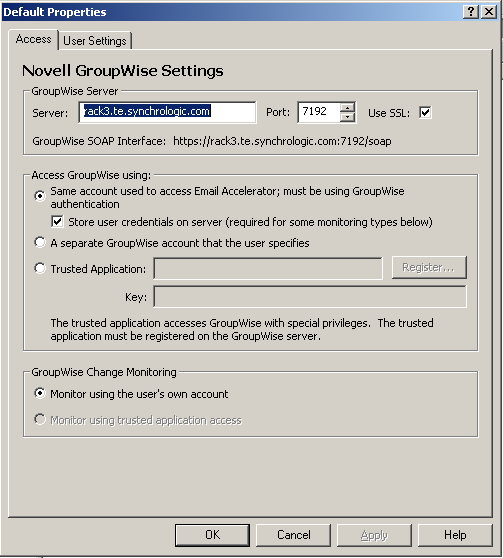
GroupWise Server
Use this section to manage the GroupWise server, which has the following components:
-
Server: Specify the name of the GroupWise server.
-
Port/SSL: Define the name, port number and SSL state of the GroupWise server, which runs the SOAP listener.
Access GroupWise
Use this section to determine how users should connect to the GroupWise server.
-
Same account used to access Wireless Email; must be using GroupWise authentication: Select this option if you want users to connect to the GroupWise server using the same GroupWise user account they use for accessing Email Accelerator.
-
A separate GroupWise account that the user specifies: Select this option if you want users to connect to the GroupWise server using a different GroupWise user account.
-
Trusted Application: If a trusted application is used, it should be registered on the Novell GroupWise server. You can use GWTrustedApp.exe and GWTApp.dll, located in the PIM directory, to register the Intellisync Mobile Suite trusted application.
-
Key: If a trusted application is used, specify the application key for the registered trusted application.
For more information, see Creating a Trusted Application With GroupWise.
GroupWise Change Monitoring
Use this section to monitor for Push and Alerts. The choices include the following:
-
Monitor using the user’s own account: Select this option to use the same GroupWise user account used to access GroupWise.
-
Monitor using trusted application access: Select this option to use the trusted application used to access GroupWise.
Creating a Trusted Application With GroupWise
When you create a trusted application with GroupWise, you must register GroupWise Mobile Server with GroupWise as a trusted application. When GroupWise Mobile Server has been registered a key is assigned to GroupWise Mobile Server for accessing GroupWise.
If a trusted application is used, it should be registered on the Novell GroupWise server. You can use GWTrustedApp.exe and GWTApp.dll, located in the PIM directory, to register the Intellisync Mobile Suite trusted application.
Before creating the trusted application with GroupWise, you must first have a drive mapped to the location of the primary domain.
-
From the GroupWise Mobile Server machine, open a command window.
-
Change to C:\Program Files\Intellisync Mobile Suite\PIM.
-
From C:\Program Files\Intellisync Mobile Suite\PIM, enter the following command to register with GroupWise as a trusted application and get the key:
GWTrustedApp.exe “pathtoprimarydomain”
A message is displayed, stating that trusted application was successfully registered. It displays your trusted application key.
-
Copy the key.
-
From the Intellisync Mobile Suite control console tree, click .
-
Expand > > > .
-
Select , then click > .
-
Select , then paste the key into the field.
-
Click , then specify a valid user ID and password of a user on the POA.
-
Click .
To apply the settings, reboot the GroupWise Mobile Server machine.
Novell GroupWise Settings: User Settings Tab
The User Settings tab has settings for user options and system address book synchronization. The available settings are similar to those shown in the following figure:
Figure 4-15 Novell GroupWise Settings: User Settings
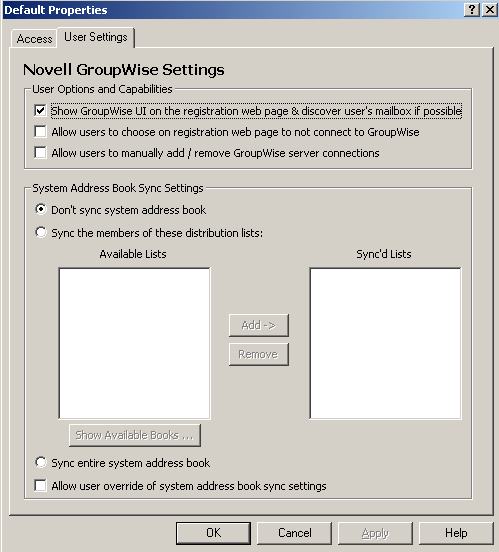
User Options and Capabilities
In this section, you can control whether users can view Novell GroupWise information when registering, set information about Novell GroupWise devices, and synchronize external e-mail. The available options include the following:
-
Show GroupWise UI on the registration web page & discover user’s mailbox if possible: Select this option if you want the user to view the Novell GroupWise user interface when registering. If you select this option and user discovery is enabled, the user’s mailbox information populates the appropriate fields.
-
Allow users to choose on registration page to not to connect to GroupWise: Select this option to give users the choice of having a handheld device that uses Novell GroupWise as the messaging platform.
-
Allow users to manually add / remove GroupWise server connections: Controls whether users can add or remove handheld devices that are using Novell GroupWise as their messaging platform.
System Address Book Sync Settings
In this section, you can specify databases and database directories for a user’s address book. The available options include the following:
-
Don’t sync system address book: Select this option so the system address book does not synchronize.
-
Sync the members of these distribution lists: Select specific groups you want to synchronize, if any.
-
Sync entire system address book: Select this option to synchronize the entire system address book.
-
Allow user override of system address book sync settings: Select this option to allow the user to override the system address book synchronization you define here.
4.3.3 Push Settings
Use the settings on this panel to configure Push values.
Figure 4-16 Push Settings
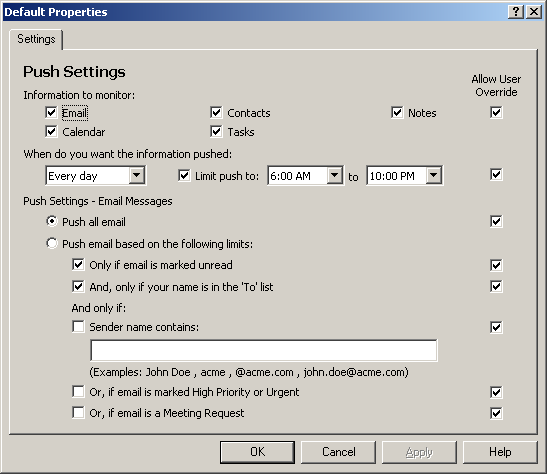
Available options include:
-
Information to monitor: Select each information type you want to monitor for Push.
- Contacts
- Notes
- Calendar
- Tasks
-
When do you want the information pushed: Select whether you want to push information every day or only on weekdays.
-
Limit push to starttime to stoptime: Use the list to select the time range for which you want users associated with the profile to receive pushes.
Push Settings - Email Messages
-
Push all email: Select this option to have all e-mail messages pushed, regardless of other factors.
-
Push email based on the following limits: By selecting from the following criteria, you can set limits on the types of e-mail messages you want to receive.
4.3.4 Alerts Settings
Use the settings on this page to configure Alert values.
Figure 4-17 Alert Settings
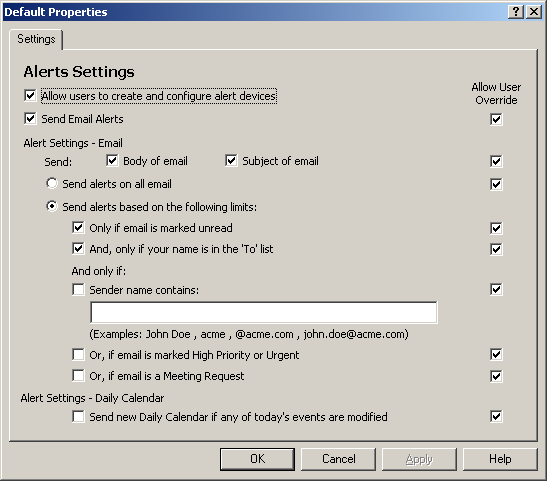
Available options include:
-
Allow users to create and configure alert devices: Select this option to give users permission to create and set up alert devices.
-
Send Email Alerts: Select this option to alert users when they receive an e-mail message.
-
Alert Settings – Email Alerts: Select whether users should receive the body of an e-mail or only the subject in the alert.
-
Send alerts on all email. Select this option to send alerts upon arrival of all e-mail messages, regardless of other factors.
-
Send alerts based on the following limits: By selecting from the following criteria, you can set limits on the types of e-mail to generate alerts.
-
Send new Daily Calendar if any of today’s events are modified: This option allows users assigned to this profile to receive a new calendar if any of the day’s events are modified.
4.3.5 Inbox and Outbox Settings
You can create profile settings for the user’s Inbox and Outbox by setting combinations of values for such options as message truncation, attachment limitations, old mail deletion, and preview. There are two tabs for settings for the Inbox and Outbox: the tab and the tab. The options on both tabs are identical, and the values for both Sync and SyncXpress can be set the same way. However, Sync settings are usually for a more comprehensive synchronization session. Sync sessions usually include items that require more transfer time or a faster connection. SyncXpress settings are usually for scaled-down, wireless data exchange sessions.
The available settings for both Sync and SyncXpress sessions are similar to those shown in the following figure:
Figure 4-18 Inbox and Outbox Settings
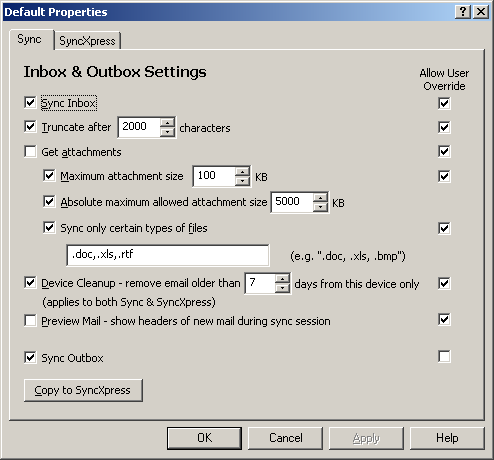
Available settings include:
-
Sync Inbox: Select whether to synchronize Inbox information.
-
Truncate after x characters: You can specify the number of characters, counting left to right, to allow before truncating an Inbox message.
-
Get attachments: Select this option to allow the device to receive file attachments in e-mail.
-
Maximum attachment size (in KB): To conserve space and minimize download times, specify a size limit (in kilobytes) for the attachments.
-
Absolute maximum attachment size (in KB): Specify a size limit (in kilobytes) for the largest attachment you can send to the device. Even if the user requests the attachment (in Preview Mail), the file does not download if it exceeds the value you set here.
-
Sync only certain types of files: You have the option to synchronize only attachments of a certain file type (such as␣.doc,␣.xls, and so forth).
-
-
Device Cleanup – remove e-mail older than x days from this device only (applies to both Sync & SyncXpress): Specify the number of days to keep e-mail on the user’s device.
-
Preview Mail – show headers of new mail during sync session: Use this option to enable or disable the Preview Mail feature, which allows users to decide whether they want to download each e-mail message based on the message header.
-
Sync Outbox: Select this option to synchronize Outbox information.
-
Copy to SyncXpress/Copy to Sync: If you set values on the Sync tab and want to apply the same settings to the tab, click . If you set values on the tab and want to apply the same settings to the tab, click .
-
Allow User Override: For each option on this page, you can control whether users can override the values you set.
4.3.6 Sent Items Settings
Profile settings for a user’s Sent items include truncation, attachment options, and e-mail deletion. There are two tabs for settings for Sent items, the tab and the tab. The options on both tabs are identical, and the values for both Sync and SyncXpress can be set the same way. However, Sync settings are usually for a more comprehensive synchronization session. Sync sessions usually include items that require more transfer time or a faster connection. SyncXpress settings are usually for scaled-down, wireless data exchange sessions.
Settings for both Sync and SyncXpress sessions are similar to those shown in the following figure.
Figure 4-19 Sent Items Settings
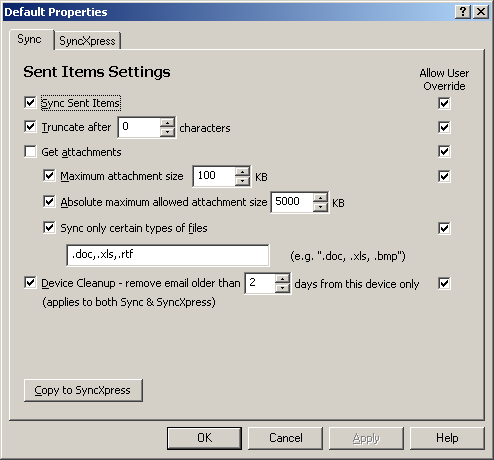
The following settings are available:
-
Sync Sent Items: Select this option to synchronize Sent items.
-
Truncate after x characters: You can specify the number of characters, counting left to right, to allow before truncating a sent message.
-
Get attachments: Select this option to allow the device to receive file attachments in e-mail.
-
Maximum attachment size (in KB): To conserve space and minimize download times specify a size limit (in kilobytes) for the attachments.
-
Absolute maximum attachment size (in KB): Specify a size limit (in kilobytes) for the largest attachment you can send to the device. Even if the user requests the attachment (in Preview Mail), the attachment is not sent if it exceeds the value you set here.
-
Sync only certain types of files: You have the option to synchronize only attachments of a certain file type (such as␣.doc,␣.xls, and so forth).
-
-
Device Cleanup – remove e-mail older than x days from this device only (applies to both Sync & SyncXpress): Specify the number of days to keep sent e-mail on the user’s device.
-
Copy to SyncXpress/Copy to Sync: If you set values on the Sync tab and want to apply the same settings to the tab, click . If you set values on the tab and want to apply the same settings to the tab, click .
4.3.7 Drafts Settings
Profile settings for draft messages are similar to the Inbox and Sent Items settings, and include truncation and attachment options. There are two tabs for setting the Drafts Settings: and . The options on both tabs are identical, and the values for both Sync and SyncXpress can be set the same way. However, Sync settings are usually for a more comprehensive synchronization session. Sync sessions usually include items that require more transfer time or a faster connection. SyncXpress settings are usually for scaled-down, wireless data exchange sessions. The available settings for both Sync and SyncXpress sessions are similar to those shown in the following figure:
Figure 4-20 Drafts Settings
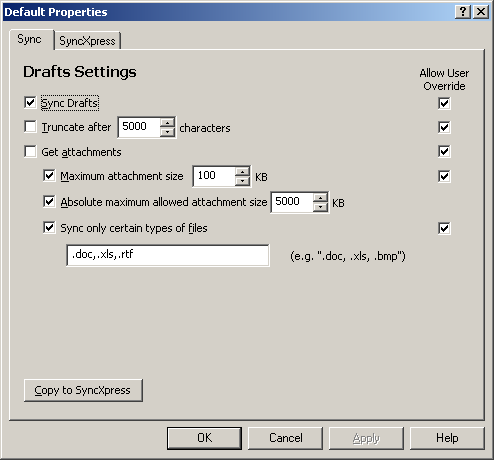
The following settings are available:
-
Sync Drafts: Select this option to synchronize Drafts information.
-
Truncate after x characters: You can specify the number of characters, counting left to right, to allow before truncating a draft message.
-
Get attachments: Select this option if you want the device to receive e-mail attachments.
-
Maximum attachment size (in KB): To conserve space and minimize download times specify a size limit (in kilobytes) for the attachments.
-
Absolute maximum attachment size (in KB): Specify a size limit (in kilobytes) for the largest attachment you can send to the device. Even if the user requests the attachment (in Preview Mail), it is not sent if it exceeds the value you set here.
-
Sync only certain types of files: You have the option to synchronize only attachments of a certain file type (such as␣.doc,␣.xls, and so forth).
-
-
Copy to SyncXpress/Copy to Sync: If you set values on the tab and want to apply the same settings to the tab, click . If you set values on the tab and want to apply the same settings to the tab, click .
4.3.8 PIM Settings
Profile settings for PIM include Calendar, Contacts, Tasks, Notes, and Personalized Information options. There are two tabs for setting PIM settings, and . The options on both tabs are identical, and the values for both Sync and SyncXpress can be set the same way. However, Sync settings are usually for a more comprehensive synchronization session. Sync sessions usually include items that require more transfer time or a faster connection. SyncXpress settings are usually for scaled down, wireless data exchange sessions.
The available settings for both Sync and SyncXpress sessions are similar to those shown in the following figure:
Figure 4-21 PIM Settings
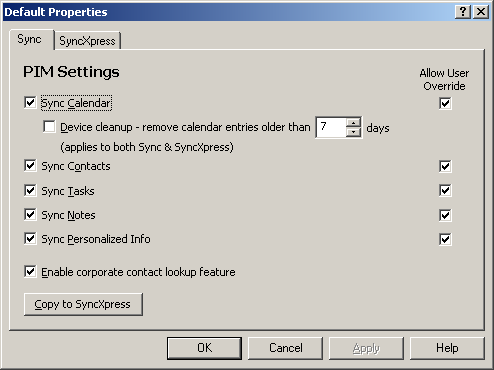
The following settings are available:
-
Sync Calendar: Select this option to synchronize users’ Calendar information.
-
Device Cleanup – remove calendar entries older than “x” days (applies to both Sync & SyncXpress): Specify the number of days to store calendar entries on users’ devices.
-
Sync Contacts: Select this option to synchronize users’ Contacts.
-
Sync Tasks: Select this option to synchronize users’ Tasks.
-
Sync Notes: Select this option to synchronize users’ Notes.
-
Sync Personalized Info: Select this option to synchronize users’ personalized information.
-
Enable corporate contact lookup feature: The corporate contact lookup feature might be appropriate for very large companies with too many employees to synchronize to the device. When you enable this feature, users can browse to access a contact lookup page to view the information they need.
-
Copy to SyncXpress/Copy to Sync: If you set values on the tab and want to apply the same settings to the tab, click . If you set values on the tab and want to apply the same settings to the tab, click .