3.3 Installing the Mobility Service
Before you run the Mobility Service Installation program, ensure that you have done the following:
-
Fill out the GroupWise Mobility Service Installation Worksheet.
If you are setting up a multi-server Mobility system, ensure that you have an Installation Worksheet for each Mobility server. Each Mobility server is independent of other Mobility servers, so you can set them up in whatever order is convenient, based on the overall configuration of your Mobility system.
-
Complete the tasks in Section 3.2, Preparing to Install the Mobility Service.
The following sections step you through the process of installing the Mobility Service and configuring a Mobility system.
3.3.1 Obtaining the GroupWise Mobility Service 2.1 ISO
You can obtain the GroupWise Mobility Service 2.1 ISO from these locations:
Novell Customer Center
-
Log in to the Novell Customer Center.
-
In the drop-down list (next to your name in the upper-right corner), select your organization that is entitled to GroupWise Mobility Service.
-
Click .
-
In the Novell GroupWise section, locate , then click
 to display the download page.
-
Follow the online instructions to download the GroupWise Mobility Service ISO to a convenient temporary directory on the Mobility server.
novell-groupwise-mobility-service-2.1.0-x86_64-build_number.iso
Novell Downloads Website
-
On Novell Downloads, under , click to display Patch Finder.
-
In the drop-down list, select .
-
At the bottom of the GroupWise product list, click to list the available patches.
-
Click , review the product description, then click .
-
Follow the online instructions to download the GroupWise Mobility Service ISO to a convenient temporary directory on the Mobility server.
novell-groupwise-mobility-service-2.1.0-x86_64-build_number.iso
-
Continue with Running the Mobility Service Installation Program.
3.3.2 Running the Mobility Service Installation Program
-
Ensure that you know the location where the Mobility Service ISO was downloaded on the Mobility server:
novell-groupwise-mobility-service-2.1.0-x86_64-build_number.iso
-
On your Linux desktop, click > to open the YaST Control Center.
-
Enter the root password.
-
Under , click , then click .
-
On the Installed Add-On Products page, click .
-
On the Media Types page, select , then click .

-
In the field, specify a name for the repository that will hold the Mobility Service software, such as Mobility Service.
-
In the field, specify the full path name of the ISO file from Step 1, then click Next.
-
Accept the License Agreement, then click .
-
Under , select .

-
Click to start the installation.
-
Click to acknowledge the automatic changes to other aspects of the server that will be made as the Mobility Service software is installed.
IMPORTANT:Do not click Next at this point.

-
After the software has been installed, click to configure your Mobility system.
-
Use the information that you have entered on the GroupWise Mobility Service Installation Worksheet to provide the information that the Mobility Service Installation program prompts you for. Click to move from page to page.
User/Server Settings:
LDAP Server Settings (if you selected as the user source):
Mobility Service Settings ( only):
Mobility Service Settings:
GroupWise Sync Agent Settings:
- Trusted Application Name
- Trusted Application Key File
- GroupWise Post Office Agent IP Address or Hostname
- SOAP Port
- Secure SOAP
Device Sync Agent Settings:
- Device Port
- Secure
- Generate Self-Signed Certificate
- Enter Certificate File
- GroupWise Address Book User
Novell Customer Center Registration:
-
On the Mobility Service Configuration page, click Next to save the configuration settings and install the Mobility Service software.
You see the GroupWise Mobility Service listed on the Installed Add-on Products page.
-
Click OK to return to the YaST Control Center.
If you encounter any problems during the installation, check the Mobility Service Installation program log file for information about the problem:
/var/log/datasync/install.log
For additional assistance, see Section A.0, GroupWise Mobility Service Installation Troubleshooting.
The Mobility Service Installation program creates the following directories and files:
/opt/novell/datasync
/etc/init.d/rcgms
/etc/datasync
/var/lib/datasync
/var/log/datasync
/var/run/datasync
/var/lib/pgsql
IMPORTANT:Although you use the YaST Add-On Products installer to install the Mobility Service, you must use the Mobility Service uninstall.sh script to uninstall it. For instructions, see Section 3.3.5, Uninstalling the Mobility Service. If you do not uninstall the Mobility Service correctly, you cannot successfully install it again.
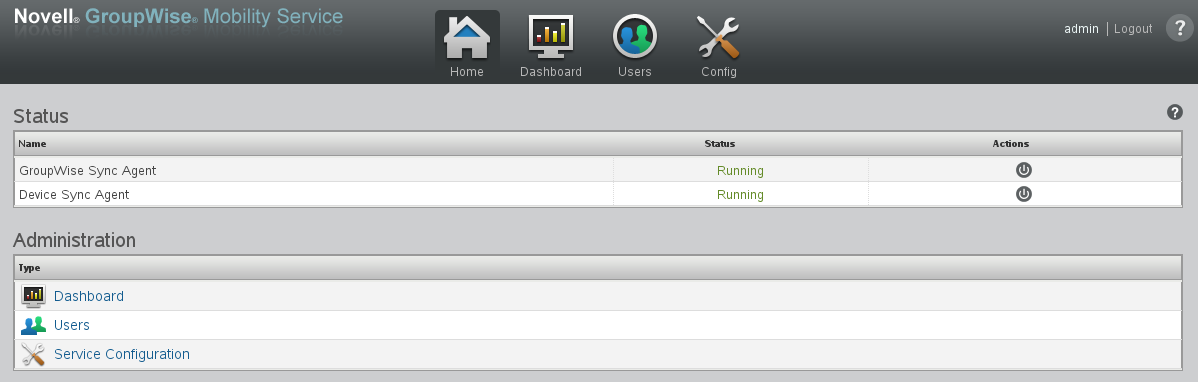
3.3.4 Using the Mobility Admin Console
The Mobility Service Installation program starts the GroupWise Sync Agent and the Device Sync Agent for you. Use the Mobility Admin console to check sync agent status.
-
In your web browser, access the Mobility Admin console at the following URL:
https://mobility_server_address:8120Replace mobility_server_address with the IP address or DNS hostname of the server where the Mobility Service is installed.
-
Log in as the Mobility administrator (the LDAP Admin user that was set up during installation, or root).
The sync agents should display a status of .
-
(Conditional) If one or both sync agents are not yet running:
-
Start the GroupWise Sync Agent first.
-
Start the Device Sync Agent second.
The GroupWise Sync Agent accesses the GroupWise Address Book to obtain information needed by the Device Sync Agent.
-
-
(Conditional) If you encounter problems starting the sync agents, see the following troubleshooting resources:
-
Skip to Section 3.4, Adding Users to Your Initial Mobility System.