Configuring SMTP/MIME Services
SMTP and MIME are standard protocols that the GroupWise® Internet Agent uses to send and receive e-mail messages over the Internet. SMTP, or Simple Mail Transfer Protocol, is the message transmission protocol. MIME, or Multipurpose Internet Mail Extension, is the message format protocol. Choose from the following topics for information about how to enable SMTP/MIME services and configure various SMTP/MIME settings:
- Configuring Basic SMTP/MIME Settings
- Using Extended SMTP (ESMTP) Options
- Configuring How the Internet Agent Handles E-Mail Addresses
- Determining Format Options for Messages
- Protecting Against Unidentified Hosts and Mailbombs (Spam)
- Configuring the SMTP Timeout Settings
- Determining What to Do with Undeliverable Messages
- Configuring SMTP Dial-Up Services
- Enabling SMTP Relaying
- Configuring SMTP Host Authentication
- Using a Route Configuration File
- Customizing Delivery Status Notifications
- Managing MIME Messages
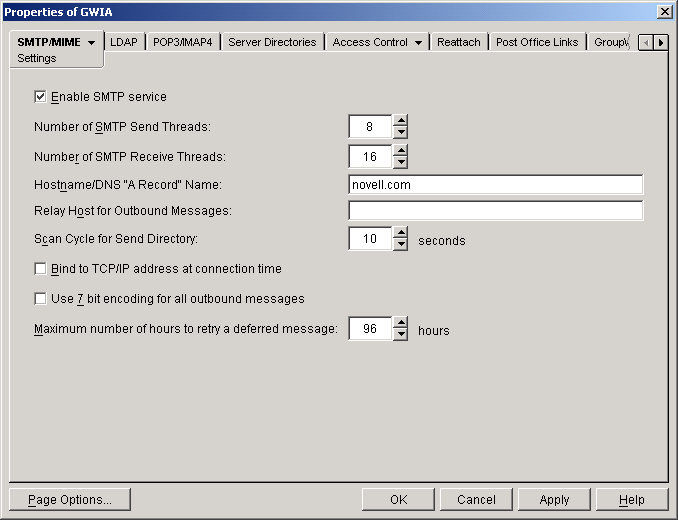
Configuring Basic SMTP/MIME Settings
-
In ConsoleOne®, right-click the Internet Agent object, then click Properties.
-
If the SMTP/MIME Settings page is not the default page, click SMTP/MIME > Settings.
-
Fill in the fields:
Enable SMTP Service: SMTP service is on by default. This setting allows SMTP Internet messaging. This setting corresponds with the Internet Agent's /smtp switch.
Number of SMTP Send Threads: The SMTP send threads setting lets you specify the number of threads that will process SMTP send requests. The default is 8 threads. This setting corresponds with the Internet Agent's /sd switch.
Number of SMTP Receive Threads: The SMTP receive threads setting lets you specify the number of threads that will process SMTP receive requests. The default is 16 threads. This setting corresponds with the Internet Agent's /rd switch.
Hostname/DNS "A Record" Name: The Hostname/DNS "A Record" name setting lets you identify the hostname of the server where the Internet Agent resides, or in other words the A Record in your DNS table that associates a hostname with the server's IP address (for example, gwia.novell.com). This setting corresponds with the Internet Agent's /hn switch.
If the Reject Mail if Sender's Identity Cannot be Verified setting is turned on (SMTP/MIME tab > Security Settings page), you are required to fill in the Hostname/DNS A Record Name setting. When a TCP/IP communication begins, the two servers involved exchange greetings. Part of the greeting is the recipient server identifying itself. The other part of the greeting is the sending server identifying itself with the SMTP HELO command. The Internet Agent verifies the authenticity of the greetings. If the greeting string does not match the actual Hostname/DNS A Record, the Internet Agent will either pass a warning and continue the communication or terminate the connection.
If you leave this field blank, the Internet Agent uses the fully qualified hostname obtained from your Internet service provider (such as gwia.novell.com), which you should have entered in the Foreign ID field on the Identification page (GroupWise tab).
Relay Host for Outbound Messages: The Relay host setting can be used if you want to use a relay host to route all outbound Internet e-mail. Enter the IP address or DNS hostname of the relay host. The relay host can be part of your network or can reside at the Internet service provider's site. This setting corresponds with the Internet Agent's /mh switch.
If you want to use a relay host, but you want some outbound messages sent directly to the destination host rather than to the relay host, you can use a route configuration file (route.cfg). Whenever a message is addressed to a user at a host that is included in the route.cfg file, the Internet Agent sends the message directly to the host rather than to the relay host. For information about creating a route.cfg file, see Using a Route Configuration File.
Scan Cycle for Send Directory: The Scan cycle setting specifies how often the Internet Agent polls for outgoing messages. The default is 10 seconds. This setting corresponds with the Internet Agent's /p switch.
Bind to TCP/IP Address at Connection Time: Select this option if you want the Internet Agent to bind to the TCP/IP address that has been defined as the Internet Agent's network address (GroupWise tab > Network Address page). When this occurs, the Internet Agent will only use this TCP/IP address when sending outbound messages. This applies to outbound messages only; for inbound messages, it will still listen on all IP addresses assigned to the Internet Agent's server.
This option is useful if the Internet Agent's server has multiple IP addresses and you want to force it to always use the same IP address when sending messages. It is also useful if the Internet Agent is running in a clustered environment (through the use of Novell® Cluster ServicesTM or Microsoft* Clustering Services) and you want to bind the Internet Agent to the server's secondary IP address.
Use 7 Bit Encoding for All Outbound Messages: By default, the Internet Agent uses 8-bit MIME encoding for any outbound messages that are HTML-formatted or that contain 8-bit characters. If, after connecting with the receiving SMTP host, the Internet Agent discovers that the receiving SMTP host cannot handle 8-bit MIME encoded messages, the Internet Agent converts the messages to 7-bit encoding.
With this option selected, the Internet Agent will automatically use 7-bit encoding and not attempt to use 8-bit MIME encoding. You should use this option if you are using a relay host that does not support 8-bit MIME encoding. This setting corresponds with the Internet Agent's /force7bitout switch.
Maximum Number of Hours to Retry a Deferred Message: Specify the number of hours after which the Internet Agent will stop trying to send deferred messages. The default is 96 hours, or four days. A deferred message is any message that couldn't be sent because of a temporary problem (host down, MX record not found, and so forth).
For the first hour of the specified time, the Internet Agent will try resending the message every 20 minutes. After the first hour, it will try resending the message every four hours. For example, if you specify 10 hours, the Internet Agent will try resending the message at 20 minutes, 40 minutes, 1 hour, 5 hours, and 9 hours. After the 10 hours has expired, it will return an undeliverable status to the sender. This setting corresponds with the Internet Agent's /maxdeferhours switch.
-
Click OK to save the changes.
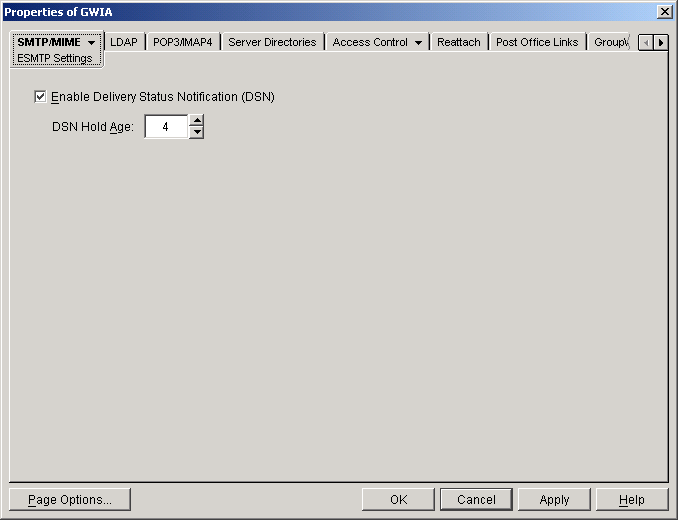
Using Extended SMTP (ESMTP) Options
The Internet Agent supports several Extended SMTP (ESMTP) settings. These are settings which might or might not be supported by another SMTP system.
The following ESMTP extensions are supported:
SIZE For more information, see RFC 1870.
AUTH For more information, see RFC 2554.
8BITMIME For more information, see RFC 1652.
STARTTLS For more information, see RFC 3207.
To configure ESMTP settings:
-
In ConsoleOne, right-click the Internet Agent object, then click Properties.
-
Click SMTP/MIME > ESMTP Settings.
-
Fill in the fields:
Enable Delivery Status Notification: Turn on this option to allow the Internet Agent to request status notifications for outgoing messages and to supply status notifications for incoming messages. This requires the external e-mail system to also support Delivery Status Notification. Currently, notification consists of two delivery statuses: successful or unsuccessful.
If you enable the Delivery Status Notification option, you need to select the number of days that you want the Internet Agent to retain information about the external sender so that status updates can be delivered to him or her. For example, the default hold age causes the sender information to be retained for 4 days. If the Internet Agent does not receive delivery status notification from the GroupWise recipient's Post Office Agent (POA) within that time period, it deletes the sender information and the sender does not receive any delivery status notification.
-
Click OK to save the changes.
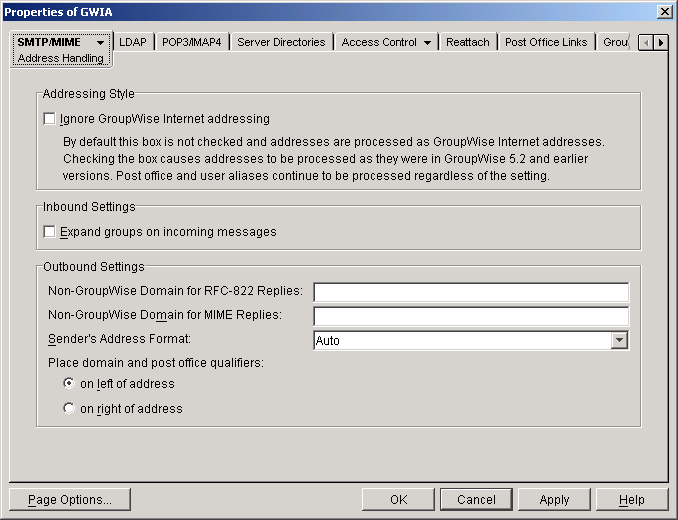
Configuring How the Internet Agent Handles E-Mail Addresses
-
In ConsoleOne, right-click the Internet Agent object, then click Properties.
-
Click SMTP/MIME > Address Handling.
-
Fill in the fields:
Ignore GroupWise Internet Addressing: GroupWise supports both Internet-style addressing (user@host) and GroupWise proprietary addressing (user_ID.post_office.domain). By default, the Internet Agent uses Internet-style addressing.
If you do not want the Internet Agent to use standard Internet-style addressing (user@host), turn on the Ignore GroupWise Internet Addressing option. With this option turned on, messages use the mail domain name in the Foreign ID field (GroupWise tab > Identification page) for the domain portion of a user's Internet address. If you've included multiple mail domain names in the Foreign ID field or the frgnames.cfg file, as described in Listing Foreign Domain Names, the first mail domain name listed will be the one used in addresses.
The Internet Agent will support user and post office aliases in either mode. This setting corresponds with the Internet Agent's /dia switch.
Expand Groups on Incoming Messages: Turn on this option to have incoming Internet messages addressed to public groups sent to all members of the groups. This setting corresponds with the Internet Agent's /group switch.
Non-GroupWise Domain for RFC-822 Replies: This setting can be used only if 1) you created a non-GroupWise domain to represent all or part of the Internet, and 2) you defined the non-GroupWise domain's outgoing conversion format as RFC-822 when you linked the Internet Agent to the domain.
Enter the name of the non-GroupWise domain associated with the RFC-822 conversion format. When a GroupWise user replies to a message that was originally received by the Internet Agent in RFC-822 format, the reply is sent to the specified non-GroupWise domain and converted to RFC-822 format so that it is in the same format as the original message.
This setting corresponds with the Internet Agent's /fd822 switch.
Non-GroupWise Domain for MIME Replies: This setting can be used only if 1) you've created a non-GroupWise domain that represents all or part of the Internet, and 2) you defined the non-GroupWise domain's outgoing conversion format as MIME when you linked the Internet Agent to the domain.
Enter the name of the non-GroupWise domain associated with the MIME conversion format. When a GroupWise user replies to a message that was originally received by the Internet Agent in MIME format, the reply is sent to the specified non-GroupWise domain and converted to MIME format so that it is in the same format as the original message.
This setting corresponds with the Internet Agent's /fdmime switch.
Sender's Address Format: This setting applies only if you have not enabled GroupWise Internet addressing (in other words, you've selected the Ignore GroupWise Internet Addressing option). If GroupWise Internet addressing is enabled, the Internet Agent ignores this setting and uses the preferred address format established for outbound messages (Tools menu > GroupWise System Operations > Internet Addressing).
The Sender's Address Format setting lets you specify which GroupWise address components (domain.post_office.user_ID) will be included as the user portion of the address on outbound messages. You can choose from the following options:
Domain, Post Office, User, and Hostname: Uses the domain.post_office.user_ID@host syntax.
Post Office, User, and Hostname: Uses the post_office.user_ID@host syntax.
Auto (default): Uses the GroupWise addressing components required to make the address unique within the user's GroupWise system. If a user ID is unique in a GroupWise system, the outbound address will use only the user ID. If the post office or domain.post office components are required to make the address unique, these components will also be included in the outbound address.
The Sender's Address Format setting corresponds with the Internet Agent's /aql switch.
Place Domain and Post Office Qualifiers: If the sender's address format must include the domain and/or post office portions to be unique, you can use this option to determine where the domain and post office portions are located within the address.
On Left of Address (default): Leaves the domain and post office portions on the left side of the @ sign (for example, domain.post_office.user_ID@host.
On Right of Address: Moves the domain and post office portions to the right side of the @ sign, making the domain and post office part of the host portion of the address (for example, user_ID@post_office.domain.host. If you choose this option, you must ensure that your DNS server can resolve each post_office.domain.host portion of the address. This setting corresponds with the Internet Agent's /aqor switch.
-
Click OK to save the changes.
Listing Foreign Domain Names
The Foreign ID field (ConsoleOne > Internet Agent object > GroupWise tab > Identification page) identifies the Internet domain names for which the Internet Agent will accept messages. The field should always include your mail domain name (for example, novell.com). You can include additional domain names by separating them with a space, as in the following example:
novell.com gw.novell.com gwia.novell.com
When you list multiple Internet domain names, the Internet Agent accepts messages for a GroupWise user provided any of the Internet domain names are used (for example, jsmith@novell.com, jsmith@gw.novell.com, or jsmith@gwia.novell.com).
The field limit is 255 characters. If you need to exceed that limit, you can create a frgnames.cfg text file in the domain\wpgate\gwia directory. Include each Internet domain name, separated by a space, just like you would in the Foreign ID field.
Determining Format Options for Messages
-
In ConsoleOne, right-click the Internet Agent object, then click Properties.
-
Click SMTP/MIME > Message Formatting.

-
Fill in the fields:
Number of Inbound Conversion Threads: The inbound conversion threads setting lets you specify the number of threads that will convert inbound messages from MIME or RFC-822 format to the GroupWise message format. The default setting is 4. This setting corresponds with the Internet Agent's /rt switch.
GroupWise View Name for Incoming Messages: The GroupWise view setting lets you specify a mail view attachment for all inbound Internet messages. A view is the screen that a user sees when a message is opened. This switch helps users identify Internet messages. If you do not specify a view, or if the view has not been configured, the default view (Internet) will be used. This setting corresponds with the Internet Agent's /mv switch.
Number of Outbound Conversion Threads: The outbound conversion threads setting lets you specify the number of threads that will convert outbound messages from the GroupWise message format to MIME or RFC-822 format. The default setting is 4. This setting corresponds with the Internet Agent's /st switch.
Default Message Encoding: The default message encoding setting lets you select the encoding method for your outbound Internet messages. You can select either Basic RFC-822 formatting or MIME formatting. MIME is the default message format. This setting corresponds with the Internet Agent's /mime switch.
If you select the Basic RFC-822 option, you can decide whether or not to have the Internet Agent UUEncode all ASCII text attachments to RFC-822 formatted messages. By default, this option is turned off, which means ASCII text attachments will be included as part of the message body. By default, the setting is off. This setting corresponds with the Internet Agent's /uueaa switch.
Message Text Line Wrapping: The Quoted Printable text line wrapping setting lets you select the Quoted Printable MIME standard for line wrapping. By default this setting is turned on. If you turn the setting off, MIME messages will go out as plain text and will wrap text according to the number of characters specified in the line wrap length setting. This setting corresponds with the Internet Agent's /nqpmt switch.
The Line Wrap Length for Message Text on Outbound Mail setting lets you specify the line length for outgoing messages. This is useful if the recipient's e-mail system requires a certain line length. The default line length is 72 characters. This setting corresponds with the Internet Agent's /wrap switch.
-
Click OK to save the changes.
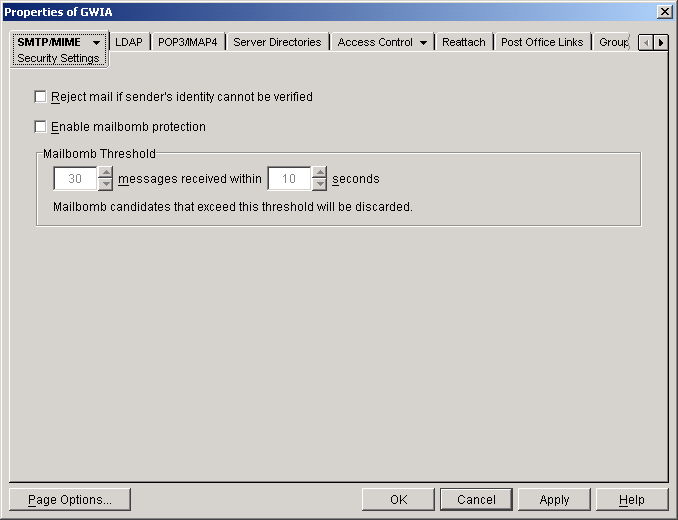
Protecting Against Unidentified Hosts and Mailbombs (Spam)
Multiple unsolicited messages (sometimes called a mailbomb or spam) from the Internet can potentially harm your GroupWise messaging environment. You can use the settings on the SMTP Security page to help protect your GroupWise system from malicious or accidental attacks.
To configure the SMTP security settings:
-
In ConsoleOne, right-click the Internet Agent object, then click Properties.
-
Click SMTP/MIME > Security Settings.
-
Fill in the fields:
Reject Mail if Sender's Identity Cannot be Verified: This setting lets you prevent messages if the sender's host is not authentic.
When this setting is turned on, the Internet Agent will refuse messages from a smart host if a DNS reverse lookup shows that a "PTR" record does not exist for the IP address of the sender's host.
When this setting is turned off, the Internet Agent will accept messages from any host, but display a warning if the initiating host is not authentic.
This setting corresponds with the Internet Agent's /rejbs switch.
Enable Mailbomb Protection: Mailbomb protection is turned off by default. You can turn it on by clicking the check box.
Mailbomb Threshold: When you enable Mailbomb protection, default values are defined in the threshold settings. The default settings are 30 messages received within 10 seconds. You can change the settings to establish an acceptable security level.
Any group of messages that exceeds the specified threshold settings will be entirely discarded. If you want to prevent future mailbombs from the mailbomb sender, identify the sender's IP address (by looking at the Internet Agent's console) and then modify the appropriate class of service to prevent mail being received from that IP address (Access Control tab > Settings page).
The time setting corresponds with the Internet Agent's /mbtime switch. The message count setting corresponds with the /mbcount switch.
-
Click OK to save the changes.
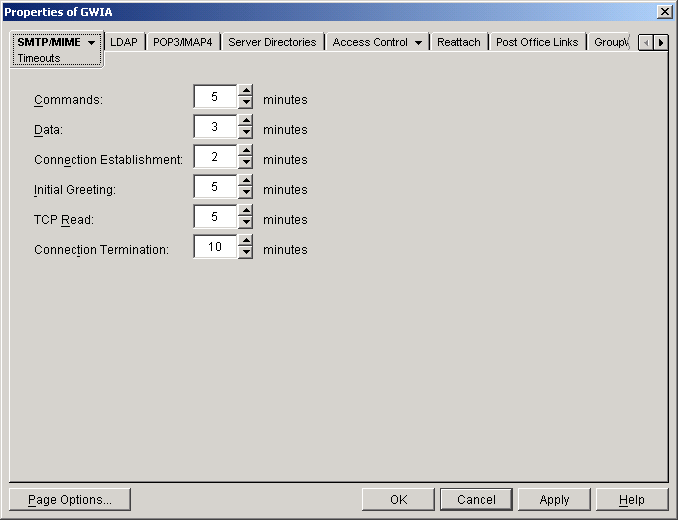
Configuring the SMTP Timeout Settings
The SMTP Timeout settings specify how long the Internet Agent's SMTP service will wait to receive data that it can process. After the allocated time expires, the Internet Agent might give a TCP read/write error.
To configure the SMTP timeout settings:
-
In ConsoleOne, right-click the Internet Agent object, then click Properties.
-
Click SMTP/MIME > Timeouts.
-
Fill in the fields:
Commands: The Commands setting lets you specify how long the Internet Agent will wait for an SMTP command. The default is 5 minutes. This setting corresponds with the Internet Agent's /tc switch.
Data: The Data setting lets you specify how long the Internet Agent will wait for data from the receiving host. The default is 3 minutes. This setting corresponds with the Internet Agent's /td switch.
Connection Establishment: The Connection Establishment setting lets you specify how long the Internet Agent will wait for the receiving host to establish a connection. The default is 2 minutes. This setting corresponds with the Internet Agent's /te switch.
Initial Greeting: The Initial Greeting setting lets you specify how long the Internet Agent will wait for the initial greeting from the receiving host. The default is 5 minutes. This setting corresponds with the Internet Agent's /tg switch.
TCP Read: The TCP Read setting lets you specify how long the Internet Agent will wait for a TCP read. The default is 5 minutes. This setting corresponds with the Internet Agent's /tr switch.
Connection Termination: The Connection Termination setting lets you specify how long the Internet Agent will wait for the receiving host to terminate the connection. The default is 10 minutes. This setting corresponds with the Internet Agent's /tt switch.
-
Click OK to save the changes.
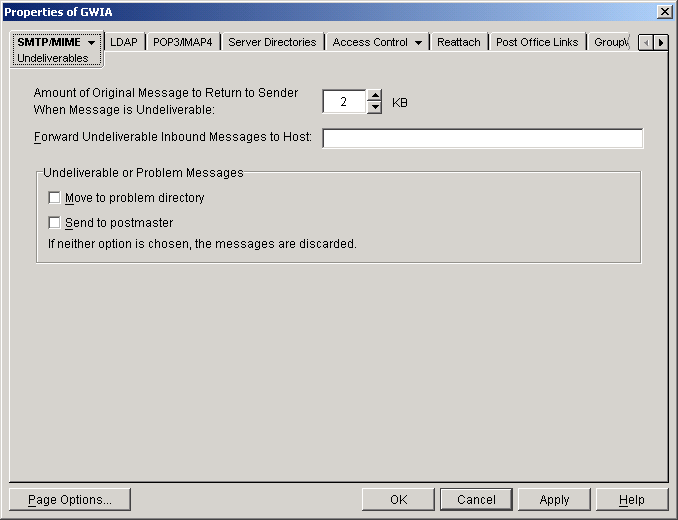
Determining What to Do with Undeliverable Messages
-
In ConsoleOne, right-click the Internet Agent object, then click Properties.
-
Click SMTP/MIME > Undeliverables.
-
Fill in the fields:
Amount of Original Message to Return to Sender When Message is Undeliverable: This setting lets you specify how much of the original message is sent back to the sender when a message is deemed undeliverable. By default, only 2 KB of the original message will be sent back. This setting corresponds with the Internet Agent's /mudas switch.
Forward Undeliverable Inbound Messages to Host: This setting lets you specify a host that will be forwarded undeliverable messages. This may be useful if you use UNIX sendmail aliases.
When an IP address is specified rather than a DNS hostname, the IP address must be surrounded by square brackets [ ]. For example, [151.155.134.246].
This setting corresponds with the Internet Agent's /fut switch.
Undeliverable or Problem Messages: This setting lets you specify what you want the Internet Agent to do with problem messages. A problem message is an inbound or outbound message that the Internet Agent cannot convert properly. By default, problem messages are discarded. If you want to save problem messages, specify whether to move the messages to the problem directory (gwprob), send them to the postmaster, or do both. This setting corresponds with the Internet Agent's /badmsg switch.
IMPORTANT: Despite the field name (Undeliverable or Problem Messages), this setting does not apply to undeliverable messages.
-
Click OK to save the changes.
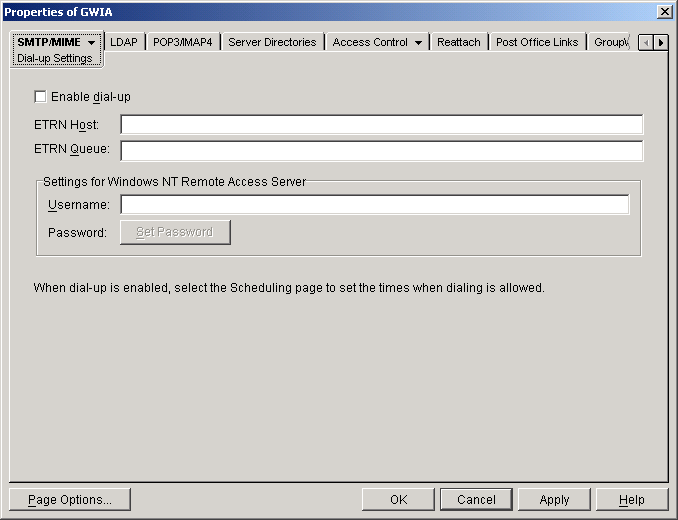
Configuring SMTP Dial-Up Services
SMTP dial-up services can be used when you don't require a permanent connection to the Internet and want to periodically check for mail messages queued for processing. Perform the following tasks in order to use SMTP dial-up services:
Setting up Internet Dial-Up Software
The Internet Agent requires routing software to make the dial-up connection to the Internet. The Internet Agent cannot make this connection itself; it simply creates packets to hand off to the routing software.
For information about configuring the Internet Agent's dial-up feature with routing software, see Novell Technical Information Document 10007366.
Enabling Dial-Up Services
After you have the appropriate routing software in place, you can enable and configure the Internet Agent's dial-up services.
-
In ConsoleOne, right-click the Internet Agent object, then click Properties.
-
Click SMTP/MIME > Dial-Up Settings.
-
Fill in the fields:
Enable Dial-Up: Turn on this option to allow the Internet Agent to support SMTP dial-up service. This option is off by default. This setting corresponds with the Internet Agent's /usedialup switch.
ETRN Host: Specify the IP address, or DNS hostname, of the mail server (where your mail account resides) at your Internet Service Provider. You should obtain this address from your Internet Service Provider. This setting corresponds with the Internet Agent's /etrnhost switch.
ETRN Queue: Specify your e-mail domain as provided by your Internet Service Provider (for example, novell.com). This setting corresponds with the Internet Agent's /etrnqueue switch.
Username: The Username setting applies only if you are using a Windows NT Remote Access Server (RAS) and the Internet Agent is not running on the same server as the RAS.
Specify the RAS Security username. This setting corresponds with the Internet Agent's /dialuser switch.
Password: The Password setting applies only if you are using a Windows NT Remote Access Server (RAS) and the Internet Agent is not running on the same server as the RAS.
Specify the RAS Security user's password. This setting corresponds with the Internet Agent's /dialpass switch.
-
Click OK to save the changes.
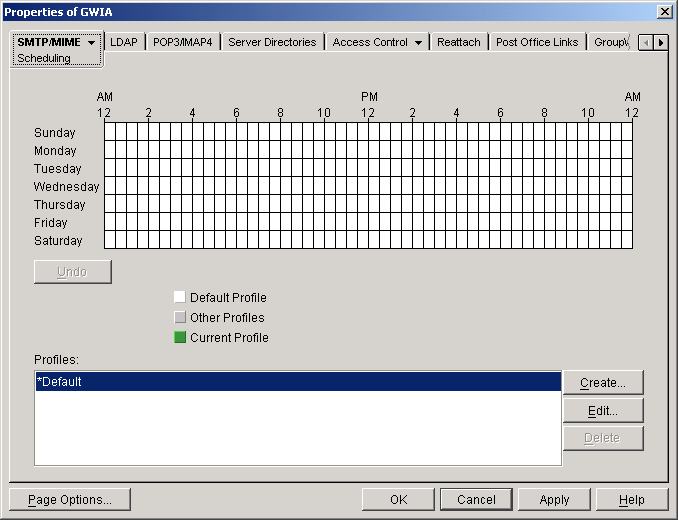
Creating a Dial-Up Schedule
After you've enabled the Internet Agent to use a dial-up connection, you need to schedule the times when the Internet Agent will initiate a connection.
NOTE: When the Internet Agent initiates a connection, it simply passes TCP/IP packets to the routing service that makes the Internet connection. The routing software, not the Internet Agent, is responsible for the actual dial-up or timeout.
The Internet Agent uses profiles to enable you to assign different dial-up criteria to different times. For example, the default profile instructs the Internet Agent to initiate a dial-up connection whenever an outgoing message is placed in its send queue. However, during the night, you may want the Internet Agent to initiate a connection only after 30 outgoing messages have been queued. In this case, you could create a profile that requires 30 messages to be queued and then apply the profile between the hours of 11 p.m. and 7 a.m. each day.
To create a dial-up schedule:
-
In ConsoleOne, right-click the Internet Agent object, then click Properties.
-
Click SMTP/MIME > Scheduling.
-
To apply a profile to a block of time, skip to Applying a Profile.
or
To create a profile, skip to Creating a Profile.
or
To edit a profile, skip to Editing a Profile.
or
To delete a profile, skip to Deleting a Profile
Creating a Profile
-
Click Create to display the Create Profile dialog box.
-
Fill in the fields:
Name: Enter a unique name for the profile. It must be different than any other name in the Profile list.
Description: If desired, enter a description for the profile.
Queue Thresholds: The queue thresholds determine the criteria for the Internet Agent to initiate a dial-up connection to send messages. The settings do not apply to receiving messages (see Dial Parameters below).
You can base the criteria on the number of messages in the send queue, the total size of the messages in the send queue, or the number of minutes to wait between connections. If necessary, you can use a combination of the three criteria.
For example, if you set Messages to 20, Kilobytes to 100, and Minutes to 60, the Internet Agent will instruct the routing service to initiate a dial-up connection when 20 messages have accumulated in the queue, when the total size of the messages in the queue reaches 100K, or when 60 minutes have passed since the last connection.
Dial Parameters: The dial parameters serve two purposes: 1) the Internet Agent passes the Redial Interval and Idle Time Before Hangup parameters to the routing service to use when initiating a connection to send outbound messages, and 2) the Internet Agent uses the Polling Interval parameter to determine how often the routing service should initiate a connection to check for inbound messages. The Polling Interval parameter is required.
Specify the interval between redials (default is 30 seconds), the amount of time to wait before hanging up when there are no messages to process (default is 60 seconds), and the interval between polling for inbound messages (default is 0 minutes).
-
Click OK to add the profile to the Profiles list.
-
To apply the profile to a block of time, see Applying a Profile.
Editing a Profile
-
Select the profile you want to edit, then click Edit to display the Edit Profile dialog box.
-
Modify the desired fields. For information about each of the fields, click the Help button in the Edit Profile dialog box or see Creating a Profile.
-
Click Apply to save the changes or click OK to save the changes and close the page.
Enabling SMTP Relaying
You can enable the Internet Agent to function as a relay host for Internet messages. The Internet Agent can relay messages received from all Internet hosts, or you can select specific hosts for which you will allow it to relay.
-
In ConsoleOne, right-click the Internet Agent object, then click Properties.
-
Click Access Control > SMTP Relay Settings.
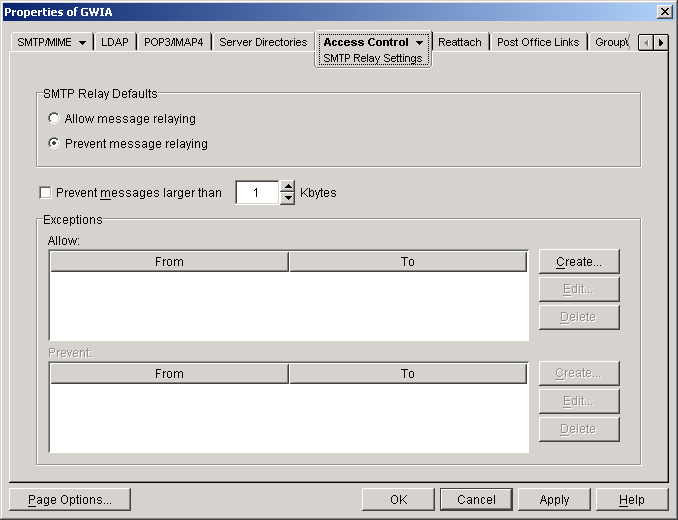
-
Under SMTP Relay Defaults, select whether you want to allow or prevent message relaying.
If you prevent message relaying, you can define exceptions that will allow message relaying for specific Internet hosts. This can also be done if you allow message relaying. We suggest that you select the option that enables you to define the fewest exceptions.
-
To prevent relaying of messages larger than a specific size (regardless of the SMTP Relay Defaults setting), enable the Prevent Messages Larger Than option and specify the size limitation.
-
To define an exception, click Create to display the New Internet Address dialog box.
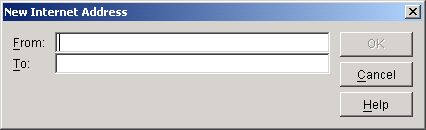
-
Fill in the following fields:
From: Enter the Internet address that must be in the message's From field for the exception to be applied.
To: Enter the Internet address that must be in the message's To field for the exception to be applied. This is also the address that the message will be relayed to (in the case of an Allow exception).
In both the From and To fields, you can use either an IP address or a DNS hostname, as shown in the following examples:
novell.com
10.1.1.10
You can enter a specific address, as shown above, or you can use wildcards and IP address ranges to specify multiple addresses, as follows:
*.novell.com
10.1.1.*
10.1.1.10-15 -
Click OK to add the exception to the list.
-
When finished defining exceptions, click OK to save your changes.
Configuring SMTP Host Authentication
The Internet Agent supports SMTP host authentication for both outbound and inbound message traffic.
Outbound Authentication
For outbound authentication to other SMTP hosts, the Internet Agent requires that the remote SMTP hosts support the AUTH LOGIN authentication method. To set up outbound authentication:
-
Include the remote SMTP host's domain name an authentication credentials in the gwauth.cfg file, located in the domain\wpgate\gwia directory. The format is:
domain_name authuser authpassword
For example:
smtp.novell.com remotehost novell
-
If you have multiple SMTP hosts that require authentication before they will accept messages from your system, create an entry for each host. Make sure to include a hard return after the last entry.
-
If you want to allow the Internet Agent to send messages only to SMTP hosts listed in the gwauth.cfg file, use the following startup switch:
/forceoutboundauth
With this option enabled, if a message is sent to an SMTP host not listed in the gwauth.cfg file, the sender will receive an Undeliverable message.
Inbound Authentication
For inbound authentication from other SMTP hosts, you can use the /forceinboundauth startup switch to ensure that the Internet Agent accepts messages only from SMTP hosts that use the AUTH LOGIN authentication method to provide a valid GroupWise user ID and password. The remote SMTP hosts can use any valid GroupWise user ID and password. However, for security reasons, we recommend that you create a dedicated GroupWise user account for remote SMTP host authentication.
Using a Route Configuration File
The Internet Agent supports the use of a route configuration file (route.cfg) to specify destination SMTP hosts. This can be useful in situations such as the following:
- You are using a relay host for outbound messages. However, you want some outbound messages sent directly to the destination host rather than the relay host. Whenever a message is addressed to a user at a host that is included in the route.cfg file, the Internet Agent will send the message directly to the destination host rather than the relay host.
- You need to send messages to SMTP hosts that are unknown to the public Domain Name Servers. The route.cfg file acts much like a hosts file to enable the Internet Agent to resolve addresses not listed in DNS.
- You want to route messages through an SMTP host that checks for viruses (or performs some other task) before routing them to the destination host.
To set up a route.cfg file:
-
Create the route.cfg file as a text file in the domain\wpgate\gwia directory.
-
Add an entry for each SMTP host you want to send to directly. The entry format is:
hostname address
where address is either an alternative hostname or an IP address. For example:
novell.com gwia.novell.com
unixbox [123.1.2.3]
Make sure to include a hard return after the last entry. In addition, if you use an IP address, it must be included in square brackets, as shown in the second example.
-
Save the route.cfg file.
Customizing Delivery Status Notifications
The Internet Agent returns status messages for all outbound messages. For example, if a GroupWise user sends a message that the Internet Agent cannot deliver, the Internet Agent returns an undeliverable message to the GroupWise user.
By default, the Internet Agent uses internal status messages. However, you can override the internal status messages by using a status.xml file that includes the status messages you want to use.
-
Open the appropriate statusxx.xml file, located in the domain\wpgate\gwia directory.
The domain\wpgate\gwia directory includes a statusxx.xml file for each language included on your GroupWise 6.5 Administrator CD (for example, statusus.xml, statusde.xml, and statusfr.xml).
-
Make the modifications you want.
The following sample code shows the elements and default text of the Undeliverable Message status:
<STATUS_MESSAGE type="undeliverableMessage" xml:lang="en-US">
<SUBJECT>Message status - undeliverable</SUBJECT>
<MESSAGE_BODY>
<TEXT>\r\nThe attached file had the following undeliverable recipient(s):\r\n</TEXT>
<RECIPIENT_LIST format="\t%s\r\n"
<SESSION_TRANSCRIPT>
<TEXT>\r\nTranscript of session follows:\r\n<TEXT>
</SESSION_TRANSCRIPT>
<ATTACH_ORIGINAL_MSG></ATTACH_ORIGINAL_MSG>
</MESSAGE_BODY>
</STATUS_MESSAGE>
You can modify text in the <SUBJECT> tag or in the <TEXT> tags.
You can add additional <TEXT> tags in the <MESSAGE_BODY>.
You can remove tags to keep an element from being displayed. For example, you could remove the <ATTACH_ORIGINAL_MSG></ATTACH_ORIGINAL_MSG> tags to keep the original message from displaying.
You can use the following format characters and variables:
- \t: tab
- \r: carriage return
- \n: line feed
- %s: recipient name variable
-
Save the file, renaming it from statusxx.xml to status.xml.
-
Restart the Internet Agent.
The Internet Agent will now use the status messages defined in the status.xml file rather than its internal status messages.
Managing MIME Messages
Multipurpose Internet Mail Extensions, or MIME, provides a means to interchange text in languages with different character sets. Multimedia e-mail can be sent between different computer systems that use the SMTP protocol. MIME allows you to send and receive e-mail messages containing:
- Images
- Sounds
- UNIX Tar Files
- PostScript*
- FTP-able File Pointers
- Non-ASCII Character Sets
- Enriched Text
- Nearly any other file
Because MIME handles such a variety of file types, you might need to customize aspects of MIME for your users.
Customizing MIME Preamble Text
An ASCII file called preamble.txt is installed in the Internet Agent gateway directory (domain\wpgate\gwia). This file, which is included with any MIME multipart message, is displayed when the message recipient lacks a MIME-compliant mail reader.
The content of the preamble.txt file is a warning, in English, that the file is being sent in MIME format. If the recipient cannot read the message, he or she will need to either use a MIME-compliant mail reader or reply to the sender and request the message not be sent in MIME format.
It is recommended that you use the preamble.txt file so that those who read MIME messages coming from your GroupWise system and who lack MIME-compliant mail readers will understand why they cannot read the message and will be able to take corrective action.
If you choose to modify the preamble.txt file, be aware of the following considerations:
- The maximum file size is 1024 bytes (1 KB)
- This file is read by the Internet Agent when the Internet Agent starts, so if you change the file, you will need to restart the Internet Agent.
The Internet Agent's gateway directory also contains a preamble.all file. The preamble.all file includes the text of preamble.txt translated into several languages. If you anticipate that your users will be sending mail to non-English speaking users, you may want to copy the appropriate language sections from the preamble.all file to the preamble.txt file.
The 1024-byte limit on the size of the preamble.txt file still applies, so make sure that the file does not exceed 1024 bytes.
Customizing MIME Content-Type Mappings
By default, the GroupWise client determines the MIME content-type and encoding for message attachments. If, for some reason, the GroupWise client cannot determine the appropriate MIME content-type and encoding for an attachment, the Internet Agent must determine the content-type and encoding.
The Internet Agent uses a mimetype.cfg file to map attachments to the appropriate MIME content types. Based on an attachment's content type, the Internet Agent encodes the attachment using quoted-printable, Base64, or BinHex. Generally, quoted-printable is used for text-based files, Base64 for application files, and BinHex for Macintosh files.
The mimetype.cfg file includes mappings for many standard files. If necessary, you can modify the file to include additional mappings. If an attachment is sent which does not have a mapping in the file, the Internet Agent will choose quoted-printable, BinHex or Base64 encoding.
The mimetype.cfg file is also used for RFC-822 attachments, but UUencode or BinHex encoding will be used regardless of the mapped content type.
The mimetype.cfg file is located in the domain\wpgate\gwia directory. The following section provide information you will need to know to modify the file:
Mapping Format
Each mapping entry in the file uses the following format:
content-type .ext|dtk-code|mac-ttttcccc [/parms] ["comment"]
File Organization
The mimetype.cfg file contains the following four sections:
- [Parameter-Override]
- [Mac-Mappings]
- [Detect-Mappings]
- [Extension-Mappings]
[Parameter-Override]
The [Parameter-override] section take priority over other sections. You can use this section to force the encoding scheme for certain file types. This section also contains defaults for sending various kinds of multipart messages. This is how the Internet Agent knows to put attachments into MIME Alternate/Parallel multiparts.
[Mac-Mappings]
The [Mac-mappings] section defines mappings for Macintosh file attachments. The following is a sample entry:
application/msword mac-wdbnmswd "Word for Macintosh"
Macintosh files have a type and creator associated with them. The first four characters are used for the type and the last four characters are used for the creator application.
In the above example, the type is wdbn and the creator application is mswd. When a user attaches a Macintosh file to a message, the Internet Agent uses the appropriate entry in the [Map-mappings] section to map the file to a MIME content type and then encode the file according to the assigned encoding scheme. Unless otherwise specified by the /parms element, BinHex 4.0 will be used for the encoding. The following example shows how you can use the /parms element to change the encoding from the default (BinHex) to Base64:
application/msword mac-wdbnmswd /base64 "Word for Macintosh"
If necessary, you can use ???? for the creator portion (mac-text????) to indicate a certain file type created by any application. Or, you can use ???? in both portions (mac-????????) to match any file type created by any application. For example:
application/octet-stream mac-???????? /base64 "Mac Files"
This causes all Macintosh files to be encoded using Base64 rather than BinHex.
[Detect-Mappings]
GroupWise attempts to assign each attachment a detect code based on the attachment's file type. The [Detect-mappings] section defines the mappings based on these detect codes. The following is a sample entry:
application/msword dtk-1000 "Microsoft Word 4"
The Internet Agent will use the detect code to map to a MIME content type and then encode the file according to the assigned encoding scheme. If there is no mapping specified or if the file type cannot be determined, one of the other mapping methods, such as Extension-Mappings, will be used. The detect codes associated with attachments are GroupWise internal codes and cannot be changed.
[Extension-Mappings]
If a mapping could not be made based on the entries in the [Mac-mappings] and [Detect-mappings] section, the Internet Agent uses the [Extension-mappings] section. The [Extension-mappings] section defines mappings based on the attachment's file extension. The following is a sample entry:
application/pdf .pdf