Simplifying Addressing
The recommended way to simplify addressing is to enable your GroupWise system to use Internet-style addressing as its primary addressing format rather than the standard GroupWise addressing format. For information about enabling Internet-style addressing, see Internet-Style Addressing.
If you choose not to enable Internet-style addressing, you can complete the tasks in the following section to simplify the Internet addressing syntax. You should review each section before deciding which method you want to use.
Creating a Non-GroupWise Domain Structure
A non-GroupWise domain structure includes a GroupWise domain that represents the Internet, post offices that represent Internet sites (hosts), and users that represent users located at those Internet sites.
Defining the Internet as a non-GroupWise domain enables GroupWise users to use the following syntax to send messages to Internet users:
domain:user@host (internet:jsmith@novell.com)
Adding Internet sites (hosts) as post offices in the domain enables GroupWise users to use the following syntax when sending messages to users at those Internet sites:
user@post_office (jsmith@novell)
Adding an Internet site's users to the post office enables GroupWise users to select the users from the GroupWise Address Book or use the following syntax when sending messages to those users:
user (jsmith)
You can create as much of the structure as is necessary to provide the desired addressing level. The following sections provide instructions:
- Simplifying Syntax to domain:user@host
- Simplifying Syntax to user@postoffice
- Simplifying Syntax to User
Simplifying Syntax to domain:user@host
By performing the following tasks, you can configure your GroupWise system so that users can send Internet messages using the domain:user@host syntax.
Creating a Non-GroupWise Domain
The non-GroupWise domain represents the Internet and allows GroupWise to route Internet-bound messages to the Internet Agent. If you create a domain called "internet," GroupWise users would use the following syntax to send Internet messages:
internet:user@host
Messages sent from GroupWise to the Internet must be converted from GroupWise format to MIME or RFC-822 format. By default, the Internet Agent converts messages to MIME format. If your GroupWise users need to send messages in both MIME format and RFC-822 format, you may want to create two non-GroupWise domains, one to handle messages that need to be sent in MIME format and one to handle messages that need to be sent in RFC-822 format.
For example, if you define the domain "mime" and configure the Internet Agent to convert all messages sent to that domain to MIME format, GroupWise users can use the following syntax to send MIME-formatted messages:
mime:user@host
If you define the domain "rfc822" and configure the Internet Agent to convert all messages sent to that domain to RFC-822 format, GroupWise users can use the following syntax to send RFC-822 formatted messages:
rfc822:user@host
To create a non-GroupWise domain:
-
In ConsoleOne®, right-click GroupWise System (in the left pane), click New, then click Non-GroupWise Domain.
-
Fill in the fields:
Domain Name: Enter a name that has not been used for another domain in your system (for example, Internet).
Time Zone: This should match the time zone for the Internet Agent. If it does not, select the correct time zone.
Link to Domain: Select the domain in which the Internet Agent is located.
-
Click OK to create the non-GroupWise domain.
The domain will appear under GroupWise System in the left pane.
Linking to the Non-GroupWise Domain
After you have created the non-GroupWise domain, you must link the Internet Agent's domain to the non-GroupWise domain. This enables the GroupWise system to route all Internet messages to the Message Transfer Agent (MTA) located in the Internet Agent's domain. The MTA can then route the messages to the Internet Agent, which will send them to the Internet.
To link to the non-GroupWise domain:
-
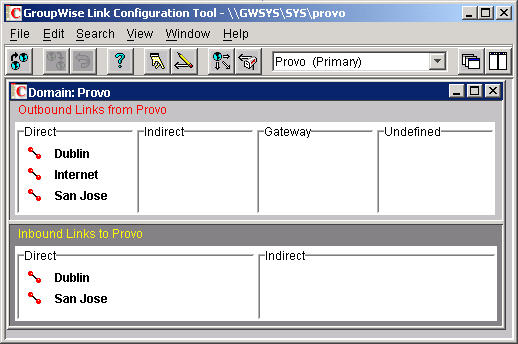
In ConsoleOne, click the Tools menu > GroupWise Utilities > Link Configuration to display the Link Configuration tool.
By default, the Link Configuration tool displays the links for the domain that you are currently connected to.
-
If the Internet Agent's domain is not the currently displayed domain, select it from the list of domains on the toolbar.
The non-GroupWise domain should be displayed in the Direct column. In the screen displayed under step 1, Internet is the non-GroupWise domain.
-
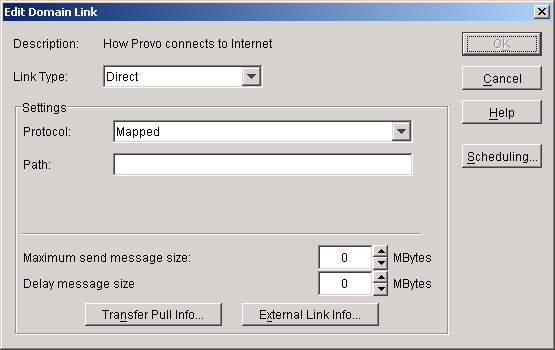
Double-click the non-GroupWise domain to display the Edit Domain Link dialog box.
NOTE: If you are prompted that the mapped path is empty, click Yes to dismiss the prompt and display the Edit Domain Link dialog box.
-
In the Link Type field, select Gateway.
After you select Gateway, the dialog boxes changes to display the settings required for a gateway link.

-
Fill in the following fields:
Gateway Link: Select the Internet Agent.
Gateway Access String: If you want to specify the conversion format (RFC-822 or MIME) for messages sent to the domain, include one of the following parameters: -rfc822 or -mime. If you do not use either of these parameters, the Internet Agent will convert messages to the format specified in its startup file. The default is for MIME conversion (as specified by the Internet Agent's /mime startup switch).
Return Link: Leave this field as is. It does not apply to the Internet Agent.
Maximum Send Message Size: If you want to limit the size of messages that the Message Transfer Agent (MTA) in the Internet Agent's domain will pass to the Internet Agent, specify the maximum size. This will be applied to all messages. If you want to limit the size of messages sent by specific users or groups of users, you can also use the Access Control feature. For details, see Controlling User Access.
Delay Message Size: If you want the MTA to delay routing of large-sized messages to the Internet Agent, specify the message size. Any messages that exceed the message size will be assigned a lower priority by the MTA and will be processed after the higher priority messages.
-
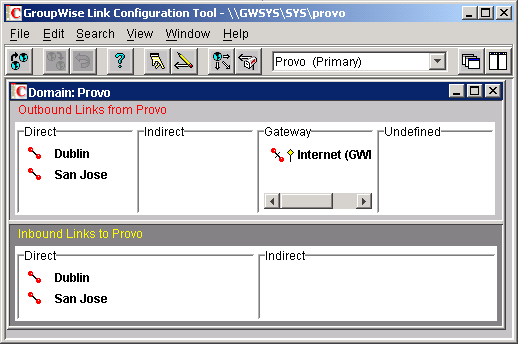
Click OK to save the changes.
The non-GroupWise domain is moved from the Direct column to the Gateway column. For a description of the link symbols in front of the domain names, see the Help in the Link Configuration tool.
-
Click the File menu, click Exit, then click Yes to exit the Link Configuration tool and save your changes.
At this point, users can exchange e-mail with other Internet users using the syntax domain:user@host. Make sure you distribute the name of the domain to your users.
Simplifying Syntax to user@postoffice
This section assumes that you have already created a non-GroupWise domain. If you have not, see Creating a Non-GroupWise Domain.
After you've created a non-GroupWise domain to represent the Internet, you can add post offices to the domain to represent different Internet hosts. For example, if your GroupWise users frequently send messages to users at XYZ.COM, you can define XYZ.COM as a post office. GroupWise users would then use the following syntax to send messages to those users:
user@postoffice
To simplify the addressing syntax to this level, complete the following tasks:
Creating a Post Office to Represent a Internet Host
When creating a post office to represent an Internet host, the post office name cannot be identical to the hostname because the period that separates the hostname components (for example, novell.com) is not a valid character for post office names. GroupWise reserves the period for its addressing syntax of user_ID.post_office.domain. Therefore, you should choose a name that is closely related to the hostname.
To create the post office:
-
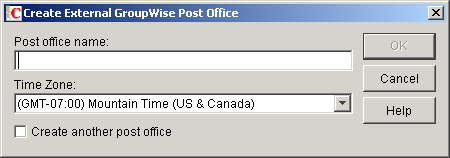
In ConsoleOne, right-click the non-GroupWise domain that represents the Internet, click New, then click External Post Office.
-
Fill in the following fields:
Post Office Name: Enter a name that will associate the post office with the Internet host. Do not use the fully-qualified hostname.
Time Zone: Select the time zone in which the Internet host is located.
-
Click OK to create the post office.
The post office is added under the non-GroupWise domain.
Adding the Hostname As an Alias
When a GroupWise user sends a message to a user at the Internet host, he or she will use the post office name in the address:
user@post_office
For the Internet Agent to send the message, you need to associate the Internet hostname with the post office. You do this by defining the hostname as an alias for the post office.
To create a post office alias:
-
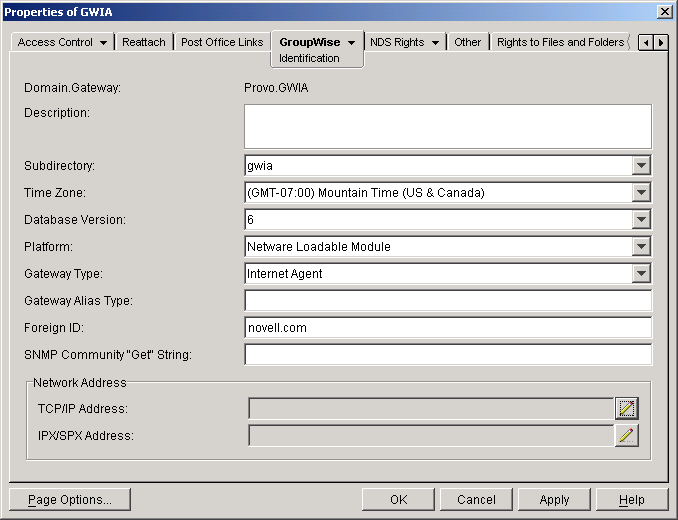
In ConsoleOne, right-click the Internet Agent object, click Properties.
-
Click GroupWise > Identification to display the Identification page.
-
In the Gateway Alias Type field, enter an alias type.
This can be any name you want, including the same name as the Internet Agent. It will be used to associate the post office alias with the Internet Agent.
-
Click OK to save the gateway alias type information.
-
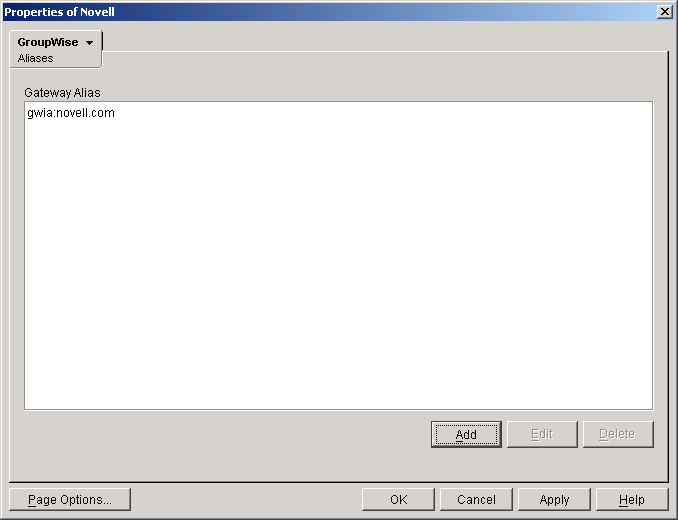
Right-click the post office you created for the Internet host, then click Properties.
-
Click GroupWise > Gateway Aliases to display the Gateway Aliases page.

-
Click Add to display the Create Alias dialog box.

-
Fill in the following fields:
Gateway Alias Type: Select the gateway alias type you assigned to the Internet Agent.
Gateway Alias: Enter the Internet hostname (for example, novell.com).
-
Click OK to add the alias to the Gateway Alias list.
-
Click OK.
With these steps completed, GroupWise users can send a message to a user at the Internet host with the following syntax:
user@post_office
Users are not restricted to using user@post_office addressing. They can still use domain:user@host addressing to send messages to other users.
Simplifying Syntax to User
This section assumes that you have already completed the tasks in Simplifying Syntax to domain:user@host and Simplifying Syntax to user@postoffice.
To configure your GroupWise system for user syntax, you need to add Internet users to the post offices you created to represent their Internet hosts. This not only enables the user syntax, but also adds the Internet users to the GroupWise Address Book.
To add an Internet user to a post office:
-
In ConsoleOne, right-click the post office that represents the user's Internet host, click New, then click External User.

-
In the User Name field, enter the exact user portion of the user's Internet address. If the address is jsmith@novell.com, the portion you would enter is jsmith.
-
Click OK to create the external user.
-
Because the user will be displayed in the GroupWise Address Book, you might want to define the user's given name and last name. To do so, right-click the user's object, fill in the desired fields on the Identification page, then click OK to save the information.
To send a message to an Internet user who you've added, your GroupWise users can use the Address Book or enter the following syntax:
user
For example,
jsmith
User addressing does not restrict users from addressing messages to other Internet users who are not included in the GroupWise Address Book. Users can also use domain:user@host addressing, which lets them communicate with Internet users who are not yet part of your system's non-GroupWise domain structure.
Creating a Customized Addressing Rule
You can use addressing rules to determine how addresses with specific syntax elements are handled. For example, you could establish an addressing rule that enables GroupWise users to enter an Internet address (user@host) and then resolves it to the syntax (internet_agent:"user@host") required by the Internet Agent.
An addressing rule is not a macro; you cannot embed one rule within another rule. The addressing rule simply searches for a string pattern and replaces it with the syntax defined in the rule.
Each addressing rule you create is available for your entire GroupWise system. However, you can enable or disable a rule at the domain level.
The following sections provide information about creating and managing addressing rules:
- Creating an Addressing Rule
- Enabling and Disabling Addressing Rules
- Changing the Addressing Rule Order
Creating an Addressing Rule
GroupWise uses user_ID@domain.post_office syntax internally. Because of this, it is important the addressing rule you create includes an Internet domain identifier such as .com or .edu. You may need to include Internet domain identifiers for all the Internet addresses you will use. For example, if you want to send to jsmith@novell.com, bharris@college.edu, and tsternes@marketing.net, you should create a rule for each domain identifier (.com, .edu, and .net).
To create an addressing rule:
-
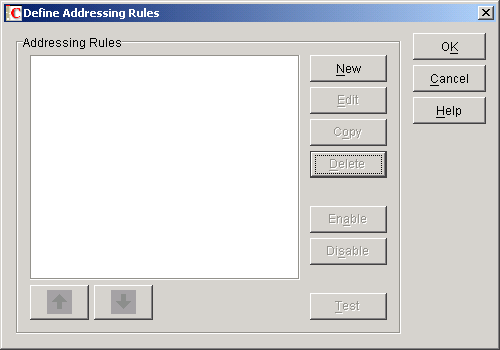
In ConsoleOne, click the Tools menu > GroupWise System Operations > Addressing Rules.
-
Click New to display the New Addressing Rule dialog box.

-
Fill in the following fields:
Description: Enter a short description for the rule. The description is what appears when the rule is listed in the Addressing Rules dialog box.
Name: Enter the name you want to use for the rule (for example, Internet Addresses).
Search String: Enter a string of characters (including any wildcards for variable elements) that represents the addressing syntax you expect for an Internet message. The syntax must have at least one unique character that will identify it for your rule as an Internet address. The rule can then plug in the required, missing elements of the explicit address. For example, if you want GroupWise users to enter user@host when addressing Internet messages, you could define the search string as *@*.com.
Replace With: Enter the symbol for the variable string (information typed in by the user) that you want to replace for the wildcard characters. In addition to the variable symbol, you can also add any additional static elements required in the explicit address. A good replacement string is internet:"%1%2.com.". When the message is sent, the rule refers to the wildcards in search string order. That is, %1 (replace string 1) replaces the first wildcard in the search string, %2 replaces the second wildcard, and so on. The replacement variables do not have to be positioned in numerical order in the replacement string; instead, they must be placed in the string according to the order required for the explicit address.
For example, one of your GroupWise users sends a message using the following address: jsmith@sales.novell.com.
Address syntax (entered by user): jsmith@sales.novell.com
Search string: *@*.com
Replacement string: internet"%1@%2.com
Results: internet"jsmith@sales.novell.com"
-
Type an address in the Test Address field just as you would expect a GroupWise user to type an address in the GroupWise client.
-
Click Test to determine if your search and replace strings result in an accurately resolved explicit address.
-
Click OK to save the addressing rule.
Enabling and Disabling Addressing Rules
Addressing rules are not automatically enabled. You need to enable them in each domain to which you want them applied
To enable or disable addressing rules:
-
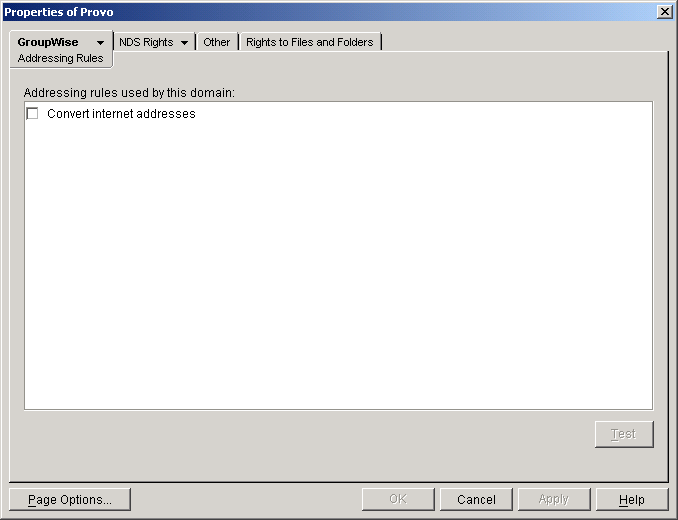
Right-click a Domain object, then click Properties.
-
Click GroupWise > Addressing Rules to display the Addressing Rules page.
-
Click the check box to enable the addressing rule you want in this domain.
-
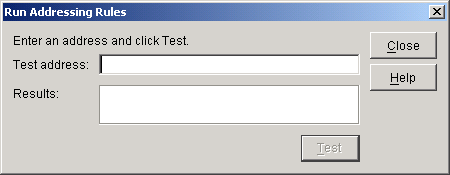
To ensure that the rule is being applied correctly in the domain, click Test to display the Run Addressing Rules dialog box.
-
Enter an address as if you were a user sending a message, then click Test.
The Results field displays the resolved address. If this is not the address you were expecting, check the other rules that precede the rule in the list. Addresses are evaluated against the rules in the order the rules are listed. It may be necessary to change the order of the rules (see Changing the Addressing Rule Order).
-
Click Close to close the Run Addressing Rule dialog box, then click OK.