Managing Disk Space Usage in the Post Office
Many users are prone to save every message and attachment they ever receive. You can moderate this behavior by implementing disk space management:
- Preparing to Implement Disk Space Management
- Setting Mailbox Size Limits
- Enforcing Mailbox Size Limits
- Restricting the Size of Messages That Users Can Send
- Preventing the Post Office from Running Out of Disk Space
- An Alternative to Disk Space Management in the Post Office
NOTE: The Cross-Platform client does not currently respect the mailbox size limits established in ConsoleOne.
Preparing to Implement Disk Space Management
If you are implementing disk space management in an existing GroupWise system, you must begin by setting the initial size information on all users' mailboxes. If you are implementing disk space management in a new GroupWise system, skip to Setting Mailbox Size Limits.
To establish current mailbox size:
-
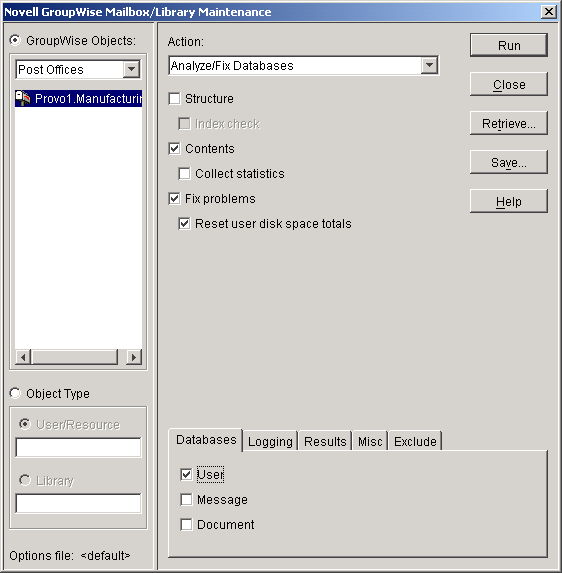
In ConsoleOne, browse to and select a Post Office object.
-
Click Tools > GroupWise Utilities > Mailbox/Library Maintenance.
-
In the GroupWise Objects field, select Post Offices.
-
In the Action field, select Analyze/Fix Databases.
-
As options to the action, select Contents, Fix Problems, and Reset User Disk Space Totals. Make sure all other options are deselected.
-
On the Databases tab, select User. Make sure all other types of databases are deselected.
-
Click Run > OK to acknowledge that the Mailbox/Library Maintenance task has been sent to the POA.
After the POA has performed the task, current mailbox size information becomes available on each user's mailbox. The information is updated regularly as the user receives and deletes messages.
-
To generate a report of current mailbox information, follow the instructions in Gathering Mailbox Statistics.
-
Repeat Step 1 through Step 8 for each post office where you want to implement disk space management.
-
Continue with Setting Mailbox Size Limits.
Setting Mailbox Size Limits
After initial size information is recorded on each user's mailbox, you can establish a limit on the amount of disk space each user's mailbox is allowed to occupy. You can set a single limit for an entire domain. You can set different limits for each post office. You can even set individual user limits if necessary.
If you are implementing disk space management in an existing GroupWise system where users are accustomed to unlimited disk space, you should warn them about the coming change. After you establish the mailbox size limits as described in this section, users whose mailboxes exceed the established limit cannot send messages until the size of their mailboxes is reduced. Users might want to manually delete and archive items in advance in order to avoid this interruption in their use of GroupWise.
To establish mailbox size limits:
-
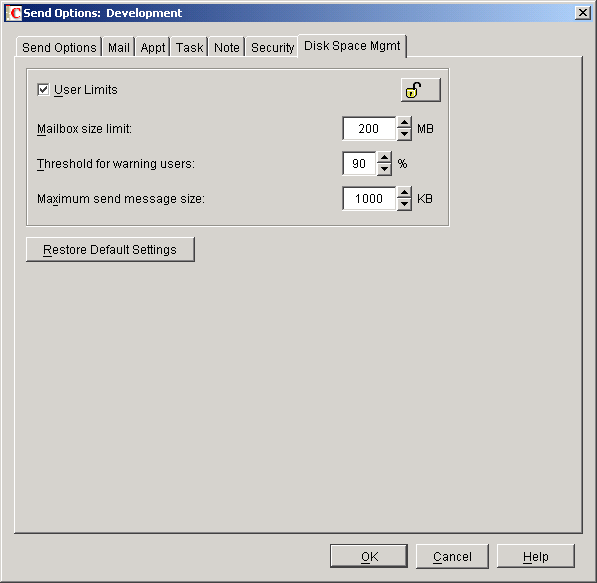
In ConsoleOne, browse to and select a Domain, Post Office, or User object.
-
Click Tools > GroupWise Utilities > Client Options.
-
Click Send > Disk Space Management.
-
Select User Limits.
-
Specify the maximum number of megabytes allowed for each user's mailbox.
Unless disk space is extremely limited, 200 MB is a comfortable mailbox size to enforce.
-
Specify as a percentage the point where you want to warn users that their mailboxes are getting full.
After a user receives a warning message, he or she cannot send additional messages until mailbox cleanup has been performed and the mailbox size is brought below the warning percentage.
-
Optionally, specify in kilobytes the largest message that users can send.
By restricting message size, you can influence how fast users' mailboxes fill up. However, if users have valid reasons for sending messages that exceed this limit, the limit can become a hindrance to users getting their work done.
-
Click OK > Close to save the disk space management settings.
-
If you are adding disk space management to an existing GroupWise system where users' mailboxes are already over the desired size limit, continue with Enforcing Mailbox Size Limits.
or
If you are implementing disk space management in a new system where users have not yet begun to use their mailboxes, see "Using Mailbox Storage Size Information" in "Managing Your Mailbox" in the GroupWise 6.5 Windows Client User Guide to see how setting a mailbox size limit affects users' activities in the GroupWise client.
Enforcing Mailbox Size Limits
If existing GroupWise users are having difficulty fitting their mailboxes into the established mailbox size limits, you can assist them by reducing their mailboxes for them. Users should be warned before this action is taken.
-
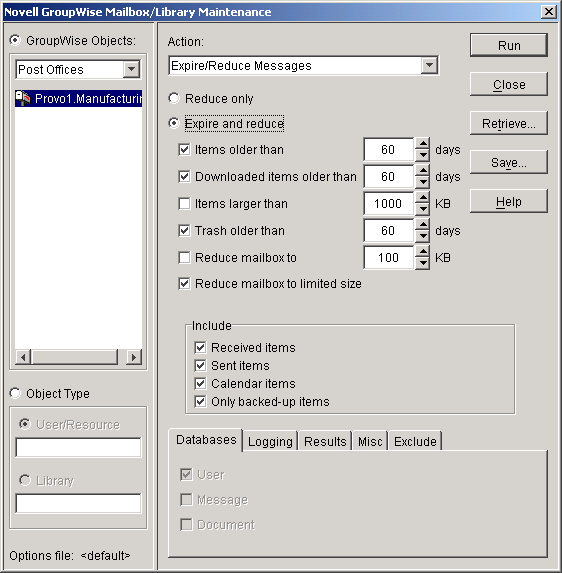
In ConsoleOne, select a Post Office object.
-
Click Tools > GroupWise Utilities > Mailbox/Library Maintenance.
-
In the Action field, select Expire/Reduce.
-
Set the Expire and Reduce options as desired, making sure that Reduce Mailbox to Limited Size is selected.
-
Click Run > OK to acknowledge that the Mailbox/Library Maintenance task has been sent to the POA.
After the POA has performed the task, users mailboxes fit within the mailbox size limit you have established.
-
Repeat Step 1 through Step 5 for each post office where you want to reduce users' mailboxes to the established mailbox size limit.
See "Using Mailbox Storage Size Information" in "Managing Your Mailbox" in the GroupWise 6.5 Windows Client User Guide to see how setting a mailbox size limit affects user's activities in the GroupWise client.
Restricting the Size of Messages That Users Can Send
By restricting message size, you can influence how fast users' mailboxes fill up. However, if users have valid reasons for sending messages that exceed this limit, the limit can become a hindrance to users getting their work done.
There are three levels at which you can restrict message size:
- Within the Post Office
- Between Post Offices
- Between Domains
- Between Your GroupWise System and the Internet
NOTE: Although the Cross-Platform client does not respect the message size limits established in ConsoleOne using Tools > GroupWise Utilities > Client Options > Send > Disk Space Management, messages originating from the Cross-Platform client can be restricted by the POA and MTA as they pass between post offices and domains.
Within the Post Office
You can use Client Options to restrict the size of messages that users can send within their local post office.
-
In ConsoleOne, browse to and select a Domain, Post Office, or User object.
-
Click Tools > GroupWise Utilities > Client Options.
-
Click Send > Disk Space Management.
-
Select User Limits.
-
Specify in kilobytes the largest message that users can send.
-
Click OK > Close to save the maximum message size setting.
Between Post Offices
You can configure the POA to restrict the size of messages that it allows to pass outside the local post office. See Restricting Message Size between Post Offices for setup instructions.
Between Domains
You can configure the MTA to restrict the size of messages that it allows to pass outside the local domain. See Restricting Message Size between Domains for setup instructions.
Between Your GroupWise System and the Internet
You can configure the Internet Agent to restrict the size of messages that it allows to pass outside your GroupWise system. See Controlling User Access for setup instructions.
Preventing the Post Office from Running Out of Disk Space
In spite of the best disk space management plans, it is still possible that some unforeseen situation could result in a post office running out of disk space. To prevent this occurrence, you can configure the POA to stop processing messages, so that disk space usage in the post office cannot increase until the disk space problem is resolved.
-
In ConsoleOne, double-click a Post Office object, right-click its POA object, then click Properties.
-
Click GroupWise > Agent Settings, then adjust the settings in the Disk Check Interval and Disk Check Delay fields as described in Scheduling Disk Space Management.
-
Click GroupWise > Scheduled Events.
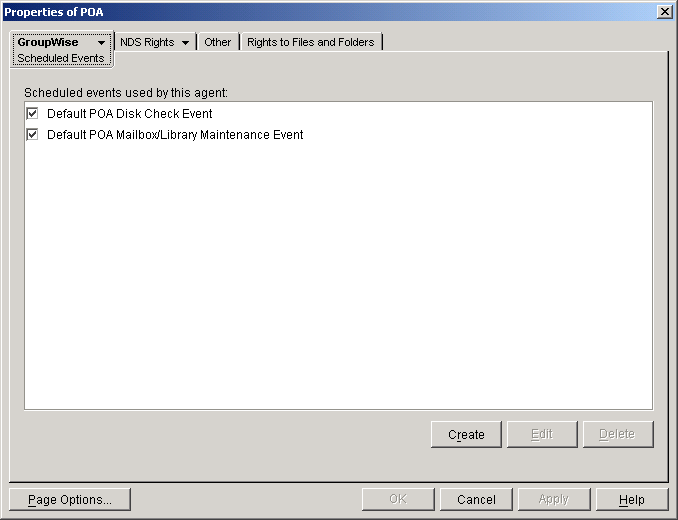
-
Click Create to create a new scheduled event to handle an unacceptably low disk space condition.
-
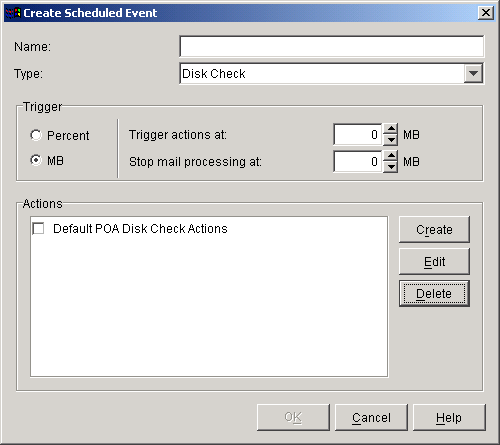
Type a unique name for the new scheduled event, then select Disk Check as the event type.
-
In the Trigger Actions At field, specify the amount of free post office disk space at which to take preventive measures.
-
Click Create to define your own disk check actions, then give the new action a unique name.
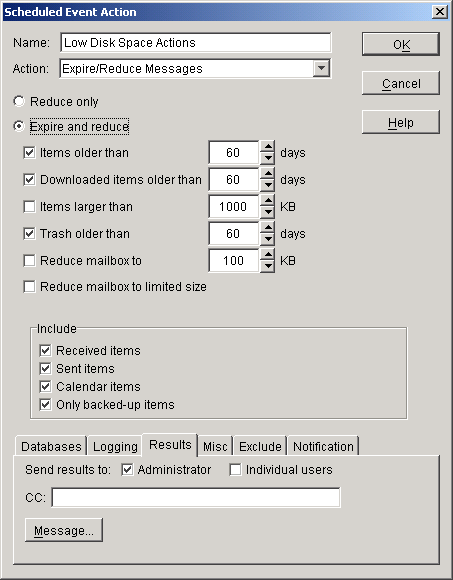
-
Configure the actions for the POA to take in order to relieve the low disk space condition.
Use the Results or Notification tab if you want to receive notification about the POA's response to the low disk space condition.
-
Click OK to return to the Create Scheduled Event dialog box.

For additional instructions, see Scheduling Disk Space Management.
-
Select the new set of actions.
-
In the Stop Mail Processing At field, specify the amount of free post office disk space at which you want the POA to stop processing messages.
-
Click OK to create the new disk space management event and return to the Scheduled Events page.
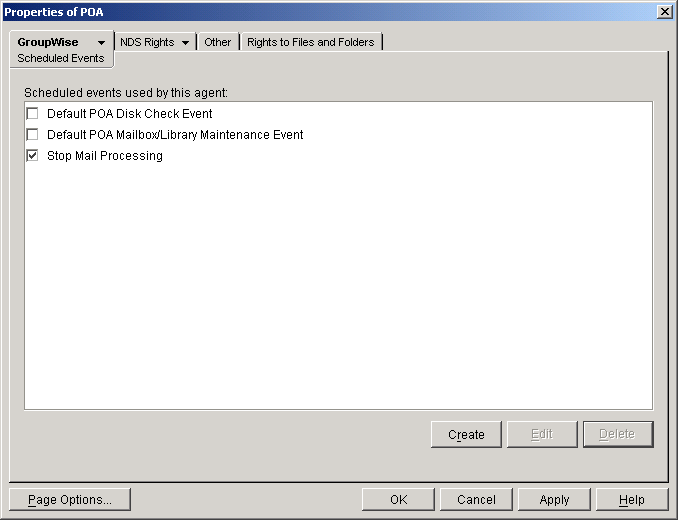
-
Select the new disk space management event.
-
Click OK to close the Scheduled Events page.
ConsoleOne then notifies the POA to restart so the new disk space management event can be put into effect.
An Alternative to Disk Space Management in the Post Office
If you want to place more responsibility for disk space management onto GroupWise client users, you can require that they run the client in Caching mode, where all messages can be stored on users' workstations, or other personal locations, rather than in the post office. For an overview of Caching mode, see:
- "Using Caching Mode" in the GroupWise 6.5 Windows Client User Guide
- "Using Caching Mode" in the GroupWise 6.5 Cross-Platform Client User Guide
IMPORTANT: Do not force Caching mode for a post office that supports Outlook clients along with GroupWise clients.
Forcing Caching Mode
You can force Caching mode for an entire domain. You can force Caching mode for specific post offices. You can even force Caching mode for an individual user if necessary.
When you initially force caching mode, users' Caching mailboxes are identical with their Online mailboxes. However, as you employ disk space management processes in the post office and reduce the size of users' Online mailboxes, more and more of the users' mailbox items exist only in their Caching mailboxes. Make sure that users understand their responsibilities to back up their Caching mailboxes, as described in:
- "Backing Up Your Mailbox" in "Managing Your Mailbox" in the GroupWise 6.5 Windows Client User Guide
- "Backing Up Your Mailbox" in "Managing Your Mailbox" in the GroupWise 6.5 Cross-Platform Client User Guide
To force Caching mode:
-
In ConsoleOne, browse to and select a Domain, Post Office, or User object.
-
Click Tools > GroupWise Utilities > Client Options.
-
Click Environment > General.
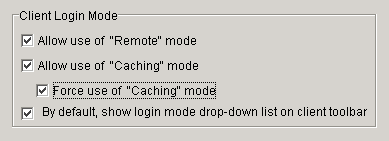
-
In the Client Login Mode box, select Force Use of Caching Mode.
-
Click OK > Close to save the Caching mode setting.
If you are helping existing users, who might have sizeable mailboxes, to start using Caching mode exclusively, you can configure the POA to respond efficiently when multiple users need to download their entire mailboxes for the first time. See Supporting Forced Mailbox Caching for setup instructions.