Composing Items
GroupWise WebAccess has five different item types: mail message, phone message, appointment, note, and task. You address all item types in the same way, using the Address Book to add recipients' addresses to the To, CC, and BC boxes. You can also attach files to each item type and include Web site locations (URLs) in the Subject and Message box of each item type.
You can further group these five item types into two categories: unscheduled items and scheduled items.
Unscheduled Items: Unscheduled items include mail messages and phone messages. Both types of messages let you send a messages that are not scheduled for a particular time or date.
Scheduled Items: Appointments, tasks, and notes are scheduled items, meaning that they appear in the recipient's Calendar as well as the Mailbox. The recipient of an appointment, task, or note has the option of accepting or declining it. Accepted items are removed from the recipient's Mailbox and stored in the recipient's Calendar. Declined items are removed from both the recipient's Mailbox and the Calendar. If you are the sender, you can see what action recipients have taken by checking the status information for the scheduled item.
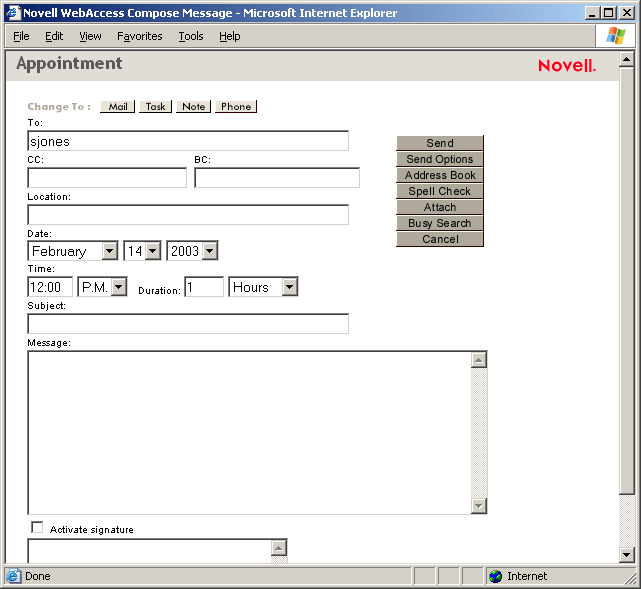
Appointment: Lets you include the time, date, and place of the appointment. You can use Busy Search to find times when all recipients are free.
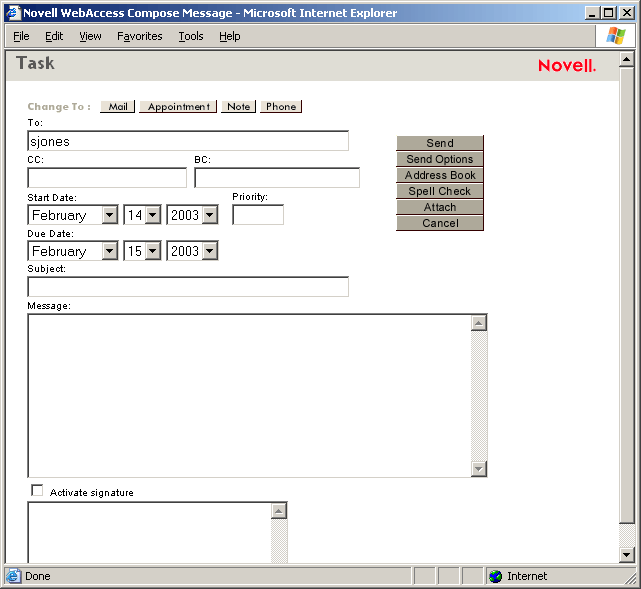
Task: Lets you indicate which day you want the task to appear in the recipient's Calendar and which day you want the task completed. You can also assign a priority to the task.
Note: Lets you indicate which day you want the note to appear on the recipient's Calendar. Because notes are posted in the recipient's Calendar, they are frequently used as reminders of specific events, such as days off, project deadlines, or birthdays.
This section contains the following topics:
- Sending a Mail Message
- Sending a Phone Message
- Scheduling an Appointment
- Assigning a Task
- Writing a Note
- Sending or Receiving an Internet Location
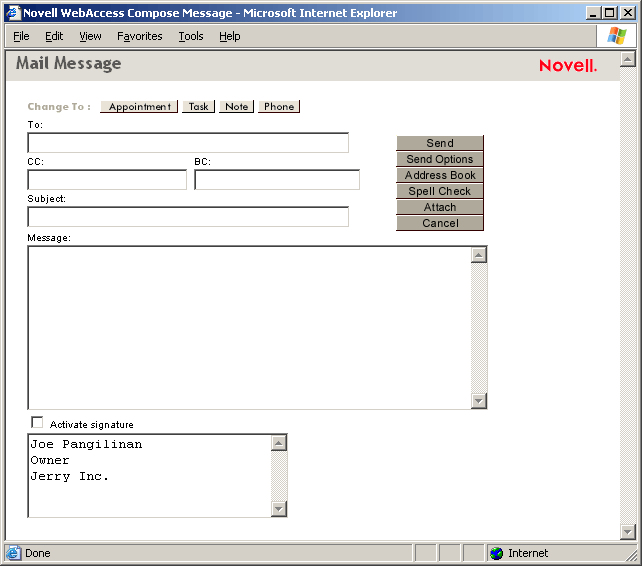
Sending a Mail Message
-
From the GroupWise WebAccess main window, click
 .
.
-
Click Address Book to add recipients in the To, CC, and BC boxes.
or
Type a recipient's address in the To, CC, or BC box. The address can be a GroupWise user ID, GroupWise full name, or external e-mail address. Separate each address with a comma.
-
Type a subject and message.
You can include Web site locations or addresses (URLs) in both the Subject and Message boxes.
-
(Optional) Click Spell Check to spell check the message. For this feature to work, your browser must be enabled for Java*.
-
(Optional) Click Attach to attach files to the message. For this feature to work, your browser must support attachments.
-
Click Send Options to select a security setting (classification), assign a priority (high, standard, low), request a reply, or select to receive return notification.
-
Click Send.
If a Web server outage occurs while you are composing a message, your message is not lost when you click Send. It is captured and appears at the bottom of the WebAccess Login page so that you can retrieve it when your Web server comes back up and you log into WebAccess again.
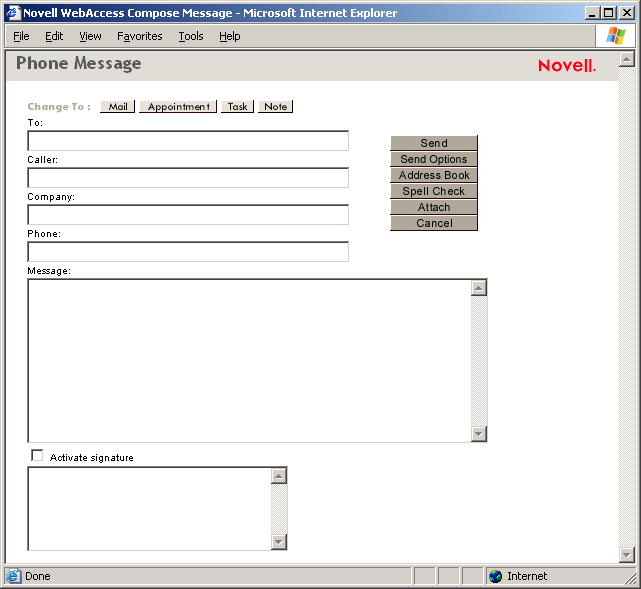
Sending a Phone Message
GroupWise phone messages are similar to paper-based While You Were Out messages. You send GroupWise phone messages to inform other users of calls and their details. GroupWise phone messages do not send spoken messages.
-
From the GroupWise WebAccess main window, click
. -
Click Phone to change the mail message to a phone message.
-
Click Address Book to add recipients in the To box.
or
Type a recipient's address in the To box. The address can be a GroupWise user ID, GroupWise full name, or external e-mail address. Separate each address with a comma.
-
Type the caller, company, and phone information.
-
Type a message.
You can include Web site locations or addresses (URLs) in the Message box.
-
(Optional) Click Spell Check to spell check the message. For this feature to work, your browser must be enabled for Java.
-
(Optional) Click Attach to attach files to the message. For this feature to work, your browser must support attachments.
-
Click Send Options to select a security setting (classification), assign a priority (high, standard, low), request a reply, or select to receive return notification.
-
Click Send.
Scheduling an Appointment
-
From the GroupWise WebAccess main window, click
to display a mail message, then click Appointment to change the mail message to an appointment.or
From the HTML Calendar, click Create Appointment.
or
From the Java Calendar, double-click the Appointment list.
-
Click Address Book to add recipients in the To, CC, and BC boxes. If you want to create a personal appointment that displays only in your Calendar, do not add additional names.
or
Type a recipient's address in the To, CC, or BC box. The address can be a GroupWise user ID, GroupWise full name, or external e-mail address. Separate each address with a comma.
To schedule a resource, such as a conference room, that is available in the address book, add the resource to the To box.
-
Type a location for the meeting.
If you added a resource to the To box, the location may be filled in automatically.
-
Specify the month, day, year, and beginning time for the appointment. Skip to Step 5.
or
Click Busy Search to find and insert an appointment time when all the recipients are available.
When you use Busy Search, GroupWise lists times when the users whose schedules were checked are available for an appointment. The time blocks listed might be longer than the duration specified. For example, 8am through 1pm might be listed as an available time. If your meeting has a duration of two hours, you could select from a number of available times, including 8am-10am, 9am-11am, and 11am- 1pm. You can decide on an appointment time from the available times listed or use the first available time, which GroupWise selects for you.
To schedule the appointment for one of the times listed, click the time. Skip to Step 6.
-
To set the duration, type a number, then select Hours, Minutes, or Days.
You can use whole numbers or decimal numbers, such as 90 minutes or 1.5 hours.
-
Type a subject and message.
You can include Web site locations or addresses (URLs) in both the Subject and Message boxes.
-
(Optional) Click Spell Check to spell check the message. For this feature to work, your browser must be enabled for Java.
-
(Optional) Click Attach to attach files to the appointment. For this feature to work, your browser must support attachments.
-
Click Send Options to select a security setting (classification), assign a priority (high, standard, low), request a reply, or select to receive return notification.
-
Click Send.
Assigning a Task
-
From the GroupWise WebAccess main window, click
to display a mail message, then click Task to change the mail message to a task.or
From the HTML Calendar, click Create Task.
or
From the Java Calendar, double-click the Task list.
-
Click Address Book to add recipients in the To, CC, and BC boxes.
or
Type a recipient's address in the To, CC, or BC box. The address can be a GroupWise user ID, GroupWise full name, or external e-mail address. Separate each address with a comma.
To create a personal task that displays only in your Calendar, add your name only.
-
For the start date, specify the month, day, and year you want the task to first appear on the recipient's Calendar.
-
Type a priority.
You can type a letter (such as A), a number (such as 1), or a letter-number combination with the letter first (such as A1).
-
For the due date, specify the month, day, and year when you want the task to be completed.
-
Type a subject and message.
You can include Web site locations or addresses (URLs) in both the Subject and Message boxes.
-
(Optional) Click Spell Check to spell check the message. For this feature to work, your browser must be enabled for Java.
-
(Optional) Click Attach to attach files to the message. For this feature to work, your browser must support attachments.
-
Click Send Options to select a security setting (classification), assign a priority (high, standard, low), request a reply, or select to receive return notification.
-
Click Send.
Writing a Note
-
From the GroupWise WebAccess main window, click
display a mail message, then click Note to change the mail message to a note.or
From the HTML Calendar, click Create Note.
or
From the Java Calendar, double-click the Note list.
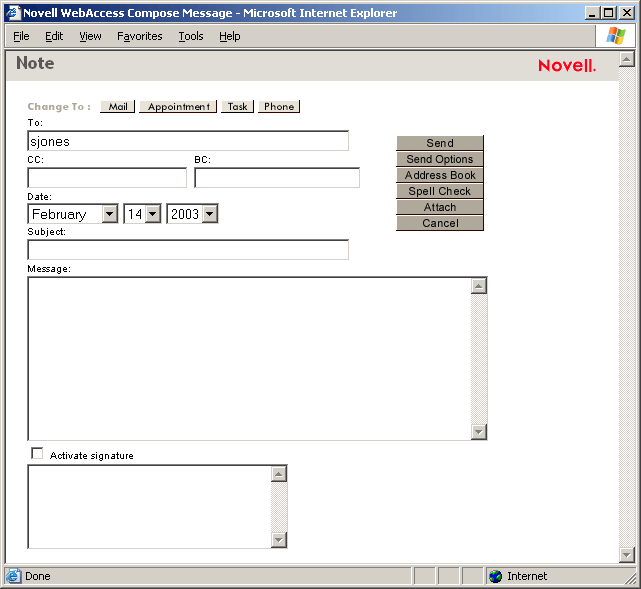
-
Click Address Book to add recipients in the To, CC, and BC boxes.
or
Type a recipient's address in the To, CC, or BC box. The address can be a GroupWise user ID, GroupWise full name, or external e-mail address. Separate each address with a comma.
To create a personal note that displays only in your Calendar, add your name only.
-
Specify the month, day, and year you want the note to appear on the recipient's Calendar.
-
Type a subject and message.
You can include Web site locations or addresses (URLs) in both the Subject and Message boxes.
-
(Optional) Click Spell Check to spell check the message. For this feature to work, your browser must be enabled for Java.
-
(Optional) Click Attach to attach files to the note. For this feature to work, your browser must support attachments.
-
Click Send Options to select a security setting (classification), assign a priority (high, standard, low), request a reply, or select to receive return notification.
-
Click Send.
Sending or Receiving an Internet Location
WebAccess allows you to send a Web site location, or URL, to another user. WebAccess interprets any URL in the Message box into a shortcut to the Web site. The recipient who opens your message in WebAccess can click the shortcut displayed in the Attachments box to open a second browser window that displays the Web site.