Using the Address Book
The Address Book stores information about users, resources, and organizations. You can use the Address Book to search for information or to add e-mail addresses to an item you are composing.
GroupWise WebAccess includes an HTML version of the Address Book and a Java version. When you open the Address Book, the Java version is displayed. You can switch between versions after you've opened the Address Book.
The Address Book consists of the GroupWise system address book, one or more personal address books, the Frequent Contacts address book, and possibly shared address books and LDAP address books.
GroupWise System Address Book: You have one GroupWise system address book. The system address book includes all users who have a GroupWise Mailbox in your organization. You cannot modify the system address book.
Personal Address Books: You can have multiple personal address books. By default, GroupWise WebAccess provides one predefined personal address book with your name as the title. You can use your personal address book to add e-mail addresses and information for users, resources, or organizations not defined in the system address book.
Frequent Contacts Address Book: You have one Frequent Contacts address book. In the Windows version of the GroupWise client, your most frequently or most recently used addresses are automatically added to the Frequent Contacts address book. In GroupWise WebAccess, you must manually add addresses to this book. Addresses added by the Windows GroupWise client will also appear in the GroupWise WebAccess Frequent Contacts address book.
Shared Address Books: In the Windows version of the GroupWise client, users can share address books with other users. In GroupWise WebAccess, you cannot share an address book with other users, but you can receive shared address books. Once you accept a shared address book, it appears in your Address Book list along with your system address book, personal address book, and Frequent Contacts address book.
LDAP Address Books: If your GroupWise system administrator has implemented LDAP (Lightweight Directory Access Protocol) to gain access to other address books, the Address Book will give you the option of switching between the GroupWise address books (system address book, personal address book, Frequent Contacts, and shared address books) and the LDAP address books. You can use the LDAP address books to address items and search for user information.
This section contains the following topics:
- Searching for an Entry in the Address Book
- Addressing an Item
- Managing a Personal Address Book
- Accepting a Shared Address Book
- Creating a Personal Group
Searching for an Entry in the Address Book
-
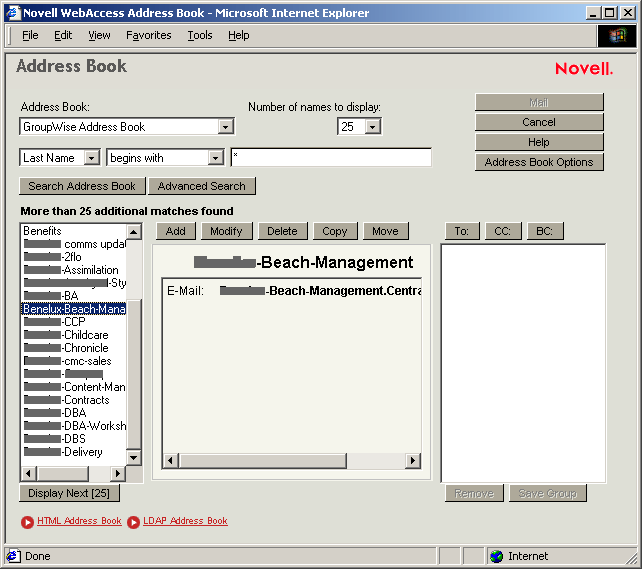
From the GroupWise WebAccess main window, click the Address Book icon to open the Address Book.
By default, the Address Book opens to the GroupWise address books. If your GroupWise system administrator has enabled LDAP, you can click LDAP Address Book to search LDAP address books.
-
In the Address Books list, select the address book you want to search.
For GroupWise, you can choose from the GroupWise address book, the Frequent Contacts address book, or a personal address book. For LDAP, you can choose from any LDAP address books your GroupWise system administrator has defined.
-
Select the number of entries you want displayed at one time. The default displays 25 entries at one time.
-
To list the first entries (25 by default) in the selected address book, leave the search conditions boxes empty.
or
To search for a specific entry, use the search conditions boxes to define the Address Book fields and information you want to search.
GroupWise WebAccess supports the * (asterisk) and ? (question mark) wildcards. When searching a field, you can use * to represent multiple characters and ? to represent one character. In the Java Address Book, for example, if you define a "First Name begins with jo*" condition, the search will return all entries whose first names start with JO (John, Joel, Jose, and so forth). If you define a "Last Name contains s?n" condition, the search will return all entries whose last names contain S and N separated by one character (Sanders, Johannson, Larsen, and so forth).
The HTML Address Book and LDAP Address Book allow you to enter two search conditions. The Java Address Book, however, lets you enter more than two conditions. To do so, click the Advanced Search button.
-
Click Search Address Book (or Search) to display a list of entries that match your search conditions.
If you decide to send an item to a user you found, you can click To, CC, or BC to indicate the recipient type and then click Mail to open a new item.
Addressing an Item
-
Open a new item.
-
Click Address Book to open the Address Book.
By default, the Address Book opens to the GroupWise address books. If your GroupWise system administrator has enabled LDAP, you can click LDAP Address Book to search LDAP address books.
-
In the Address Books list, select the address book you want to search.
For GroupWise, you can choose from the GroupWise address book, the Frequent Contacts address book, or a personal address book. For LDAP, you can choose from any LDAP address books your GroupWise system administrator has defined.
-
Select the number of entries you want displayed at one time. The default displays 25 entries at one time.
-
To list the first entries (25 by default) in the selected address book, leave the search conditions boxes empty.
or
To search for a specific entry, use the search conditions boxes to define the Address Book fields and information you want to search.
GroupWise WebAccess supports the * (asterisk) and ? (question mark) wildcards. When searching a field, you can use * to represent multiple characters and ? to represent one character. In the Java Address Book, for example, if you define a "First Name begins with jo*" condition, the search will return all entries whose first names start with JO (John, Joel, Jose, and so forth). If you define a "Last Name contains s?n" condition, the search will return all entries whose last names contain S and N separated by one character (Sanders, Johannson, Larsen, and so forth).
The HTML Address Book and LDAP Address Book allow you to enter two search conditions. The Java Address Book, however, lets you enter more than two conditions. To do so, click the Advanced Search button.
-
Click Search Address Book (or Search) to display a list of entries that match your search conditions.
-
Select the entry you want to add to the item's recipient list, then click To, CC, or BC to indicate the recipient type.
If you are using the HTML Address Book or LDAP Address Book, you can add multiple recipients at one time by selecting the check boxes in front of the recipients' entries. In the Java Address Book, you must add each recipient individually.
-
After you've finished selecting the item's recipients, click OK to add them to the item.
Managing a Personal Address Book
You can have multiple personal address books. By default, GroupWise WebAccess provides one predefined personal address book with your name as the title. You can use your personal address book to add e-mail addresses and information for users, resources, or organizations not defined in the system address book. These addresses can be for people inside or outside of your organization.
This section contains the following topics:
Creating a Personal Address Book
-
From the GroupWise WebAccess main window, click the Address Book icon to open the Address Book.
-
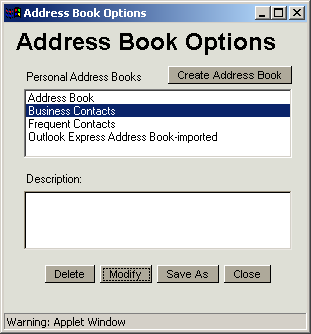
Click Address Book Options.
-
Click Create Address Book to display the Create Address Book form.
-
In the Address Book Name box, type the name you want to use for the personal address book.
-
If desired, enter a description in the Description box.
The description is for your use only. It appears only when viewing the address books in the Address Books Options form.
-
Click OK to add the new address book to the Personal Address Book list.
-
Click Close to return to the Address Book.
Adding Entries to a Personal Address Book
-
From the GroupWise WebAccess main window, click the Address Book icon to open the Address Book.
-
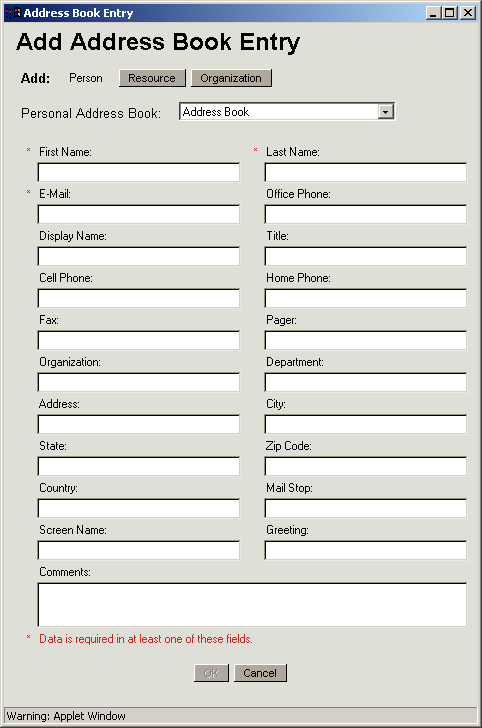
In the Address Book, click Add (or Add Entry) to display the Add Address Book Entry form.
-
If you want to add a resource or organization rather than a person, click Resource or Organization.
-
Select the personal address book where you want to add the entry.
-
Fill in at least one of the asterisked fields. This is required so that the entry can be listed in the Address Book.
If you want to send messages to the entry, make sure you complete the E-Mail field.
-
Fill in any other fields you want. Any information you add will be displayed when you select the entry in the Address Book.
-
Click OK to save the entry to the selected address book.
Accepting a Shared Address Book
In the Windows version of the GroupWise client, users can share address books with other users. In GroupWise WebAccess, you cannot share an address book with other users, but you can receive shared address books. When you accept a shared address book, it appears in your Address Book list along with your system address book, personal address book, and Frequent Contacts address book.
-
Click the Mailbox icon in the Folder List.
-
Click the shared address book notification to open it.
-
Click Accept Address Book to add the address book to the Address Book list.
You can now use the shared address book to address items or look up user information just as you would from your own address books.
Creating a Personal Group
-
From the GroupWise WebAccess main window, click the Address Book icon to open the Address Book.
By default, the Address Book opens to the GroupWise address books. If your GroupWise system administrator has enabled LDAP, you can click LDAP Address Book to search LDAP address books for entries you want to add to the personal group.
-
In the Address Books list, select the address book that contains the entries you want to add to the group.
For GroupWise, you can choose from the GroupWise address book, the Frequent Contacts address book, or a personal address book. For LDAP, you can choose from any LDAP address books your GroupWise system administrator has defined.
-
Select the number of entries you want displayed at one time. The default displays 25 entries at one time.
-
To list the first entries (25 by default) in the selected address book, leave the search conditions boxes empty.
or
To search for a specific entry, use the search conditions boxes to define the Address Book fields and information you want to search.
GroupWise WebAccess supports the * (asterisk) and ? (question mark) wildcards. When searching a field, you can use * to represent multiple characters and ? to represent one character. In the Java Address Book, for example, if you define a "First Name begins with jo*" condition, the search will return all entries whose first names start with JO (John, Joel, Jose, and so forth). If you define a "Last Name contains s?n" condition, the search will return all entries whose last names contain S and N separated by one character (Sanders, Johannson, Larsen, and so forth).
The HTML Address Book and LDAP Address Book allow you to enter two search conditions. The Java Address Book, however, lets you enter more than two conditions. To do so, click the Advanced Search button.
-
Click Search Address Book (or Search) to display a list of entries that match your search conditions.
-
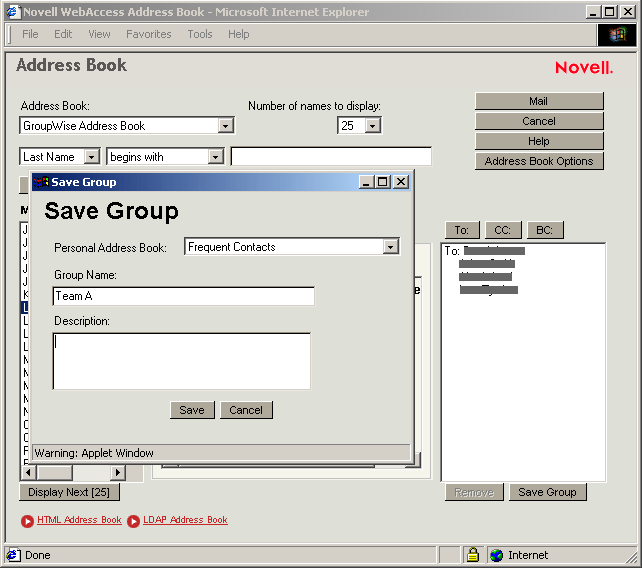
Select the entry you want to add to the group, then click To, CC, or BC to indicate the recipient type.
If you are using the HTML Address Book or LDAP Address Book, you can add multiple recipients at one time by selecting the check boxes in front of the recipients' entries. In the Java Address Book, you must add each recipient individually.
-
After you've selected the entries you want to add to the group, click Save Group to display the Save Group dialog box.
-
In the Personal Address Book list, select the personal address book where you want to save the group.
-
Specify a name and description (optional) for the group, then click Save.
The group is added to the personal address book. When addressing items, you can type the group name in the To, CC, or BC box, or you can use the Address Book to include it. The item is sent to each member of the group.
Editing a Personal Group
-
From the GroupWise WebAccess main window, click the Address Book icon to open the Address Book.
-
In the Address Books list, select the group you want to edit. If you are working in the Java view, skip to step 4.
-
Open the group.
-
Click the Modify Group button. If you are working from the Java view, click the Modify button.
-
Add or delete entries from the group.
-
After you have selected the entries you want to add to the group, click Save Group to display the Save Group dialog box.
-
In the Personal Address Book list, select the personal address book where you want to save the group.
-
Specify a name and description (optional) for the group, then click Save.
The group is added to the personal address book. When addressing items, you can type the group name in the To, CC, or BC box, or you can use the Address Book to include it. The item is sent to each member of the group.