Sending and Retrieving Items in Remote Mode
Use Send/Retrieve to synchronize your Online and Remote Mailboxes.
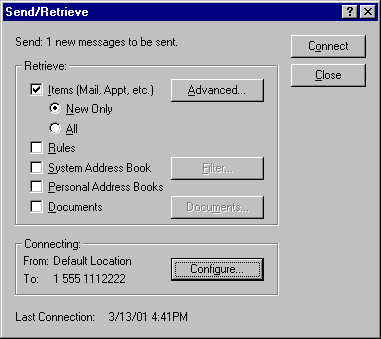
When you connect to your GroupWise system, items you sent from your Remote Mailbox are delivered to the recipients. Remote also sends a request to your Online Mailbox to retrieve your items, such as mail. Your GroupWise system processes the request, then sends your items to your Remote Mailbox, restricting the items according to the limits you set in the Send/Retrieve dialog box. In addition to items, you can retrieve rules, documents, and address books.
This section contains the following topics:
- Downloading Items, Rules, Addresses, and Documents to Your Remote Mailbox
- Sending Items in Remote Mode
- Viewing Pending Requests
- Retrieving Items That Were Not Completely Downloaded
- Using Busy Search in Remote Mode
- Filtering the System Address Book for Your Remote Mailbox
- Deleting Items from Your Remote Mailbox
Downloading Items, Rules, Addresses, and Documents to Your Remote Mailbox
-
If you're running GroupWise in Online mode, click Tools, click Hit the Road, type your Online Mailbox password, select a connection phone number if prompted, then click OK.
or
If you're running GroupWise in Remote mode, click Accounts, click Send/Retrieve, then click GroupWise Options.
-
To retrieve items, make sure Items is selected, click Advanced, click a tab if available, click an option, then click OK.
If you specify to limit the items you retrieve, for example, by selecting Get Subject Line Only or setting size limits, you can download the rest of the item or items later. See Retrieving Items That Were Not Completely Downloaded.
If you are in Remote mode and only want to download new items, select New Only on the Retrieve tab.
-
Click OK.
-
To retrieve rules, click Rules to select it.
-
To retrieve addresses from the system Address Book, click System Address Book to select it, click Filter, specify the addresses to retrieve, then click OK.
Because retrieving address books can take a long time with a modem connection, it is recommended that you retrieve address books using a network or TCP/IP connection.
For more information about filtering the system Address Book, see Filtering the System Address Book for Your Remote Mailbox.
-
To retrieve your personal address books, click Personal Address Books to select it.
-
To retrieve copies of documents from your Online Mailbox, select the Documents check box, click Documents, select your documents, mark applicable documents as In Use, then click OK.
Marking a document as In Use prevents others from modifying the document. If you don't mark a document as In Use, someone can edit it while you have the copy in your Remote Mailbox. If you then edit the document and return it to the Master Library, your document is saved as a new version and the edits are not saved to the other version. If you don't plan to edit a document, don't mark it In Use.
When you exit an In Use document, you're asked to send the document to the Master Library and mark it as Available. If you're done with the document, the document should be marked Available to allow others editing access to it.
-
If you are in Remote mode and you want to specify your remote location and connection before downloading, click Configure, select your remote location from the Connecting From drop-down list, select a connection from the Connecting To drop-down list, then click OK.
-
Click Connect or Finish.
If you are in Remote mode, all items in your Pending Requests list are sent at this time.
Sending Items in Remote Mode
-
Create a new item, then click Send on the toolbar.
Remote places the item in the Pending Requests list. When you connect to your master GroupWise system, all items in the Pending Requests list are sent.
-
Click Accounts, click Send/Retrieve, then click the remote account.
or
If you want to specify your remote location and connection before sending the item, click Accounts, click Send/Retrieve, click GroupWise Options, click Configure, select your remote location from the Connecting From drop-down list, select a connection from the Connect To drop-down list, click OK, then click Connect.
At the same time your items are being sent, your new items are retrieved according to what you have specified in the Send/Retrieve dialog box.
You can switch between connection types (network, modem, and TCP/IP) if there are no pending requests on the connection you are switching from. For example, if you're sending and retrieving items with a network connection and disconnect before the transmission is complete, you should not switch to a modem connection later to process the requests. Complete the original request with the original connection.
Viewing Pending Requests
Whenever you perform an action that requires information to be sent from your Remote Mailbox to your Online Mailbox, GroupWise creates a request that is placed in the Pending Requests list. When you connect to your master GroupWise system, all the requests are sent to your Online Mailbox. Use Pending Requests to check for outstanding requests.
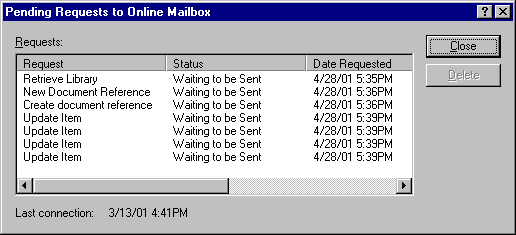
To prevent a request from being processed, click the request, then click Delete. Only requests that haven't been sent to the master GroupWise system and have the "Waiting to be Sent" status can be deleted. If you've already sent a request to the master GroupWise system, you cannot cancel the request.
Retrieving Items That Were Not Completely Downloaded
If you set size limit restrictions or specified Subject Line Only when you downloaded items, you might have items in your Remote Mailbox that are only partially downloaded. These are sometimes called ghosted items.
Using Busy Search in Remote Mode
If you want to perform a busy search on users in a POP3 or IMAP4 account that supports the CAP protocol, you must first add a CAP account on the CAP tab in the Accounts dialog box. For information, see Adding a CAP Account to GroupWise (v6.5 for NNLS 1.0). You do not need to add a CAP account if you are searching on users in a GroupWise system.
-
Create a new appointment.
-
To select the first possible meeting day, click
 , then click a date.
 -
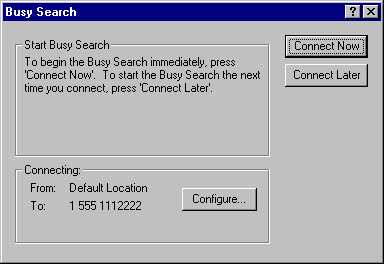
Click Busy Search on the toolbar.
-
To immediately connect to your master GroupWise system and search for available times, click Connect Now.
or
To search for available times later, click Connect Later.
Clicking Connect Later creates a busy search request, but doesn't send the request to the master GroupWise system. You can save your appointment as a draft item in the Work In Progress folder until you are ready to send it. When you're ready to check appointment times later, click Busy, then click Connect Now.
-
When the Choose Appointment Time window appears, click Auto-Select for the first available meeting time. Click Auto-Select until the best available time is displayed, then click OK.
or
Click the Available Times tab, click an available time, then click OK.
-
Complete the appointment, then click Send on the toolbar.
If you're disconnected before all schedule information returns from a busy search, clicking Busy again lets you update the information from the original busy search request.
Filtering the System Address Book for Your Remote Mailbox
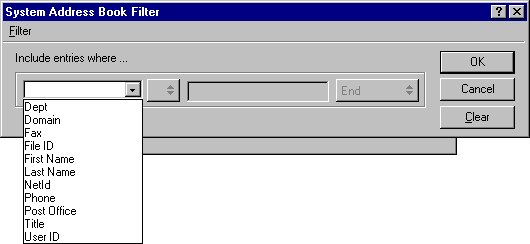
The system address book is usually large, because it contains information for your entire organization. If you don't need all the information in the system address book when using GroupWise away from your office, use System Address Book Filter to retrieve only the user addresses, resource addresses, and public groups you need from the GroupWise system.
For example, the filter statement, Dept [ ] Marketing, instructs GroupWise to retrieve all addresses with "Marketing" in the Department column in the Address Book. This way you can contact anyone from your Marketing department while you're traveling.
You should also retrieve system address book information before leaving your office to save downloading time and costs, especially if you're planning to travel to a location where you will incur long-distance phone charges.
-
If you're running GroupWise in Online mode, click Tools, click Hit the Road, type your Online Mailbox password, select a connection phone number if prompted, then click OK.
or
If you're running GroupWise in Remote mode, click Accounts, click Send/Retrieve, then click GroupWise Options.
-
Click System Address Book, then click Filter.
-
Click an Address Book column in the first drop-down list.
For example, click Dept to search for addresses from a specific department.
-
Click the operator drop-down list, click an operator, then type your search criteria in the box or click a value, if provided.
For example, click [ ], then type Accounts to search for addresses from the Accounts department. Use the operator that is most appropriate for your search. Your search criteria, such as a person's name or a subject, can include wildcard characters such as an asterisk (*) or a question mark (?) Filter is not case sensitive to the criteria you type.
-
To add more filter conditions, click the last drop-down list, then click And.
-
After specifying all filter conditions, read the text beginning with "Include entries where..." as you create your filter. This summarizes how your filter will work.
-
Click OK, then click Connect.
For more information on operators see Using Filter and Rule Operators.
Deleting Items from Your Remote Mailbox
Use Delete and Empty and Manage Library Size to remove items from your Remote Mailbox.
This section contains the following topics:
Deleting Items from Your Remote Mailbox
In Remote mode, you can delete items, retract items, and empty the Trash the same way you would in the Online mode.
-
Click the item in your Mailbox.
-
Click Edit, then click Delete.
-
If you're deleting an outgoing item, click one of the available options.
-
To free up disk space, click Edit, then click Empty Trash.
This permanently removes all deleted items from your Remote Mailbox.
The next time you connect to your master GroupWise system, the changes in your Remote and Online Mailboxes will automatically synchronize. You can turn off this synchronization by changing the delete options in Remote Properties. See Changing Remote Delete Options.
Deleting Unneeded Documents from Your Remote Library
Deleting files from your Remote Library Disk Space Management will not remove them from the Master Library. It will also not remove the document references for the deleted documents. The files are removed only from the computer where you have your Remote Mailbox, freeing disk space for you.
-
In Remote mode, click Tools, then click Manage Library Size.
-
Click the documents you want to delete, then click Delete.
-
When you're done, click Close.
If you delete an In Use document, the status of the document in the Master Library is reset to Available the next time you connect to your Online Mailbox.