Using GroupWise Messenger
This section contains the following topics:
Understanding Logging In
When you log in to GroupWise Messenger, the GroupWise Messenger icon is added to the Windows system tray.
The username and password you use to log in to GroupWise Messenger is your directory (NDS®/Novell eDirectoryTM) username and password, which might or might not be the same as your GroupWise username and password. Check with your system administrator.
When you are logged out but have the GroupWise Messenger window displayed, you can select Log In or Log In As from the File menu. Log In allows you to log back in as yourself. Log In As allows another user to log in.
Log Out logs you out of GroupWise Messenger but does not close the main window or exit GroupWise Messenger.
There are two other options on the main File menu: Close this Window closes the GroupWise Messenger window but leaves the icon in the system tray. Exit logs you out of GroupWise Messenger, closes the GroupWise Messenger window, and removes the icon from the system tray.
If at any time your network or GroupWise Messenger connection is interrupted, you are logged out of GroupWise Messenger, but as soon as your connection is restored, you are logged back in. If you are in the middle of a conversation when this happens, the conversation can continue as soon as the connection is restored.
Working with Conversations
This section contains the following topics:
Sending an Instant Message
-
Double-click a contact, then follow Step 3.
or
If you want to send a message to someone who is not in your Contact List, click Send a Message, then follow Step 2.
-
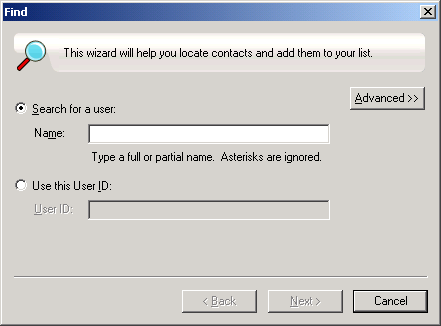
Click Find User, select Use This UserID, type the userID of the person, then click Finish.
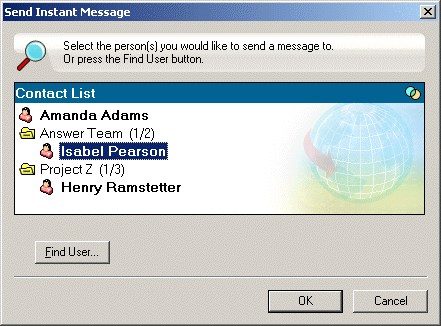
or
Click Find User, select Search for User, type all or part of the name you are looking for, then click Next. Select the user you want from the Search Results list, click Add to My Contact List if desired, then click Finish.
or
Click Find User, click Advanced, click Begins With, Contains, or Equals from the drop-down list next to a field, type the information you are looking for in the field, then click Next. Select the user you want from the Search Results list, click Add to My Contact List if desired, then click Finish.
-
Type your message.
-
Click  .
.
Using Emoticons in Your Message
-
In an open conversation, click  , then click the image that conveys your feelings.
or
Type any of the following keystrokes to represent an emoticon:
:) or :-) |

|
Smile |
:( or :-( |

|
Frown |
;) or ;-) |

|
Wink |
:O or :-O |

|
Surprised |
:@ or :-@ |

|
Angry |
:/ or :-/ |

|
Undecided |
:D or :-D |

|
Big Smile |
:'( or :'-( |

|
Crying |
O:) or O:-) |

|
Innocent |
:[ or :-[ |

|
Embarrassed |
:X or :-X |

|
Lips Are Sealed |
:! or :-! |

|
Foot in Mouth |
When you use the keystrokes rather than selecting the image, the emoticon image appears when you press Enter to send your message. To remind yourself of the keystrokes when typing a message, click Edit > Emoticons.
If you do not want the keystrokes to be converted into images, click Tools > Options, then deselect Use Graphical Emoticons. This setting prevents the typed character sequences from being converted into images.
Changing the Font of Text in a Conversation
-
In an open conversation, select the text you want to change.
-
Click Edit, then click Font.
-
Make selections, then click OK.
You can also select text and make selections from the header over the text you are typing.

To specify default fonts, see Specifying the Font of Composed Messages and Specifying the Font of Received Messages.
Holding a Group Conversation
You can hold instant messaging conversations with more than one user. Start a conversation with one user, then invite additional users to join.
-
Double-click a user in your Contact List.
or
Click Send Message, then find a user by following Step 2 in Sending an Instant Message.
-
Click Actions, then click Invite Others to Join the Conversation.
-
Click a user (or Ctrl+click multiple users) in your Contact List, then click OK.
or
Click Find User to search for users who are not in your Contact List. Follow Step 2 in Sending an Instant Message.
You can also Ctrl+click multiple users in your Contact List and press Enter to begin a group conversation.
Each user who is invited to the conversation receives this message box:
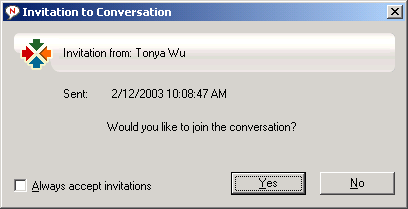
If you cannot see the list of participants in this conversation, click  to open the Control Panel.
After each user accepts the invitation to join the conversation, he or she can send messages to the other participants. A user cannot see any messages that were sent before he or she joined the conversation, or after he or she leaves the conversation.
Adding a Timestamp to Each Entry in a Conversation
-
In an open conversation, click View, then click Show Timestamp.
Saving a Conversation
-
In an open conversation, click File.
-
Click Save Conversation As, browse to a location, then specify a filename.
or
Click Save Conversation if you have already saved the conversation at least once.
or
Click Save Conversation to iFolder if you have Novell iFolder installed.
-
Click Save.
The conversation is saved with a .txt file extension.
You are also prompted to save a conversation whenever you close the conversation. To change this setting, see Specifying If You're Prompted to Save Conversations.
Opening a Saved Conversation
-
In a Conversation window, click File, then click Open Conversation.
-
Browse to the location of the conversation, then click OK.
Use this procedure to open a conversation you have saved.
In order to search for a conversation that has been archived, your system administrator needs to grant you access rights. For more information, see Searching the Archives for Logged Conversations.
Printing a Conversation
-
In an open conversation, click File, then click Print Conversation.
-
Click Print.
Searching the Archives for Logged Conversations
The system administrator can specify that all conversations be logged in a system archive. If you are given access rights, you can search the archive for logged conversations.
-
Click File, then click Search Archive.
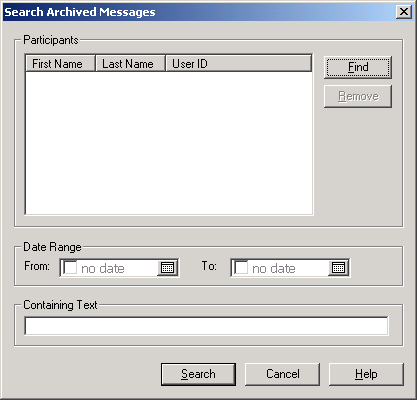
-
Use the Search Archived Messages dialog box to search by participants, dates, and conversation text:
Click Find to search for and add participants.
Click  to select dates in the Date Range group box.
Type the text you want to search for in the Containing Text field.
-
Click Search to search for conversations that meet the search criteria you specified.
-
To print or save the list of logged conversations that displays, click Print List or Save List on the File menu.
-
To print or save the currently selected logged conversation, click Print or Save on the File menu.
-
To make changes to your search, click File, click Modify Search, make changes, then click Search again.
Sending an E-Mail Message
-
Click Send E-Mail.
-
Select the name of the person you want to send an e-mail message to, then click OK.
or
Double-click the name of the person you want to send an e-mail message to.
or
Click Find User, select Use This UserID, type the userID of the person, then click Finish.
or
Click Find User, select Search for User, type all or part of the name you are looking for, then click Next. Select the user you want from the Search Results list, click Add to My Contact List if desired, then click Finish.
or
Click Find User to search for a person. Click Advanced, click Begins With, Contains, or Equals from the drop-down list next to a field, type the information you are looking for in the field, then click Next. Select the user you want from the Search Results list, click Add to My Contact List if desired, then click Finish.
-
When the e-mail item opens, complete the message and click Send on the toolbar.
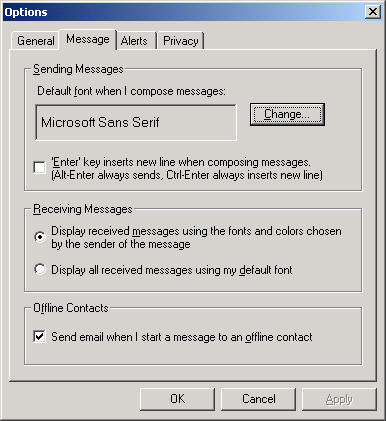
If you want to be prompted to send an e-mail each time you try to send an instant message to someone who is offline, click Tools, click Options, click the Message tab, make sure Send E-Mail When I Start A Message to An Offline Contact is selected, then click OK.
Working with Contacts
This section contains the following topics:
Adding a Contact
-
Click Add a Contact.
-
Type part or all of the name of the person you want to add, click Next, click the name in the Search Results list, then click Add.
or
Type the userID of the person, then click Add.
or
Click Advanced, click Begins With, Contains, or Equals from the drop-down list next to a field, type the information you are looking for in the field, then click Next. Select the user you want from the Search Results list, then click Add.
Deleting a Contact
-
Right-click the contact, then click Remove.
Organizing the Contact List
You can organize your Contact List by dragging contacts and folders to the location you want them. Or, you can use the following steps:
-
Click Tools, then click Organize Contacts.
-
Click contact names, then click Move Up or Move Down to change the position in the list.
-
To add a folder, click Add Folder, then type the folder name.
-
To move a contact to a folder, drag the contact to the folder, or click the contact, click Actions, click Move, select the folder from the drop-down list, then click OK.
-
Click Close.
Importing a Contact List
You can import a contact list if you have a .nmx file (contact list file) to import. A .nmx file is a file that has been exported from a GroupWise Messenger contact list. The imported contacts are merged with your existing Contact List.
-
Click File, then click Import Contact List.
-
Browse to the location of the .nmx file and select the filename, for example,  .
.
-
Click the filename, then click Open.
Exporting a Contact List
You can save your contact list as a .nmx file (contact list file) to distribute to other users. When someone imports the .nmx file, the imported contacts are merged with his or her existing Contact List.
-
Click File, then click Export Contact List.
-
Browse to the location of the .nmx file.
-
Select the filename, for example , then click Save.
Working with Statuses
This section contains the following topics:
Changing Your Status
-
Click the status bar (where your name appears under the menu bar).
-
Click the status you want other users to see next to your name in their Contact Lists.
 Online
 Busy
Busy Away
Away Appear Offline
You can also right-click the GroupWise Messenger icon in the system tray, click Status, then click a status.
Creating a Custom Status
-
Click File, click Status, then click Custom Status.
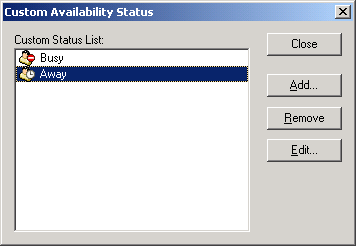
-
Click Add.
-
Type the custom status title, for example, In a Meeting.
-
Select Busy or Away from the Show As drop-down list. This determines the icon that displays next to your status.
-
(Optional) Type the text you want to automatically be returned to a user who tries to send you an instant message when you have this status selected, for example, I'm in a meeting right now and can't respond.
-
Click OK, then click Close.
Customizing GroupWise Messenger
This section contains the following topics:
Changing Your Password
If the system administrator gives you rights, you can change your GroupWise Messenger password. Because you log in to GroupWise Messenger using your directory (NDS/Novell eDirectory) password, this is actually changes your directory password.
-
Click Tools, then click Change Password.
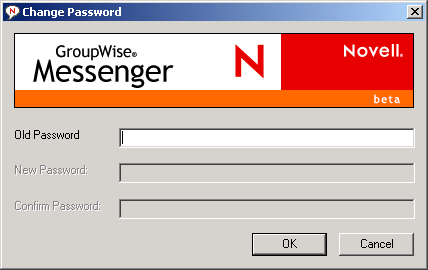
-
Type your old password in the Old Password field, then type your new password in the New Password and Confirm Password fields.
-
Click OK.
Specifying Who Can See Your Status and Send You Messages
-
Click Tools, click Options, then click the Privacy tab.
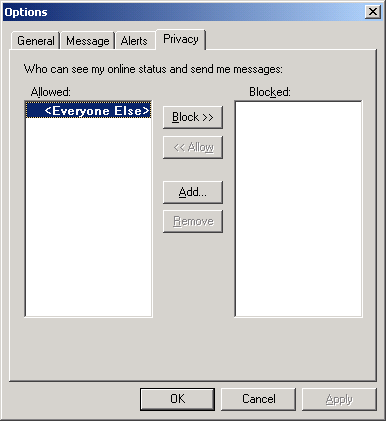
-
Use the Add and Remove buttons to add and remove users from the Allowed and Blocked lists.
-
Select users and use the Block >> and Allow >> buttons to move users from one list to the other.
-
Click OK.
Showing Only Online Contacts
By default, all the contacts in your Contact List display.
-
Click  in the header over the Contact List, then click Show Online Contacts.
You can also click View, then click Show Online Contacts.
Turning Off the Sound
You can turn all sounds off temporarily.
-
Right-click the GroupWise Messenger status icon in the system tray, then select Mute.
-
To turn sounds back on, repeat the previous step.
If you use Mute to turn sounds off, they will be turned back on when you exit GroupWise Messenger and log back in.
For information about specifying when you are notified by sounds and alerts, see Specifying When You Receive Sounds and Alerts.
Specifying How Long to Wait Before You Are Shown as Idle
When you do not use GroupWise Messenger for a certain amount of time, "Idle" displays next to the status for your name in other users' Contact Lists. You can change this amount of time.
-
Click Tools, click Options, then click the General tab.
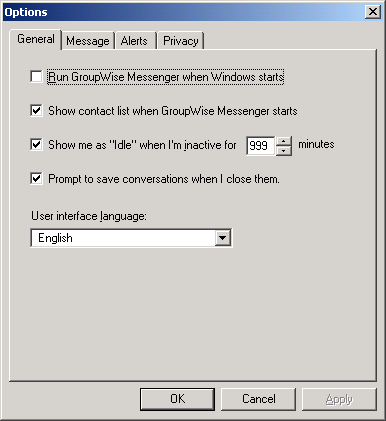
-
Make sure Show Me As Idle When I'm Inactive For __ Minutes is selected.
-
Change the amount of time.
-
Click OK.
Specifying How the Enter Key Works
By default, pressing the Enter key sends the message you are composing. You can change this so that the Enter key inserts a new line into your message.
-
Click Tools, click Options, then click the Message tab.
-
Select Enter Key Inserts New Line When Composing Messages.
-
Click OK.
Ctrl+Enter and Shift+Enter always insert a new line and Alt+Enter always sends a message.
Specifying the Font of Composed Messages
-
Click Tools, click Options, then click the Message tab.
-
Click Change next to Default Font When I Compose Messages.
-
Make font selections, then click OK.
-
Click OK.
Specifying the Font of Received Messages
-
Click Tools, click Options, then click the Message tab.
-
Select one of the options in the Receiving Messages group box.
-
Click OK.
Specifying When You Receive Sounds and Alerts
-
Click Tools, click Options, then click the Alerts tab.
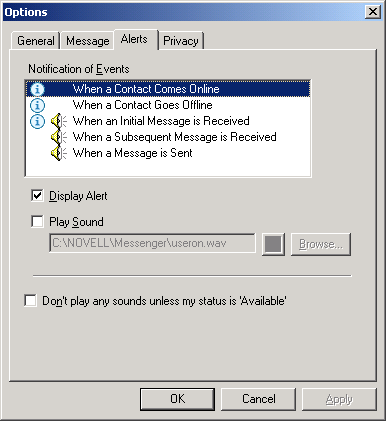
-
In the Notification of Events list, click the event for which you want to specify sounds and alerts.
-
Select or deselect Display Alert and Play Sound. To change the default sound, browse to a different sound file.
-
If desired, select Don't Play Any Sounds Unless My Status Is Available.
-
Click OK.
To mute all sounds temporarily, right-click the GroupWise Messenger status icon in the system tray, then select Mute. Follow the same step to turn sounds back on. If you use Mute to turn sounds off, they will be turned back on when you exit GroupWise Messenger and log back in.
Specifying When GroupWise Messenger Opens
-
Click Tools, click Options, then click the General tab.
-
Select or deselect Run GroupWise Messenger When Windows Starts.
-
Click OK.
In the GroupWise client, you can also specify whether or not to open GroupWise Messenger when the GroupWise client starts. In the GroupWise client, click Tools, click Options, double-click Environment, then select or deselect Launch Messenger At Startup.
Specifying If You're Prompted to Save Conversations
-
Click Tools, click Options, then click the General tab.
-
Select or deselect Prompt to Save Conversations When I Close Them.
-
Click OK.
Using Startup Options
You can use the following startup options on the command line when starting GroupWise Messenger:
/l-xx |
Sets the user interface language. XX is the two-letter ANSI language abbreviation. |
/background |
Starts GroupWise Messenger without showing the main window. |
/u-xxx or /@u-xxx |
Specifies what user ID to log in with. XXX is the user ID. |
/ipa-xxx |
Specifies the IP address to log in with. XXX is the IP address. |
/ipp-xxx |
Specifies the IP port to log in with. XXX is the IP port. |
/import-filename |
Imports a specific contacts list. filename is the .nmx file. |
The following options can be used both on the command line and in a browser window, such as Internet Explorer.
nim:launchNM |
Opens GroupWise Messenger. |
nim:startIm |
Opens the Invite dialog box. |
nim:startIm?username=username |
Starts a conversation with username. |
nim:startIm?username=username&message=message |
Sends a specific message to username. For example: nim:startIm?username=AAdams&message=Good+morning. |
nim:addContact |
Brings up the Add Contact dialog box. |
nim:addContact?username=username |
Opens the GroupWise Messenger main window with username added to the Contact List. The name will be added to the root level of the contact list and not to a specific folder. For example: nim:addcontact?username=AAdams. |
nim:addContact?username=username&foldername=folder_name |
Opens the GroupWise Messenger main window with username added to the Contact List. The name will be added to the folder named folder_name. |
nim:import?filename=filename |
Imports the contacts in the .nmx file filename. |
nim:invite |
Opens the Invite dialog box. (same as nim:startim) |
nim:close |
Closes the GroupWise Messenger main window but does not exit GroupWise Messenger. |
nim:exit |
Exits GroupWise Messenger. |
nim:open |
Opens the GroupWise Messenger main window. |
nim:preferences |
Opens the Options dialog box. |