54.1 Configuring the WebAccess Agent
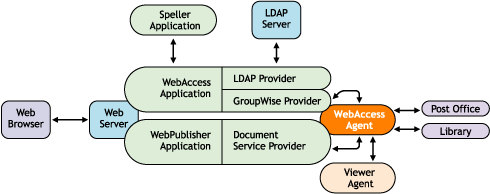
The WebAccess Agent receives user requests from the WebAccess Application and WebPublisher Application, accesses post offices and libraries to process the requests, and then passes information back to the applications.
Figure 54-3 WebAccess Agent
During installation, the GroupWise® WebAccess Agent is set up with a default configuration. However, you can use the information in the following sections to optimize the WebAccess Agent for your environment:
54.1.1 Modifying WebAccess Settings
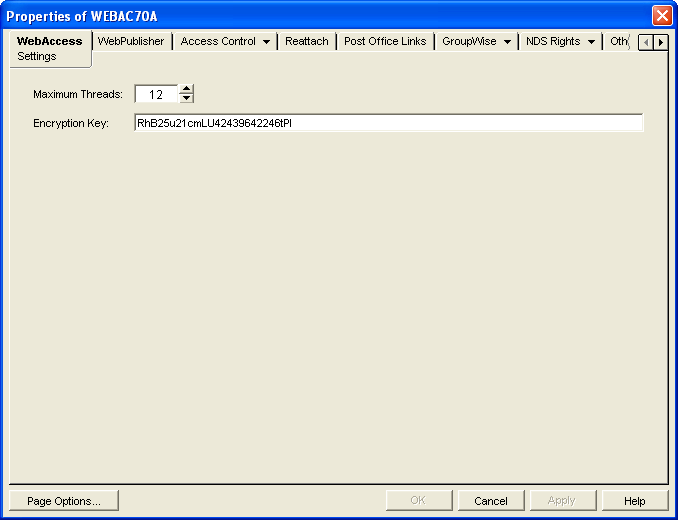
Using ConsoleOne®, you can configure the following GroupWise WebAccess settings for the WebAccess Agent:
-
The maximum number of threads the agent uses to process WebAccess messages
-
The key used to encrypt information sent between the agent and the WebAccess Application
To modify the configuration information:
-
In ConsoleOne, right-click the WebAccess Agent object, then click .
-
Click to display the WebAccess Settings page.
-
Modify any of the following fields:
Maximum Threads: This is the maximum number of threads the agent uses at one time to process requests. The default (12) enables the agent to process 12 requests at one time, which is usually sufficient. If the agent regularly receives more requests than it has threads, you might want to increase the maximum number of threads. Increasing the threads increases the amount of server memory used by the agent.
To determine the maximum number of threads that have been in use at one time (for example, 8 of the 12 threads), you can view the WebAccess Agent server console on NetWare® or you can view the status information displayed through the WebAccess Agent Web console on any platform. See Section 56.1, Monitoring the WebAccess Agent.
Encryption Key: The encryption key is used to encrypt and decrypt the information sent between the WebAccess Agent and the WebAccess Application. If you do not want to use the default encryption key, you can type your own key. The encryption key must be identical to the encryption keys of any other WebAccess Agents that the WebAccess Application communicates with. For more information, see Section 53.3, Configuring Redirection and Failover Support.
-
Click to save the changes.
54.1.2 Modifying WebPublisher Settings
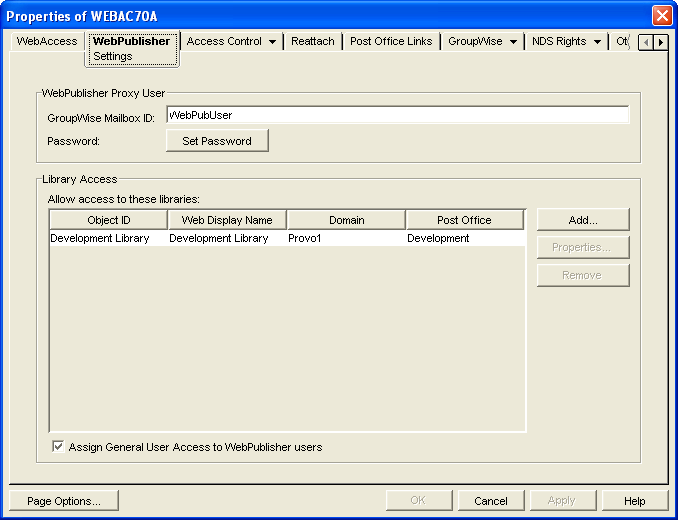
Using ConsoleOne, you can configure the following WebPublisher settings for the WebAccess Agent:
-
The GroupWise account used by the WebAccess Agent to retrieve documents for WebPublisher users
-
The GroupWise libraries where the WebAccess Agent looks for documents that have been shared with GroupWise WebPublisher users
-
Whether the WebPublisher user has General User Access to documents
To modify the configuration information:
-
In ConsoleOne, right-click the WebAccess Agent object, then click .
-
Click to display the WebPublisher Settings page.
-
Modify any of the following fields:
GroupWise Mailbox ID: The WebPublisher proxy user serves two purposes: 1) GroupWise users make documents available to GroupWise WebPublisher users by sharing the documents with the WebPublisher proxy user and 2) the WebAccess Agent logs in to GroupWise through the WebPublisher proxy user. This enables the WebAccess Agent to search for and retrieve documents that have been shared with the WebPublisher proxy user. Specify the ID for the GroupWise mailbox you want to use.
Password: Click to specify the mailbox password.
Allow Access to These Libraries: This list displays the libraries that the WebAccess Agent has access to. If a library is not in the list, WebPublisher users cannot see the library’s documents. If a library is listed, WebPublisher users can view any of the library’s documents that have been shared (by the document owner) with the WebPublisher proxy user.
To add a library to the list, click , then browse for and select the library.
To change the display name or description for the library, select the library, then click . By default, the library’s Novell® eDirectory™ object name is used for the display name.
To remove a library from the list, select the library, then click .
Assign General User Access to WebPublisher Users: When sharing documents with GroupWise users, a document’s owner can assign individual access rights and general access rights (through the General User Access option). The General User Access rights determine the access for all GroupWise users who do not receive individual access rights. For example, if a document’s owner sets the General User Access to View, all GroupWise users with access to that library can view the document.
This option lets you determine whether or not you, as the GroupWise system administrator, want to give General User Access rights to WebPublisher users. For example, with this option enabled, WebPublisher users can view any documents that have General User Access set to View.
-
Click to save the changes.
IMPORTANT:When you first set up WebPublisher, library documents are not visible to WebPublisher users until they have been indexed by the POA. You can wait until documents are indexed as part of the POA’s next indexing cycle or you can start the indexing process manually.
-
If WebPublisher documents have not yet been indexed, run QuickFinder indexing, as described in Updating QuickFinder Indexes.
54.1.3 Managing Access to Post Offices
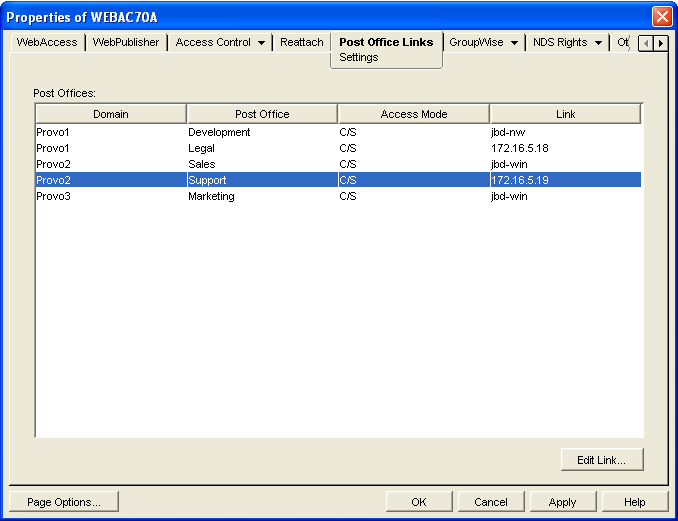
The WebAccess Agent requires access to all post offices where WebAccess users’ mailboxes or GroupWise libraries reside. The agent can access a post office using client/server mode, direct mode, or both. By default, it uses whichever mode is defined on the Post Office object’s Post Office Settings page of the Post Office object.
-
Modifying Links to Post Offices explains how to set the access mode to client/server, direct, or both.
-
Automating Reattachment to NetWare Servers explains how to configure the agent to automatically reconnect to post offices on NetWare servers.
Modifying Links to Post Offices
-
In ConsoleOne, right-click the WebAccess Agent object, then click .
-
Click .
-
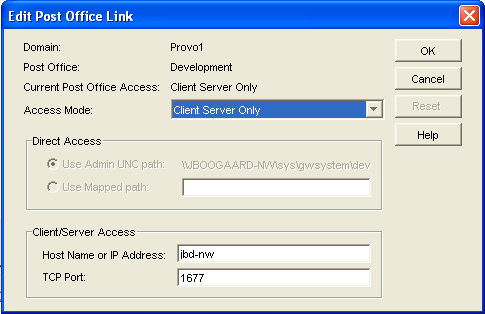
In the Post Offices list, select the post office whose link information you want to change, then click to display the Edit Post Office Link dialog box.
-
Define the following properties:
Access Mode: The access mode determines whether the WebAccess Agent uses client/server access, direct access, or both client/server and direct access to connect to the post office. With client/server and direct, the WebAccess Agent first tries client/server access; if client/server access fails, it then tries direct access. You can also choose to use the same access mode currently defined for the post office (on the Post Office object’s Post Office Settings page). The current access mode is displayed in the field.
Direct Access: When connecting to the post office in direct mode, the WebAccess Agent can use the post office’s UNC path (as defined on the Post Office object’s Identification page) or a mapped path that you specify.
Client/Server Access: When connecting to the post office in client/server mode, the WebAccess Agent must know the hostname (or IP address) and port number of the Post Office Agent running against the post office.
-
Click .
-
Repeat Step 3 through Step 5 for each post office whose link you want to change.
Automating Reattachment to NetWare Servers
You can specify the reattach information for the Windows WebAccess Agent in ConsoleOne. Whenever the Windows WebAccess Agent loses its connection to a post office that is on a NetWare server, it reads the reattach information from the domain database and attempts to reattach to the NetWare server.
The NetWare WebAccess Agent does not use this information. To reattach to NetWare servers where users’ post offices reside, the NetWare WebAccess Agent uses the user ID and password specified during installation. This user ID and password are specified in the strtweb.ncf file
To specify the reattachment information for the NetWare WebAccess Agent:
-
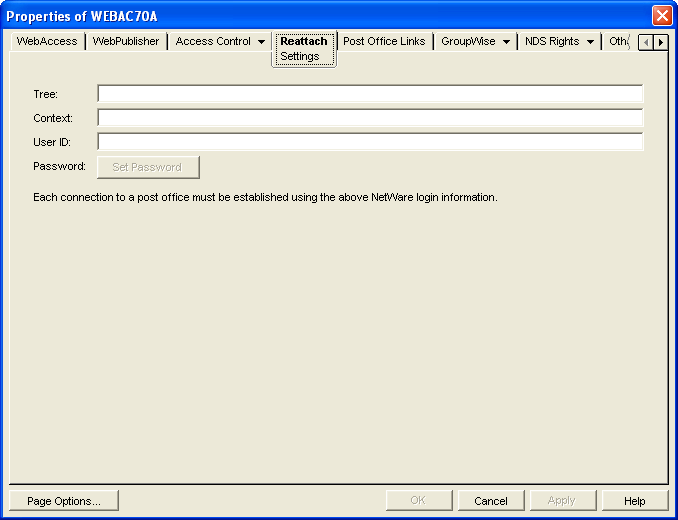
In ConsoleOne, right-click the WebAccess Agent object, then click .
-
Click .
-
Define the following properties:
Tree: Specify the eDirectory tree that the WebAccess Agent logs in to. If the WebAccess Agent does not use an eDirectory user account, leave this field blank.
Context: Specify the eDirectory context of the WebAccess Agent’s user account. If the WebAccess Agent does not use an eDirectory user account, leave this field blank.
User ID: Specify the name of the user account.
Password: Specify the password for the user account.
-
Click .
54.1.4 Securing WebAccess Agent Connections with SSL
The GroupWise WebAccess Agent can use the SSL (Secure Socket Layer) protocol to enable secure connections to Post Office Agents (POAs) and the WebAccess Agent Web console. For it to do so, you must ensure that the WebAccess Agent has access to a server certificate file and that you specified the connection types that you want secured through SSL. The following sections provide instructions:
Defining the Certificate File
To use SSL, the WebAccess Agent requires access to a server certificate file and key file. The WebAccess Agent can use any Base64/PEM or PFX formatted certificate file located on its server. If the WebAccess Agent’s server does not have a server certificate file, you can use the GroupWise Generate CSR utility to help you obtain one. For information, see Section 5.17.6, GroupWise Generate CSR Utility (GWCSRGEN).
To define the certificate file and key file for the WebAccess Agent to use:
-
In ConsoleOne, right-click the WebAccess Agent object, then click .
-
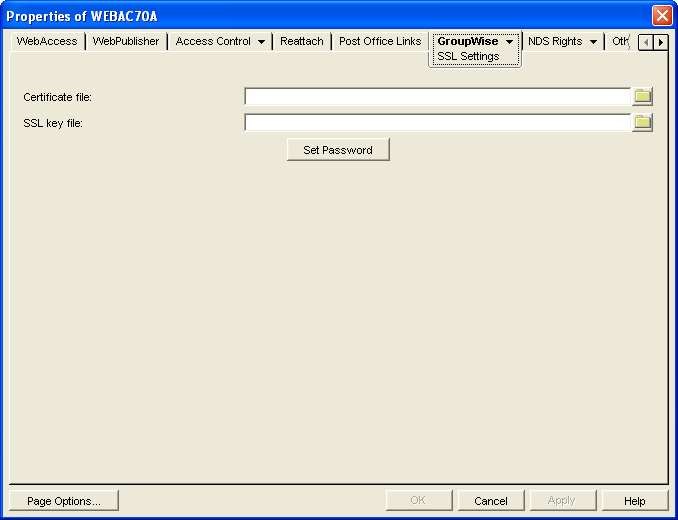
Click to display the SSL Settings page.
-
Fill in the , , and fields:
Certificate File: Select the server certificate file for the WebAccess Agent to use. The certificate file must be in Base64/PEM or PFX format. If you type the filename rather than using the button to select it, use the full path if the file is not in the same directory as the WebAccess Agent program.
SSL Key File: Select the key file associated with the certificate. If the private key is included in the certificate file rather than in a separate key file, leave this field blank. If you type the filename rather than using the button to select it, use the full path if the file is not in the same directory as the WebAccess Agent program.
Set Password: Click to specify the password for the key. If the key does not require a password, do not use this option.
-
If you want to define which connections will use SSL, click to save your changes, then continue with the next section, Enabling SSL.
or
Click to save your changes.
Enabling SSL
After you’ve defined the WebAccess Agent’s certificate and key file (see Defining the Certificate File), you can configure which connections you want to use SSL.
-
In ConsoleOne, if the WebAccess Agent object’s property pages are not already displayed, right-click the WebAccess Agent object, then click .
-
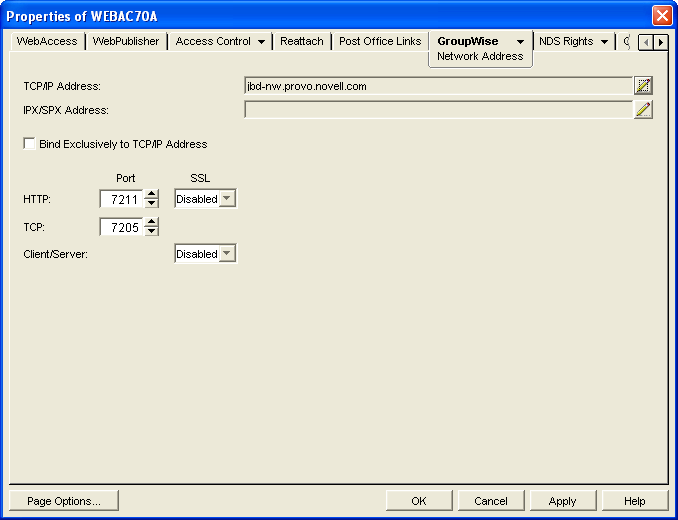
Click to display the Network Address page.
-
Configure the SSL settings for the following connections:
HTTP: Select to enable the WebAccess Agent to use a secure connection when passing information to the WebAccess Agent Web console. The Web browser must also be enabled to use SSL; if it is not, a non-secure connection is used.
Client/Server: Select from the following options to configure the WebAccess Agent’s use of secure connections to POAs:
-
Disabled: The WebAccess Agent does not support SSL connections. All connections are non-SSL.
-
Enabled: The POA determines whether an SSL connection or non-SSL connection is used.
-
54.1.5 Changing the WebAccess Agent’s Network Address or Port Numbers
If you change the network address (IP address or DNS hostname) of the WebAccess Agent’s server or move the WebAccess Agent to a new server, you need to change the network address in ConsoleOne. You can also change the port numbers used by the WebAccess Agent.
-
In ConsoleOne, right-click the WebAccess Agent object, then click .
-
Click to display the Network Address page.
-
To change the WebAccess Agent’s IP address, click the button next to the field to display the Edit Network Address dialog box.
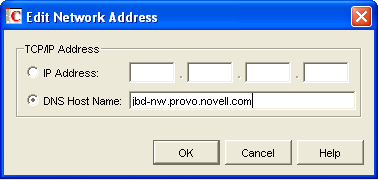
-
Change the IP address or DNS hostname as necessary, then click to return to the Network Address page.
-
To change the port numbers used by the WebAccess Agent, type the new port number in the appropriate field.
HTTP Port: This is the port used to listen for requests from its Web console. The default port number is 7211.
TCP Port: This is the port used to listen for requests from the WebAccess Application and WebPublisher Application. The default port is 7205.
-
Click to save the changes.
54.1.6 Binding the WebAccess Agent to a Specific IP Address
You can now cause the WebAccess Agent to bind to a specified IP address when the server where it runs uses multiple IP addresses. The specified IP address is associated with all ports used by the agent. Without an exclusive bind, the WebAccess Agent binds to all IP addresses available on the server. Use the /ip startup switch in the WebAccess Agent startup file (webac70.waa) to specify the IP address that you want the WebAccess Agent to bind to.