3.7 Managing Your Clustered GroupWise System
After you have set up a basic clustered GroupWise system, you should consider some long-term management issues.
3.7.1 Updating GroupWise Objects with Cluster-Specific Descriptions
After setting up your clustered GroupWise system, while the cluster-specific information is fresh in your mind, you should record that cluster-specific information as part of the GroupWise objects in ConsoleOne so that you can easily refer to it later. Be sure to keep the information recorded in the GroupWise objects up to date if the configuration of your system changes.
Recording Cluster-Specific Information for a Domain and Its MTA
To permanently record important cluster-specific information for the domain:
-
In ConsoleOne, browse to and right-click the Domain object, then click .
-
In the field of the domain Identification page, provide a cluster-specific description of the domain, including the secondary IP address of its cluster-enabled volume and the cluster-unique port numbers used by its MTA.
-
Click to save the domain description.
-
Select the Domain object to display its contents.
-
Right-click the MTA object, then click .
-
In the field of the MTA Identification page, record the secondary IP address of the cluster-enabled domain volume and the cluster-unique port numbers used by the MTA.
This information appears on the MTA console, no matter which node in the cluster it is currently running on.
-
Click to save the MTA description.
-
Continue with Recording Cluster-Specific Information for a Post Office and Its POA.
Recording Cluster-Specific Information for a Post Office and Its POA
To permanently record important cluster-specific information for a post office:
-
In ConsoleOne, browse to and right-click the Post Office object, then click .
-
In the field of the post office Identification page, provide a cluster-specific description of the post office, including the secondary IP address of its cluster-enabled volume and the cluster-unique port numbers used by its POA.
-
Click to save the post office description.
-
Select the Post Office object to display its contents.
-
Right-click the POA object, then click .
-
In the field of the POA Identification page, record the secondary IP address of the cluster-enabled post office volume and the cluster-unique port numbers used by the POA.
This information appears on the POA console, no matter which node in the cluster it is currently running on.
-
Click to save the POA description.
-
If necessary, continue with Recording Cluster-Specific Information for a Software Distribution Directory.
or
Skip to Knowing What to Expect in MTA and POA Failover Situations.
Recording Cluster-Specific Information for a Software Distribution Directory
To permanently record important cluster-specific information about a software distribution directory located on a cluster-enabled volume:
-
In ConsoleOne, click .
-
Select the software distribution directory, then click .
-
In the description field, record the secondary IP address of the cluster-enabled volume where the software distribution directory resides.
-
Click , then click to save the software distribution directory description.
-
Skip to Knowing What to Expect in MTA and POA Failover Situations.
3.7.2 Using Novell Remote Manager on NetWare 6.x
On NetWare 6.x, you can use Novell Remote Manager to manage many aspects of your GroupWise cluster from your Web browser. For instructions on setting up and accessing this useful network administration utility, see the NetWare 6.x Novell Remote Manager Administration Guide at the Novell Documentation Web site. Cluster management features are automatically added to Novell Remote Manager when you install Novell Cluster Services.
After you have accessed Novell Remote Manager, you might find that many GroupWise cluster management tasks are easier to perform with Novell Remote Manager than with ConsoleOne. The following sections help you configure and manage the cluster using Novell Remote Manager:
Configuring Your GroupWise Cluster
On the main Novell Remote Manager page:
-
In the left frame, scroll down to the section, then click .
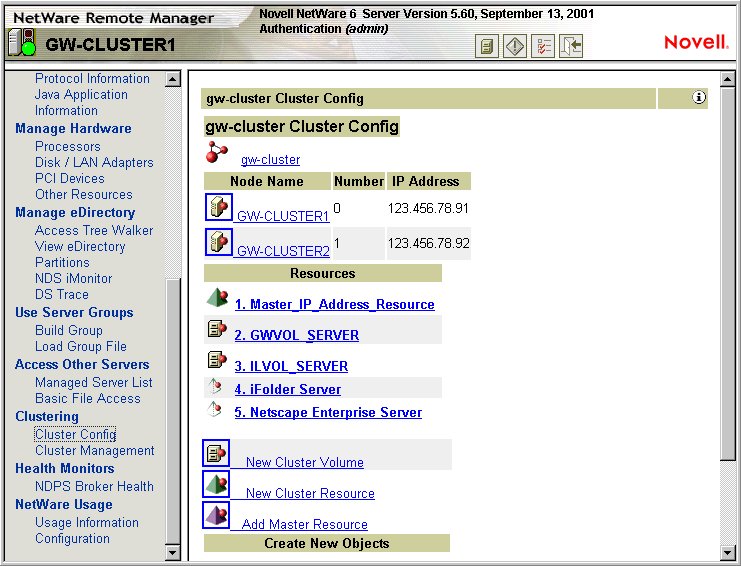
The Cluster Configuration page displays the cluster name, the nodes in the cluster, and the resources in the cluster. It also enables you to create new GroupWise Volume Resource objects (termed Cluster Volumes in the Novell Remote Manager interface).
-
Click the cluster name to display the Cluster object properties:
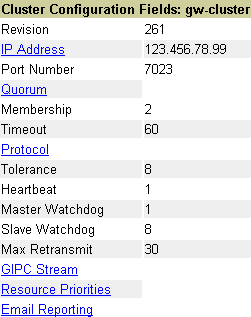
Click a linked item to edit the Cluster object properties. Click your browser’s button to return to the Cluster Configuration page.
-
On the Cluster Configuration page, click a server to display the Server object properties:
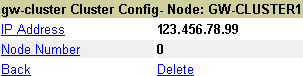
Click a linked item to edit the Server object properties. Click or to perform the specified action.
-
On the Cluster Configuration page, click a GroupWise volume to display the Volume Resource object properties:
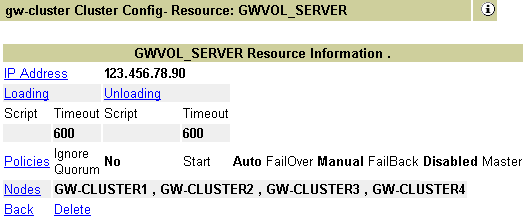
Click a linked item to edit Volume Resource object properties. Click or to perform the specified action.
-
On the Cluster Configuration page, click to create a new GroupWise Volume Resource object, then follow the instructions to provide the information needed to create the new Cluster Volume object.
Managing Your GroupWise Cluster
On the main Novell Remote Manager page:
-
In the left frame, scroll down to the Clustering section, then click .
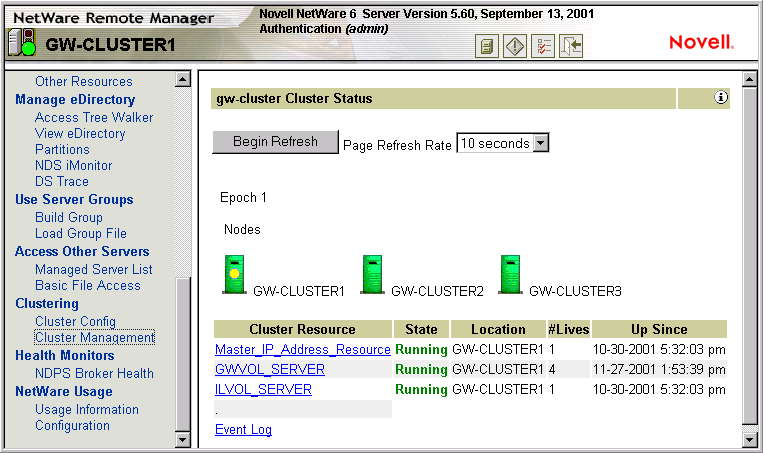
The Cluster Status page displays the nodes and volume resources in the cluster. The master node in the cluster is marked with a yellow ball. Status information is listed for each volume resource. You can set the refresh rate for the status information at the top of the Cluster Status page.
-
Select a page refresh rate, then click so that the page automatically refreshes at the selected rate.
-
Click a cluster resource to bring it online, take it offline, or migrate it to another node.

To take the currently running volume resource offline, click . To migrate the volume resource, select a node from the drop-down list, then click .
-
On the Cluster Resource page, click to view a list of cluster events.
The event log can help you resolve problems with cluster functioning.
3.7.3 Knowing What to Expect in MTA and POA Failover Situations
In a failover situation, the agents might need to perform some database repair as they start on the new node. The time required depends on the size of the databases involved.
Typically, the POA returns to full functionality faster than the MTA. This benefits GroupWise client users, who can reconnect to their mailboxes very quickly and probably do not notice if messages to users in other post offices are not delivered immediately. The only time a user would need to restart the GroupWise client would be if he or she was actually in the process of sending a message when the POA went down. Notify can continue running even if the connection to the POA becomes unavailable and then it reconnects automatically when the POA is again available.
The MTA typically takes some time reestablishing the links to its post offices, other domains, and gateways, but this situation usually resolves itself in a few minutes without administrator intervention. If it does not, you can manually restart the MTA to speed up the process.
In comparison to failover, migration typically takes longer because the agents methodically terminate their threads and close their databases as part of their normal shutdown procedure. However, as a result, no database repair is required when the agents start up again in their new location.
Continue with What’s Next.